Updated April 13, 2023

Definition of GitLab Pages
Gitlab pages are used to publish our static websites from the repository directly using gitlab, we can use gitlab webpages to any personal websites. We can also use it for business websites, we can use HTML or SSG (static site generator) with gitlab pages to publish our website. We are creating the website to our project, user account and groups, after creating a website we can host our website in our own gitlab instance. We can also connect our own TLS certificates and domains which we have used in gitlab pages.
What are GitLab pages?
- To publish our website using pages we need to use SSG like Hugo, harp, hex etc. We can also publish our website on GitLab which was written in JavaScript, HTML or CSS.
- Basically, GitLab pages are not supporting the dynamic processing of server-side, to support the dynamic processing we require php or asp.
- As we know that it makes the use of daemon gitlab pages, the HTTP server is written in GO language and it will support custom domain and certificates.
- It is important to publish the websites.
Create a static website
- We can create a static website. Below are the steps to create a static website which is as follows.
1) Create a new project –
- First, we need to create a new project. We have created the project name as gitlab-pages.
- To create a new project on our dashboard, click on the new button to create a new project.
- After clicking on the new project set a path of the project. We have set a path as
https://gitlab.com/b609/ gitlab-pages- Set the privacy as public so our project is accessible to anyone we can also set privacy as private so only one can access the project.
2) Add the configuration file –
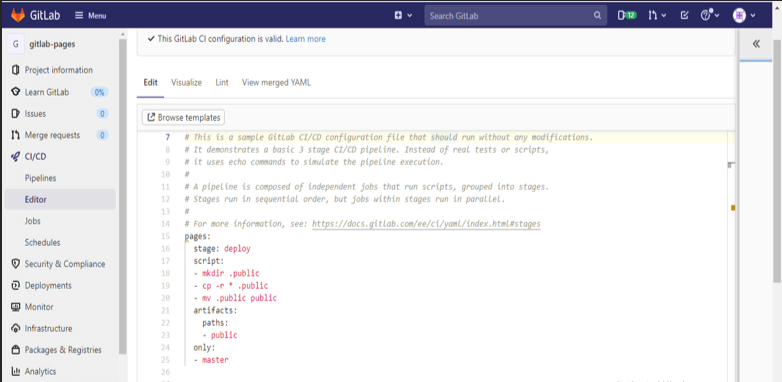
- After creating the project second step is to add the configuration file. We have to edit the .gitlab-ci.yaml file.
- We are creating the plain HTML website so we need to add the following code in .gitlab-ci.yaml file.
- To add the code in the configuration file we need to first click on CI/CD after opening it we need to edit the .gitlab-ci.yaml file.
- After changing the contents from the file we need to commit all the changes which were we have changed.
- Below code is creating the job name as pages and it was telling the runner to deploy our websites.
Code:
pages: -- crating job of pages
stage: deploy -- Deploy stage of gitlab pages
script: -- Start script section
- mkdir .public -- Create public directory
- cp -r * .public -- Copy public directory.
- mv .public public -- move public directory.
artifacts: -- Start of artifact section
paths: -- Parameter of artifact section.
- public -- Parameter of artifact section
only:
- master
3) Upload our website content –
- After adding code in the configuration file next step is to push the content into the remote project.
- At the time of using GitLab pages with the static generator, we have no need to upload the directory.
- If suppose we have uploaded the directory it will show the duplicate content at the time of building the project.
4) Add our custom domain –
- After adding the website content fourth step is to add the custom domain. We can set up a new domain name as below.
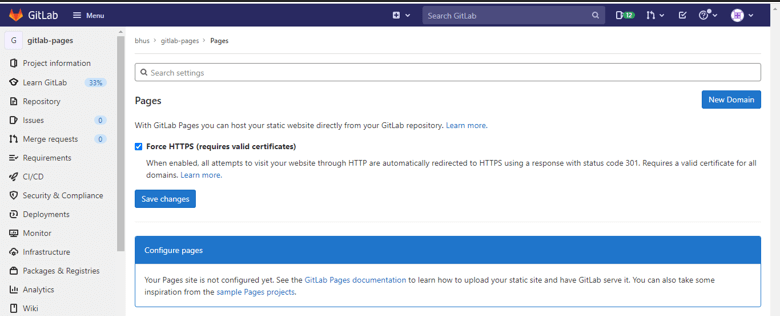
- The first click on setting, after setting tab opens click on pages. In pages select the new domain to create a new domain to our project.
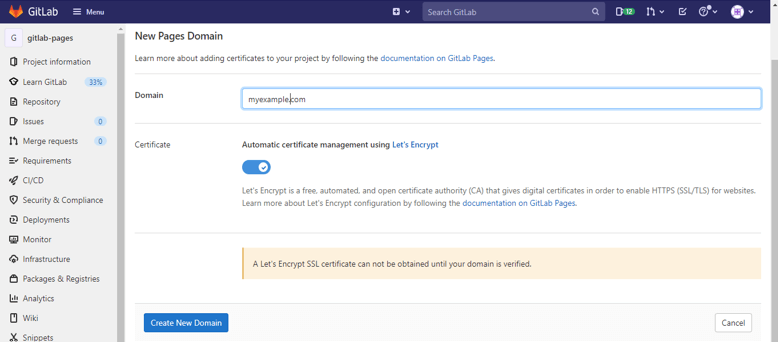
- After opening the pages page click on the new domain tab to create a new domain to our website.
- In the above example, we can see that we have created a new domain name as myexample.com.
- We can create more than one domain name for a single project or website.
- If suppose we have our own SSL certificate key, we can also add the same at the time of creating a new domain.
- We can also enable the https secure connection to our project at the time of creating a new domain.
Get Started gitlab pages
• Basically there are two ways to start with pages of gitlab. The first way is using an existing project and the second is to create a new project.
• We can start creating a website which is as follows.
1) Create .gitlab-ci.yaml file – In this step, we need to add pages site into an existing project.
2) Use .gitlab-ci.yaml template – Use existing template to create gitlab pages.
3) Create a new project – Create a new project to create the gitlab pages.
4) Use existing projects – We can use the existing projects to create the pages.
5) Use the template of the project – Create a new project using the existing template files.
6) Domain – We need to create the domain name of our website. We can create single or multiple domain names to our project.
7) SSL and TLS certificate – We need to add an SSL or TLS certificate to the domain name which was we have created for our project.
8) Set up redirects – We need to set up https redirects to open the next page.
9) Static and dynamic websites – We can create gitlab web pages by using a static website.
10) We have also need SSG in our project.
User or group Pages
• In GitLab we can use the group to manage our project. We can manage the group to manage the security privileges of our project.
• If suppose someone we have given access on the group he can access all the project.
• Using a group, we can communicate to all the members of the group.
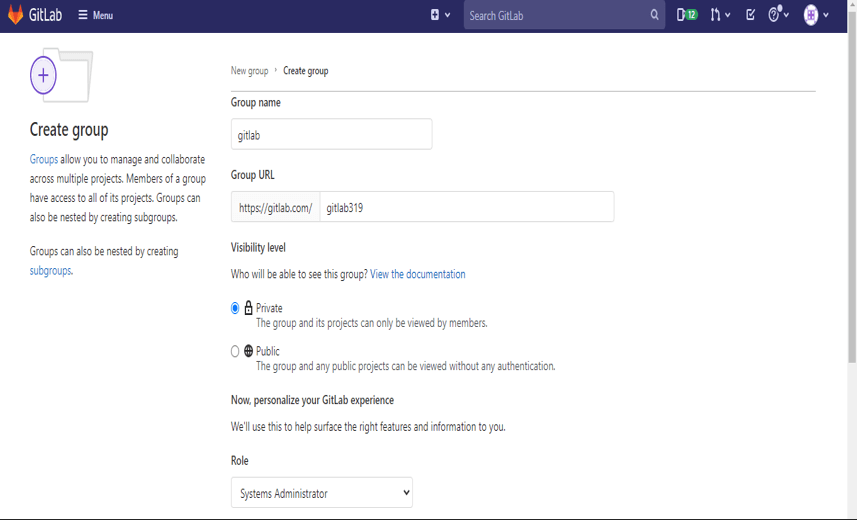
• We can create the group as below.
- Below we have to create the group name as gitlab.
Menu -> groups -> create new group
- After creating a group we can see that the gitlab group is created.
- We can also add the user into the group, we can add the user at the time of group creation or later.
Conclusion
GitLab pages are used to publish our static websites from the repository directly using GitLab. We can use gitlab webpages to any personal website. Basically gitlab pages are not supporting the dynamic processing of server-side, to support the dynamic processing we require php or asp.
Recommended Articles
We hope that this EDUCBA information on “GitLab Pages” was beneficial to you. You can view EDUCBA’s recommended articles for more information.


