Updated April 15, 2023
Introduction to GitLab repository
Gitlab repository is defined as a central location in Gitlab where aggregation of the codes pertaining to the use case that is being worked upon are stored, managed and used and can be used for various applications in terms of collaborative work, or loading off the code base to another team or group. The code that is shared across are subjected to changes that are required as a part of feature building, or bug fixes and are respectively tracked by the use of version control. In the normal use case, each project has its own corresponding repository, and, in this article, we will look at different facets of the repository in Gitlab and go in-depth of each individual element.
What is a GitLab repository?
By now we understand the concept of Gitlab repository as being the central place where codes corresponding to a project are stored, edited and managed. There are many elements in perspective of Gitlab repository viz. creation of a repository, adding files to the repository, committing changes on to a repository, cloning a repository. With respect to each of them, we in this article will go through them in detail and understand the niche ideas within the same. One important thing to note is that Gitlab allows the repositories to be at max 10 GB in size, although there is no restriction on the individual file size, keeping in mind the 10 GB size limit of the repository.
Create a GitLab repository
Coming to the first element of the Gitlab repository and without which the concept of it being a repository won’t exist and that element is the creation of a repository. There are 2 ways how a repository can be created and they are:
- Through the creation of a project
- Through forking of an existing project
In the next paragraph, we will look at the steps of creating a Gitlab repository, but before that let us concentrate on a few other elements that are equally important as the creation of the repository as following these ways, one can maintain and manage a repository. The first of the many elements are:
Adding files to the repository
Files can be added to the repository in various scenarios viz. when a project is created, and post creation of the project. When one needs to add files to the repository post creation of a project a web editor can either be used or can be completed by using the command line.
Committing changes to the repositories
Once the files are added to the repository, the immediate next step is to commit the changes. Committing changes is capturing a snapshot of the project’s staged changes and are considered as the “safe” versions of the project which would never be changed unless explicitly asked to do so. Post committing the changes one can perform tasks like triggering a CI/CD pipeline or cross-link the issues and merge requests to the commit made. It can be also used for cherry-picking which is very useful for undoing any changes.
Repository cloning
Another important utility that that is enabled by the concept of the repository in Gitlab is the idea of cloning a repository. In the next paragraph, we will get into the details of how to clone a Gitlab repository.
How to create and clone a GitLab repository?
Creating a Gitlab repository by creating a project:
- Open the Gitlab web UI and proceed to the icon on the top bar (just beside the search bar denoted as.
- Click on the icon and select the option New project/repository.
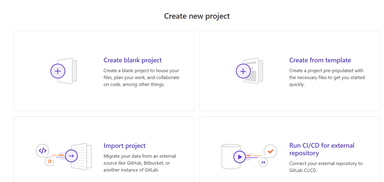
- There will be multiple options present viz.
- Create blank project: This is like a blank slate, where everything has to be built from scratch.
- Create from template: There are multiple templates present which makes some repetitive things simpler for developers to build in Gitlab so that one doesn’t have to re-invent the wheel.
- Import project:
- Run CI/CD for external repository:
Out of which the first 3 can be used for creating any project as per the need.
- Required details need to be filled in as per the choice from the last step.
Steps to clone a repository in Apple Xcode (Suitable for projects that contain .xcodeproj or .xcworkspace):
- Open the Gitlab UI and proceed to the overview page of the project.
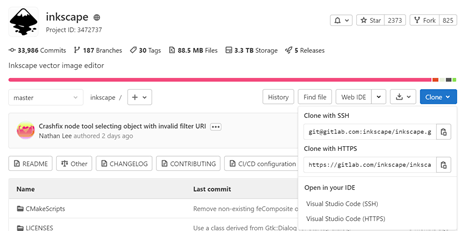
- A clickable button named Clone needs to be clicked.
- Once prompted user has to select Xcode.
- The project gets cloned into the computer where the user will be prompted to open the Xcode.
Cloning a repository in Gitlab through Visual Studio Code:
- Open the Gitlab UI and proceed to the overview page of the project.
- A clickable button named Clone needs to be clicked.
- Once prompted user has to select Clone with Visual Studio Code. This option is present under the HTTPS or SSH method.
- After this, one has to select the folder for cloning the project.
Steps to clone a repository through web UI:
- Open the Gitlab web UI.
- Search and reach to the project that needs to be cloned.
- With a lot of buttons present, there will be one highlighted in blue, named as a clone.
- There will be a lot of options present viz. Clone with SSH, Clone with HTTPS, Visual Studio Code (SSH), Visual Studio Code (HTTPS), on which anyone can be chosen to complete the task. The former two denotes the cloning through CLI, and the latter two, when clicked opens the Visual Studio code application.
GitLab repository example (screenshot)
Creating the Gitlab repository through web UI
Cloning Gitlab project through web UI (Through opening an application)
Conclusion
With this article, we have looked at the various aspects of what are the elements of the Gitlab repository including the various steps that is involved in creating a repository. Not only that we have looked at other elements in brief and screenshots regarding the process of creating and cloning a repository in Gitlab.
Recommended Articles
This is a guide to GitLab repository. Here we discuss the various aspects of what are the elements of the Gitlab repository including the various steps. You may also have a look at the following articles to learn more –


