Introduction to Gitlab webhook
Gitlab provides different types of services to the user, in which that GitLab webhook is one, the service that is provided by the GitLab. Basically, a webhook is used to add the trigger into an encoded URL. For example, we can consider whether we can push the code or a new issue is created. Another word we can say is that a GitLab webhook is used to perform the specific event such as we can push the request; we can merge the request etc. Gitlab webhook uses the POST request method to send the data with a webhook URL. Normally we can set up our own webhook receiver as per our requirement.
Overview on GitLab webhook
A webhook in web advancement is a technique for enlarging or adjusting the conduct of a site page or web application with custom callbacks. These callbacks might be kept up with, altered, and overseen by outsider clients and designers who may not really be partnered with the beginning site or application.
Webhooks are “client characterized HTTP callbacks”. They are normally set off by some occasion, for example, pushing code to a store or a remark being presented on a blog. At the point when that occasion happens, the source application makes an HTTP solicitation to the URI arranged for the webhook. The activity taken might be anything. Normal uses are to trigger forms with constant joining frameworks or to inform bug global positioning frameworks.
Webhooks can be utilized to refresh an outside issue tracker, trigger CI positions, update reinforcement reflect, or even convey to your creation server.
Now let’s see how we can access the Webhooks as follows.
- After successful login we need to enter the settings menu and inside that we need to select the Webhook
- In a second way, we can select the Webhook menu by using the group’s setting.
GitLab has different webhook limits as follows.
- The greatest number of webhooks and their size, both per project, and specified group.
- How many webhook can we call per minute?
Get the webhook URL for GitLab
Now let’s see how we can get the webhook URL from Gitlab as follows.
For getting the webhook URL we need to follow the same steps as follows.
- First, we need to go to the specified application page that we want.
- In the second step inside the application page, we need to select the INCOMING WEBHOOK menu.
- In the third step, we need to click on the SETUP MANUALLY option.
- After that select the Gitlab option as shown in the following screenshot as follows.
Configure GitLab webhook
Now let’s see how we can configure the webhook in Gitlab as follows.
For configuration, we need to follow the curtain step as mentioned below.
- In the web customer, sign on to Change and Configuration Management.
- Select the specified project that you want then go to the Control menu and click on Work with Git.
- Snap Browse Registered Git Repositories.
- Select the vault that you enlisted.
- Grow the Host Server Configuration area.
- In the Hosting Server field, select GitLab.
- In the Secret Key Authorization field, add confidentially. The mystery is given when you design the webhook in GitLab.
- Snap the Copy button close to the webhook URL.
- Discretionary: If GitLab and EWM don’t share a client base, add a useful client ID for the webhook URL.
- Snap Insert Functional User.
- Select the client and snap OK. Snap the Copy button close to the webhook URL.
- Snap Add Webhook.
- Snap Save to persevere the progressions to the Git Repository Registration page in IBM® Engineering Workflow Management (EWM).
- In your GitLab project web UI, open the reconciliations page of your task.
- To add the webhook URL to the GitLab store, adhere to the directions in Webhooks.
- Under the Trigger section, select the Push event.
- In the Secret Token field, enter the worth that you entered in the Secret Key Authorization field.
- In the Webhook URL field, glue the web snare URL that you replicated in synchronization with step number 8.
- Click Save to the webhook arrangement in GitLab.
Steps to add webhooks in Gitlab
Now let’s see how we can add the webhook into Gitlab and what steps we need to follow.
- Login into the Gitlab account.
- Click on the project repository that you want.
- After that just scroll down the page and select the setting menu.
- Inside the setting menu we have option integration, so just click on it.
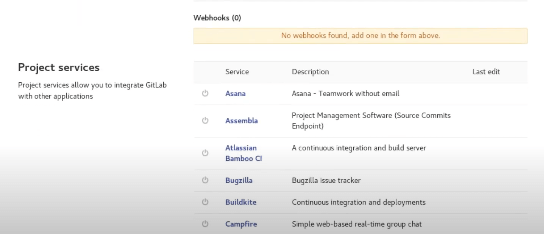
- After clicking integration scroll down the page and see the Project services.
- Select any service that you want as shown in the following screenshot as follows.
Suppose we have Jenkins DevOps and we need to add the webhook, so select the Jenkin option from the project services.
But you must be sure the connection is established with Gitlab in the Jenkins server.
After successful configuration of the Jenkins server, we need to go into our specified project into a Gitlab as shown in the following screenshot as follows.
Copy the URL from GitLab and configure your Jenkins server, after that we can see the Jenkins CI into Gitlab as shown in the below screenshot as follows.
Now let’s see another way as follows.
The repository key is deplored for the specified project key
The project.ssh_url key is deplored for the ‘project.gitssh_url’ key_
The project.http_url key is deplored for the ‘project.githttp_url’ key_
Undertaking webhooks permit you to trigger a URL if a new code is pushed or another issue is made.
You can arrange webhooks to tune in for explicit occasions like pushes, issues, or union solicitations. GitLab will send a POST solicitation with information to the webhook URL.
Webhooks are also used for the outside issue tracker, trigger CI forms, update reflect, or creation server.
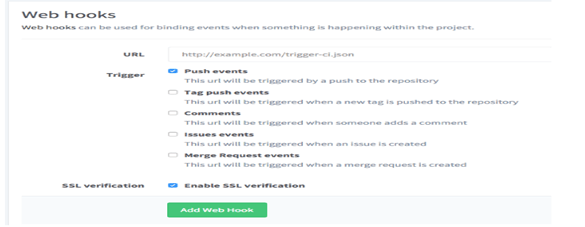
After that we need to do the SSL verification, naturally, the SSL declaration of the webhook endpoint is confirmed dependent on an inside rundown of Certificate Authorities, which implies the authentication can’t act naturally marked.
You can wind down this in the webhook settings in your GitLab projects. Inside that page, it shows the different options such as push event, tag push event, comments, issues events and merge requests events, etc. Also, we need to click on SSL verification and click on the Add Webhook button as shown in the following screenshot as follows.
Conclusion
We hope from this article you learn more about the Gitlab webhook. From the above article, we have taken in the essential idea of the Gitlab webhook and we also see the representation of the Gitlab webhook. From this article, we learned how and when we use the Gitlab webhook.
Recommended Articles
This is a guide to Gitlab webhook. Here we discuss the essential idea of the Gitlab webhook and we also see the representation of the Gitlab webhook. You may also have a look at the following articles to learn more –


