Updated May 22, 2023
Introduction to Google Analytics Setup
Google Analytics is a powerful online analytics tool offered by Google. It empowers website owners, marketers, and businesses to gain valuable insights into their website or mobile app’s performance and user behavior. By tracking and analyzing various metrics, Google Analytics helps you comprehend user engagement and provides data-driven insights for optimizing your online operations.
Key Takeaways
- To set up Google Analytics, you need to create a Google Analytics account, define a property to monitor data for your website and obtain a tracking code to collect the necessary information.
- The tracking code is crucial because it needs to be inserted into the HTML code of your website.
- This allows Google Analytics to gather data regarding user interactions, traffic sources, and other important metrics.
- By analyzing this data, you can gain insights and make informed decisions to enhance website speed and improve the overall user experience.
How to Setup Google Analytics? [GA4]
If you don’t have a Google Analytics account, you need to create one. When you initiate a new account, Google Analytics 4 is automatically included as a new property. However, it also provides the option to set up Universal Analytics, which can be done by following the simple steps outlined below.
Step 1: To get started, log in to your Google account and visit the website: https://analytics.google.com/analytics/
Step 2: Once the website has finished loading, locate and click on the “Start Measuring” button.
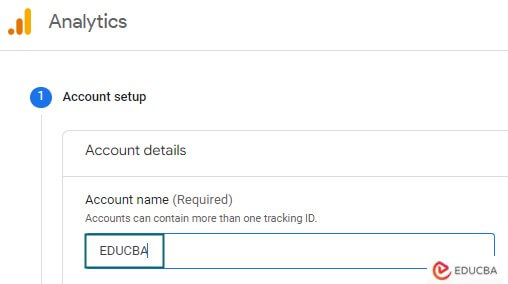
Step 3:In the Account setup step, input the name of your account (which can be your company name). After entering the company name, proceed by clicking the “Next” button.
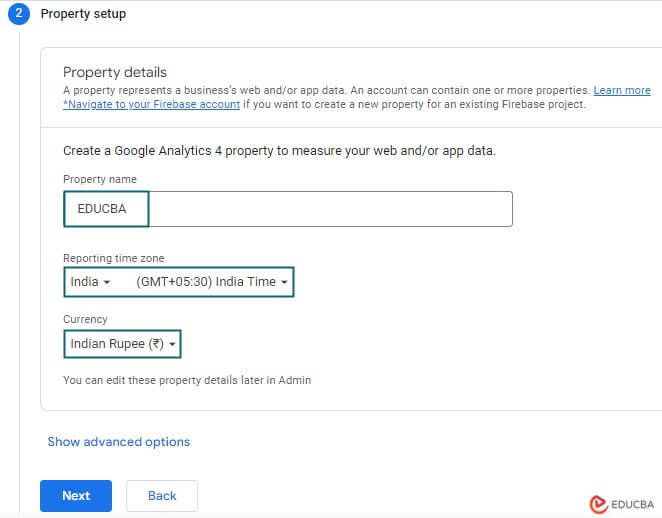
Step 4: In this step, you are required to provide a Property Name for your Google Analytics setup. Additionally, you should select the Reporting Time Zone and Currency that align with your preferences and requirements.
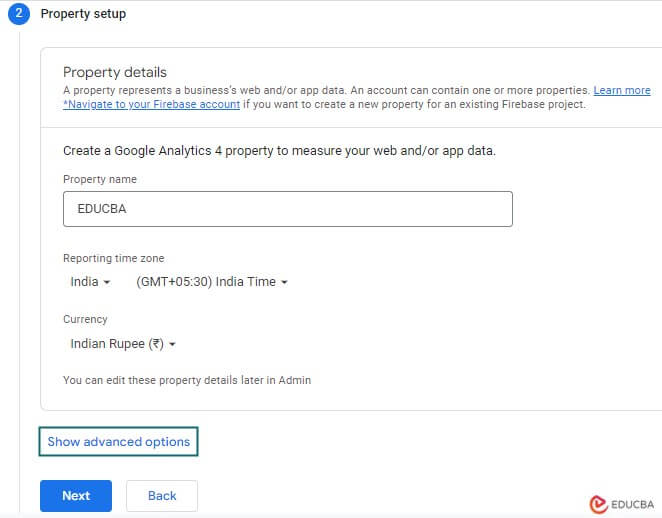
Step 5: To create both a Universal Analytics Property and a GA4 Analytics Property simultaneously, click on the “Show Advanced Options” button, as shown in the example below.
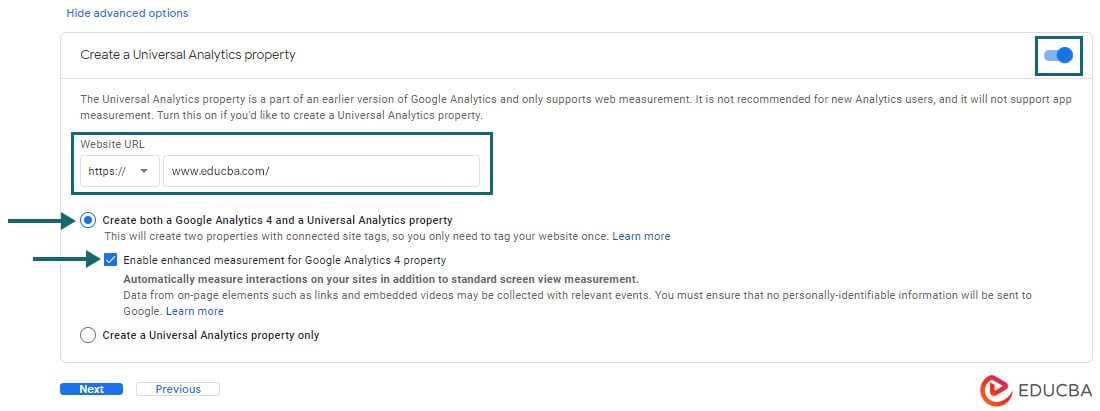
Step 6: To enable the creation of a Universal Analytics Property alongside a GA4 Analytics Property, click on the toggle button to switch it on.
Next, enter the website URL for which you want to set up the analytics. Then, choose whether you want to establish a GA4 plus Universal Analytics Property or solely a Universal Analytics Property.
Once you have made your selection, click on the “Next” button to proceed to the next step.
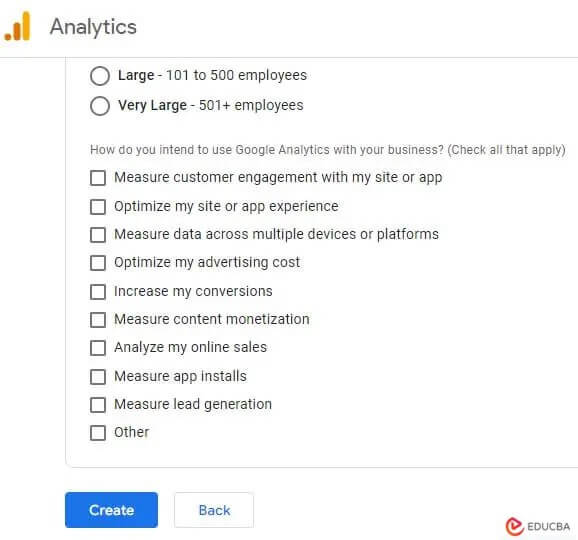
Step 7: In the “About Your Business” section, select the relevant options for your business, including the Industry Category, business size, and how you plan to utilize Google Analytics for your business.
Once you have made all the necessary selections, click on “Create” to generate both GA4 and Universal Analytics Properties within the new Google Analytics Setup in your account.
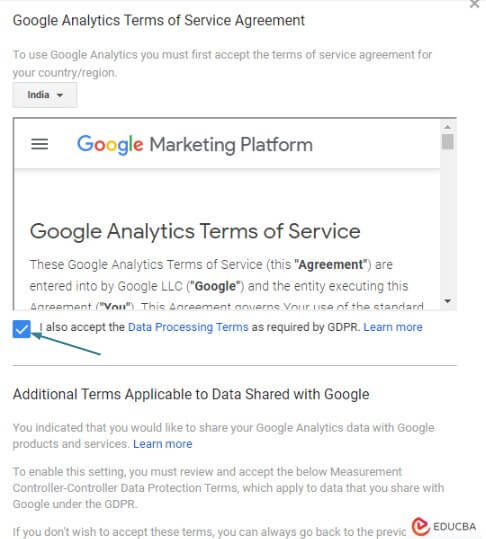
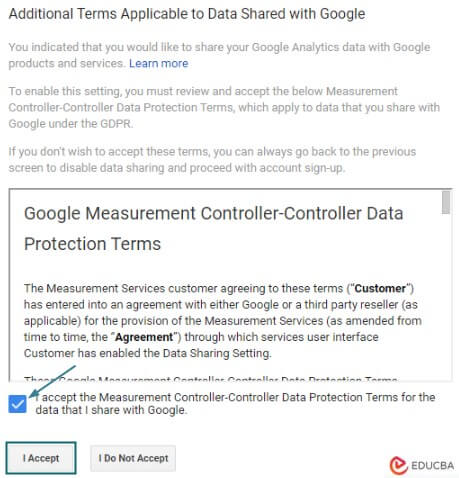
Step 8: To comply with GDPR requirements, select the appropriate checkboxes to accept the Data Processing Terms and Measurement Controller-Controller Data Protection Terms, then click “I Accept.”
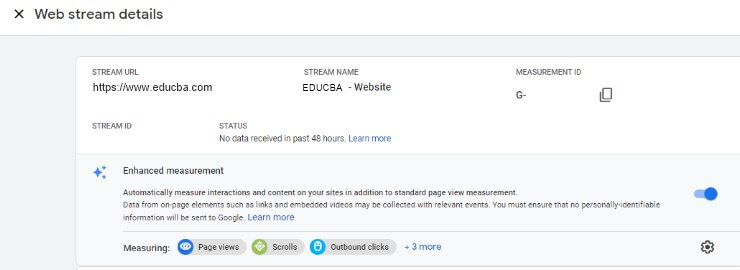
Step 9:Once you accept the terms, you will be directed to the Web Stream Details screen, where you can find the Measurement ID in the top right corner.
How to Upgrade an Existing Universal Analytics to a GA4 Property?
If you already have a Universal Analytics Property and want to upgrade to Google Analytics 4 (GA4), here are the steps you need to follow to perform the update.
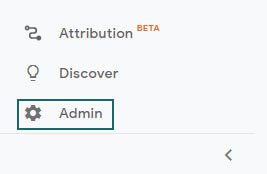
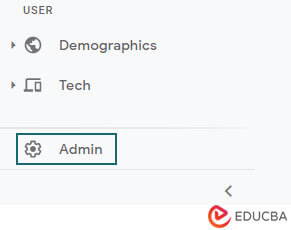
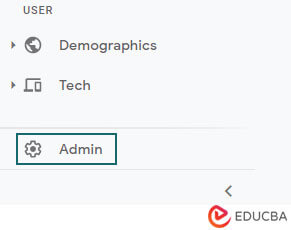
Step 1:To proceed, locate and click on the “Admin” option located in the lower-left corner of the screen.
Step 2: Once you click on the “Admin” option, you will be directed to the admin panel of your Universal Analytics Property. In the Property column, select the “GA4 Setup Assistant” to begin the setup process for Google Analytics 4.
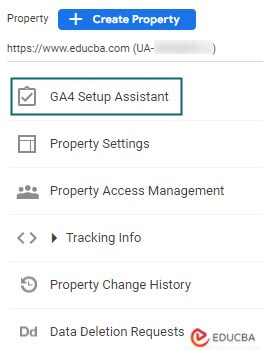
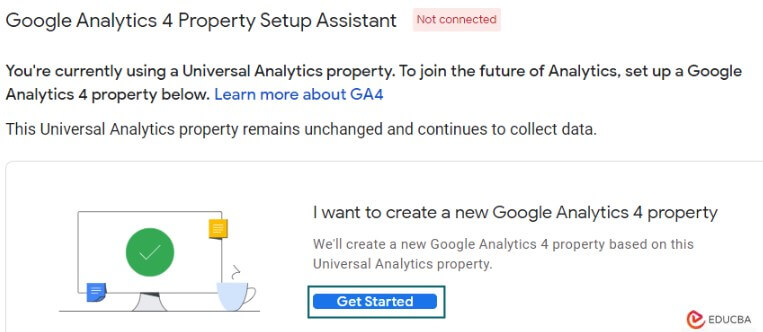
Step 3: Upon selecting the “GA4 Setup Assistant,” you will be directed to the “Google Analytics 4 Property Setup Assistant” screen. Proceed by clicking on “Get Started” to initiate the setup process.
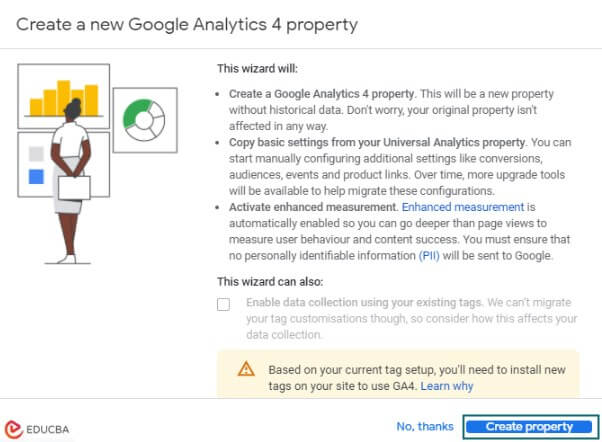
Step 4: After clicking the “Get Started” button, a pop-up window will appear on your screen. In this window, click on the “Create Property” button to continue with the setup process.
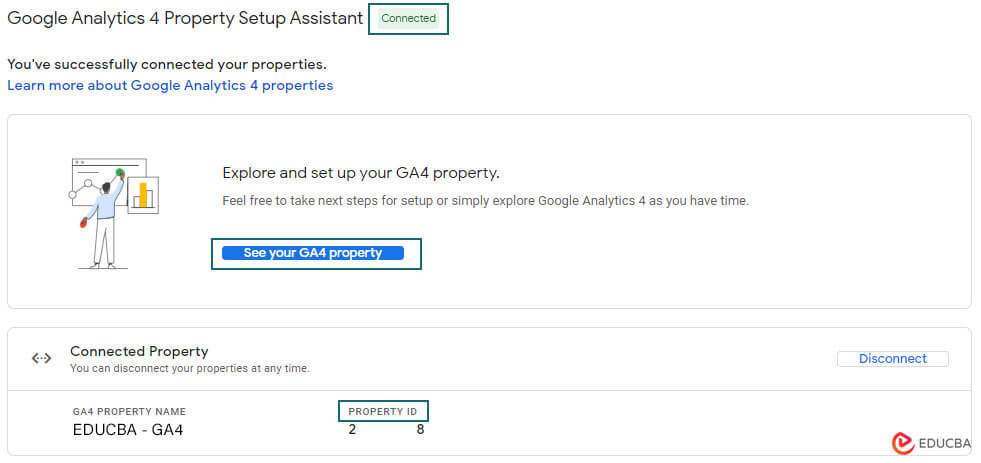
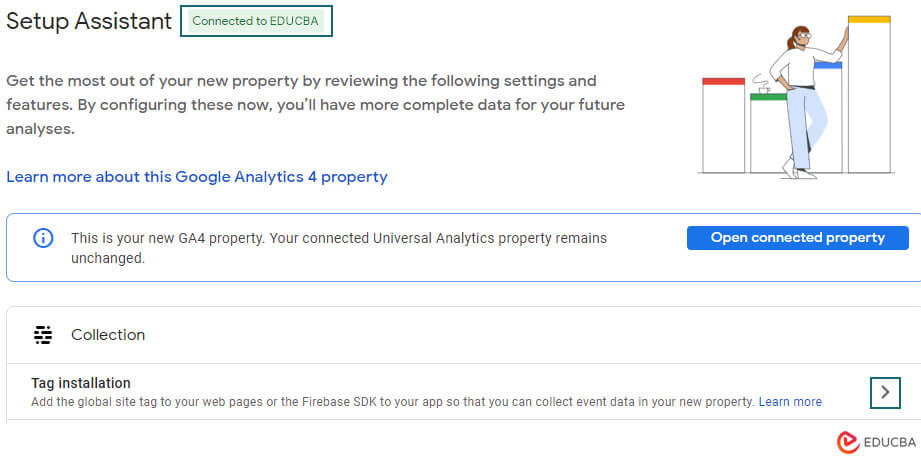
Step 5: Upon reaching the screen below, you will find the connected property message along with the property ID
To access the “Setup Assistant” screen, click on “See your GA4 property.” Then, to reach the “Data Streams” screen, click the arrow (>) next to “Tag Installation.”
Step 6: Once you reach the “Data Stream” screen, navigate to the “Web Stream Details” page by clicking on the arrow (>) located below the “Data Stream” section.
Step 7: The Measurement ID for the GA4 property can be located in the top right corner of the “Web Stream Details” page.
Congratulations!!! You have now successfully upgraded your property to GA4.
To add GA4 tracking code to a website without using Google Tag Manager, you can follow these steps:
Certainly! Here are three ways to add GA4 tracking code to a website using Google Tag Manager:
- To connect the Measurement ID of a GA4 property with an existing UA Property in Universal Analytics, you can follow these steps:
- To add a new ‘Config’ directive in the existing code on the website, you need to perform the following steps.
- To include the GA4 tracking code script in the <head> section of your website, follow these instructions.
To connect the Measurement ID of a GA4 property with an existing UA Property in Universal Analytics, you can follow these steps:
If you already have a Universal Analytics code on your website and wish to add the GA4 Measurement ID, you can connect the GA4 Measurement ID to your Universal Analytics Property by following these steps:
Step 1: To proceed, locate and click on the “Admin” button located in the lower-left corner of the screen.
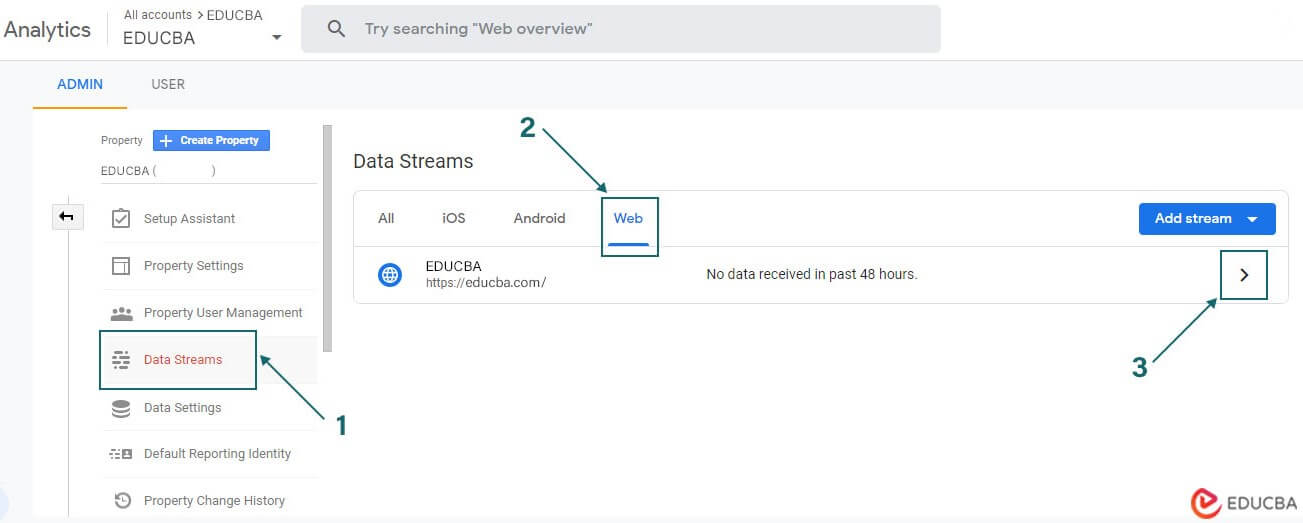
Step 2:After clicking on “Data Streams,” select “Web” from the options provided. Then, click the arrow (>) next to “Data Stream” to navigate to the “Web Stream Details” page.
Step 3: In the upper right corner of the “Web Stream Details” page, you will find the GA4 Measurement ID. Copy this ID for further use.
Step 4: To continue, go to your existing Universal Analytics Property and follow these steps:
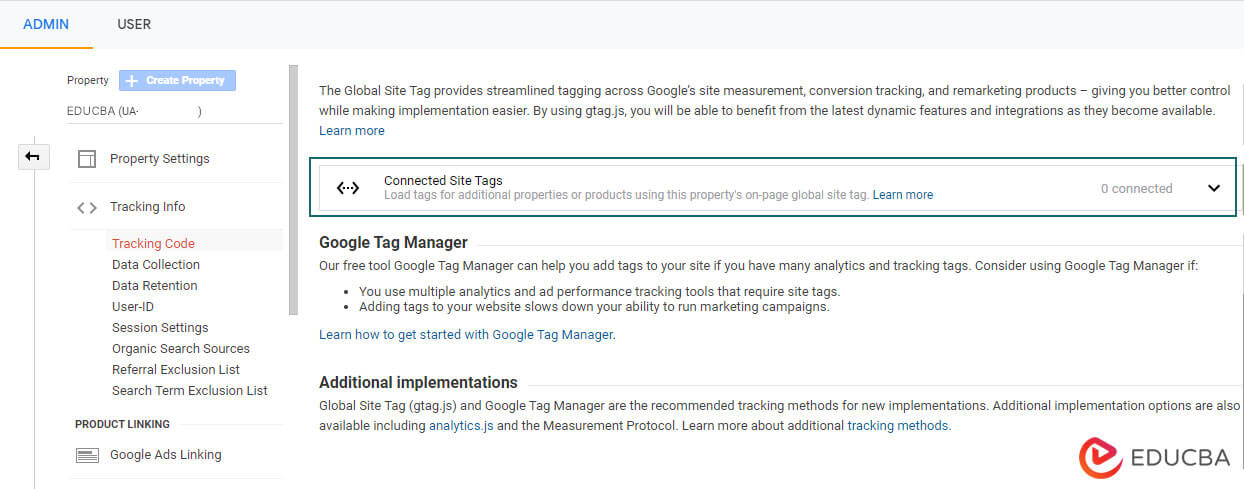
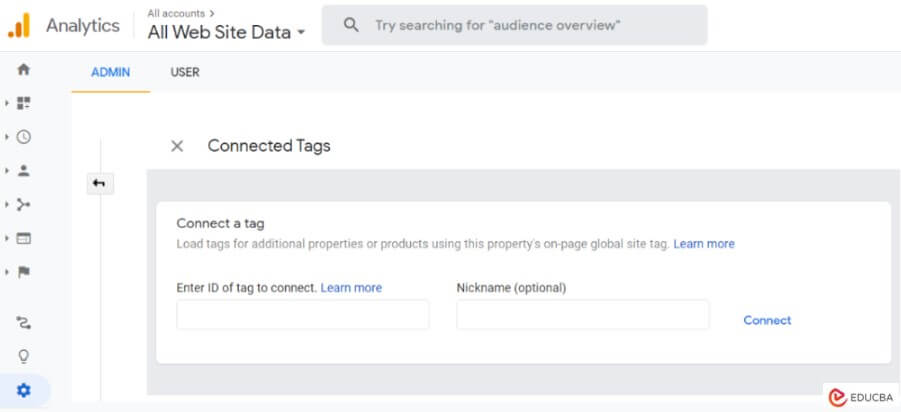
Step 5: Next, scroll down the page until you find the “Connected Site Tags” option. Select this option to proceed.
Step 6: To create a new site tag and paste the Measurement ID that you created and copied in Step 3, please follow these instructions:
After clicking the “Connect” button, your Universal Analytics and GA4 properties will be linked, allowing you to combine and analyze data from both properties in your Google Analytics reports and insights.
2. To add a new ‘Config’ directive in the existing code on your website, please follow these steps:
If you already have a (gtag.js) analytics code on your website and wish to add the GA4 Measurement ID, you have a second option where you can add a second “config” directive to the existing analytics code. Here’s how you can do it:
The gtag.js analytics code typically appears on the source page of a website with the following structure:
<!-- Google tag (gtag.js) -->
<script async src="https://www.googletagmanager.com/gtag/js?id=UA-##########"></script>
<script>
window.dataLayer = window.dataLayer || [];
function gtag(){dataLayer.push(arguments);}
gtag('js', new Date());
gtag('config', 'UA-##########');
</script>
Certainly! To add an additional “config” directive with the GA4 Property “Measurement ID” after line 8 in the gtag.js code mentioned above, you can modify the code as follows:
Here’s how the code will look after adding an additional “config” directive with the GA4 Property Measurement ID:
<!-- Google tag (gtag.js) -->
<script async src="https://www.googletagmanager.com/gtag/js?id=UA-##########"></script>
<script>
window.dataLayer = window.dataLayer || [];
function gtag(){dataLayer.push(arguments);}
gtag('js', new Date());
gtag('config', 'UA-##########');
gtag('config', 'G-Propert ID');
</script>
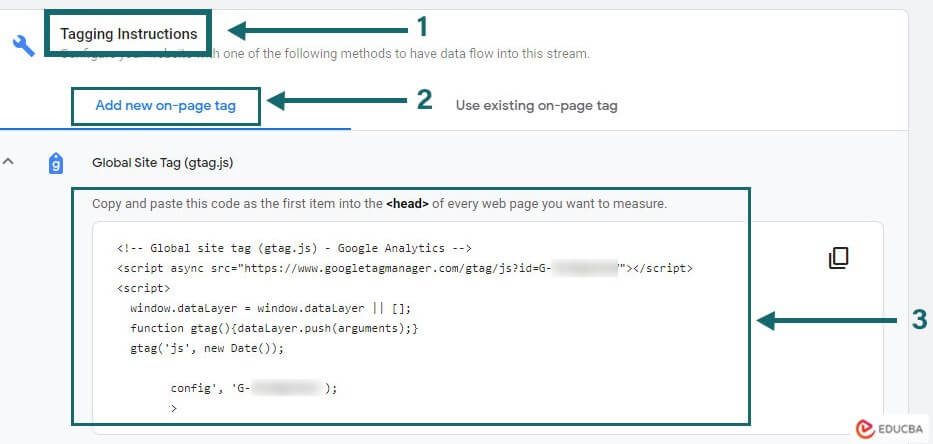
3. To copy and paste the GA4 tracking code script into the <head> section of your website, follow these steps:
Step 1: To proceed, locate and click on the “Admin” button located in the lower-left corner of the screen.
Step 2: After clicking on the “Admin” button, select the “Data Streams” option in the Admin section. Then, choose the “Web” menu from the available options. Next, click on the arrow (>) located under the “Data Stream” section to proceed to the “Web Stream Details” page.
To add GA4 tracking code to your website using Google Tag Manager, follow these steps:
Sure! Here are the steps to add the GA4 tracking code to your website using Google Tag Manager:
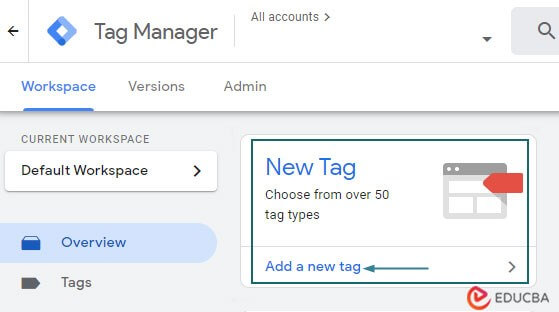
Step 1: To proceed, please visit the Google Tag Manager website at https://tagmanager.google.com/ and sign in using your Google account credentials.
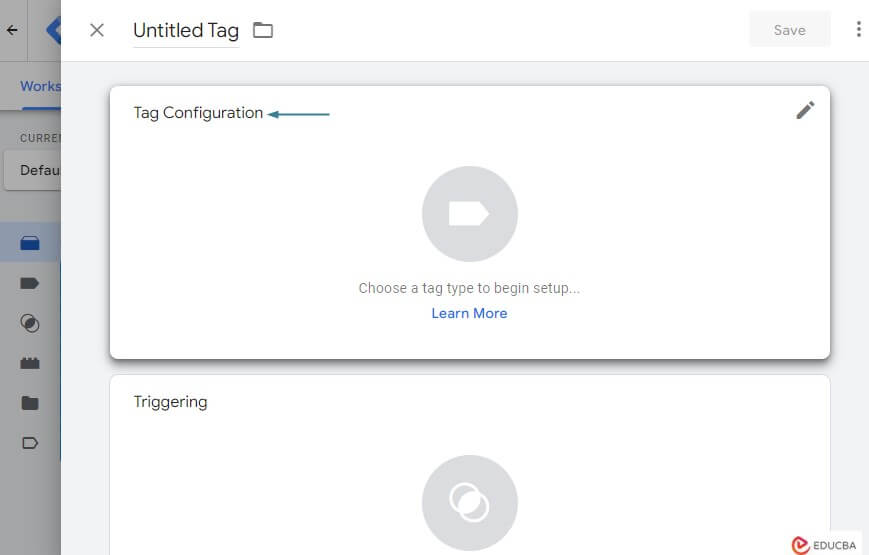
Step 2: Under the “New Tag” section, select the “Add a new tag” option.
Step 3: Now, click on the “Tag Configuration” option to proceed with configuring the tag.
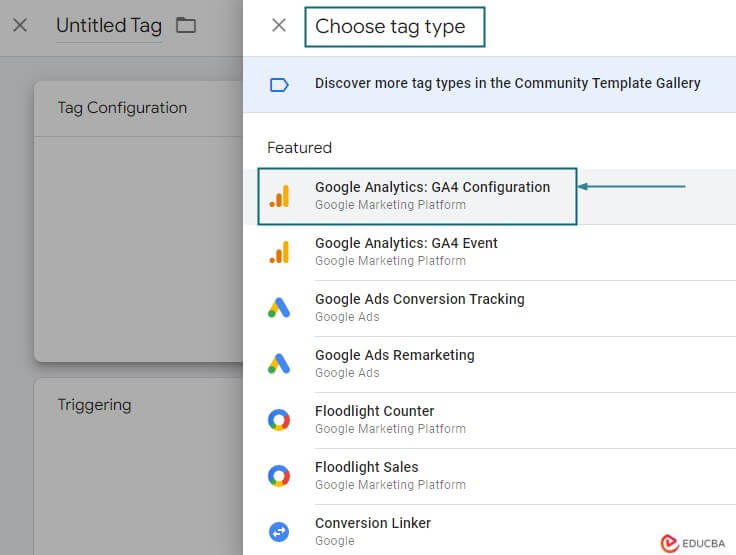
Step 4: In this step, select “Google Analytics: GA4 Configuration” as the tag type from the “Choose Tag Type” window.
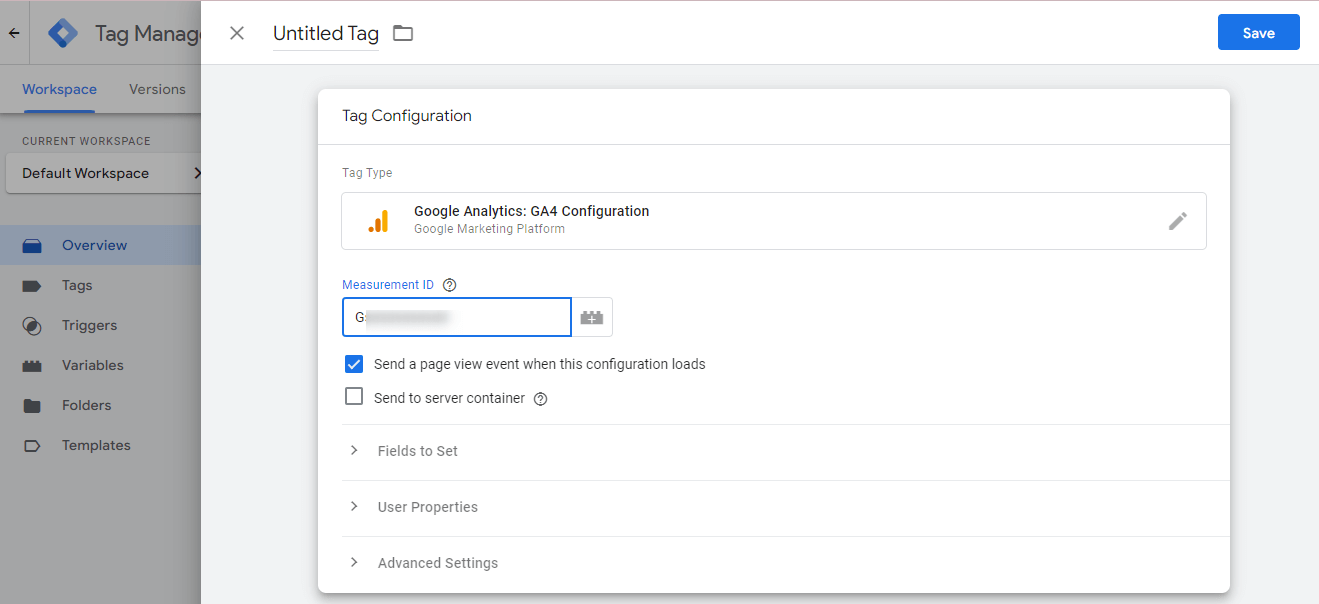
Step 5: In the “Measurement ID” section, enter your GA4 Measurement ID. Make sure to input the correct ID associated with your GA4 property..
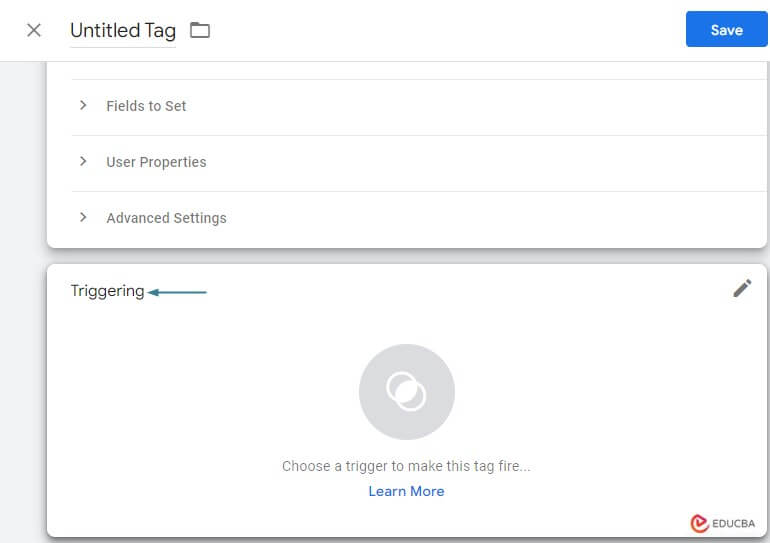
Step 6: Click on the “Triggering” option to configure the trigger for your tag’ after selecting “Google Analytics: GA4 Configuration” as the tag type.
Select the appropriate trigger based on when you want the GA4 Configuration Tag to be triggered. Choose the trigger that aligns with your desired conditions or events.
Step 7: In the “Choose a Trigger” window, you have the option to select triggers such as “All Pages” to make the tag appear on every page of your website. Alternatively, you can create custom triggers based on specific events or conditions. In this case, you have chosen “All Pages” as the trigger for the GA4 Configuration Tag.
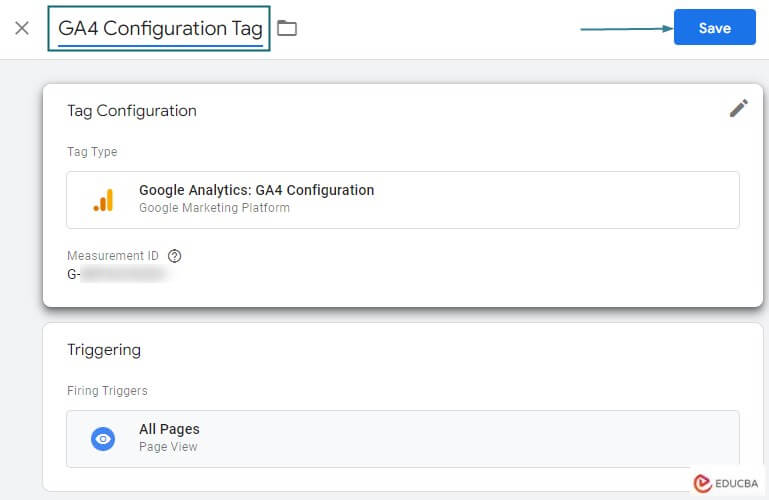
Step 8: To change the name of this tag from “Untitled Tag” to “GA4 Configuration Tag” or any other preferred name, follow these steps: To save this tag, click the SAVE button.
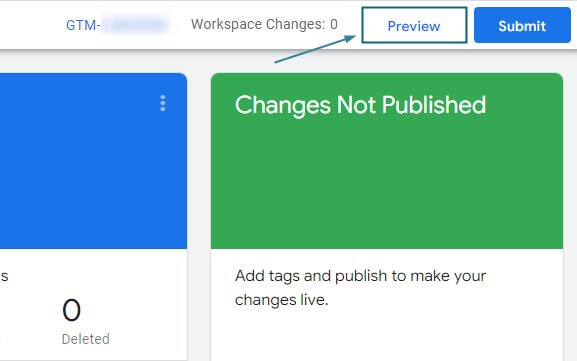
Step 9: By clicking the “Preview” button, you can visualize how the changes you made will appear and function on your website. This allows you to review and assess the impact of the modifications before publishing them.
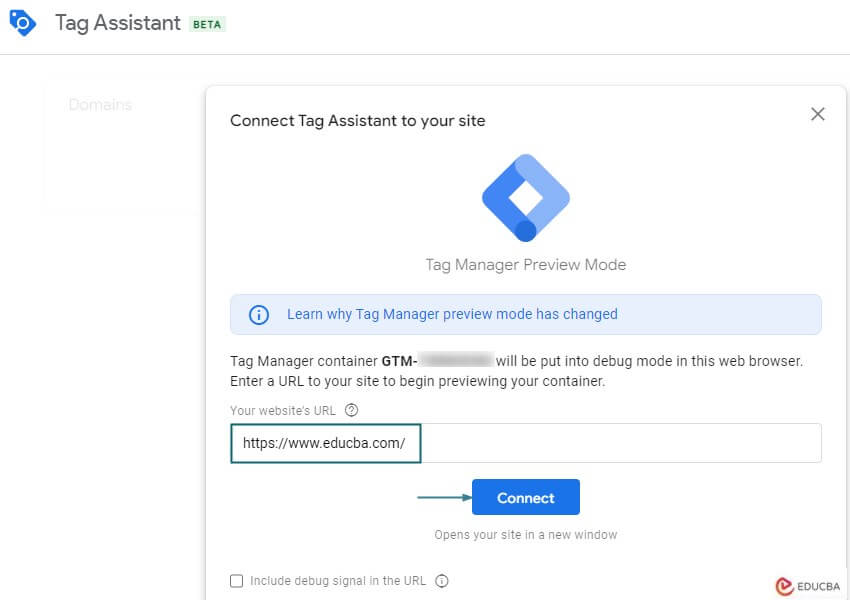
Step 10: Enter the URL of your website in the provided field, and then click on the “Connect” button. This will initiate the connection process between Google Tag Manager and your website.
Step 11: Check to see if the GA4 Configuration Tag appears in the Tags Fired list.
Step 12: In the upper-right corner of the Google Tag Manager window, click the Submit button.
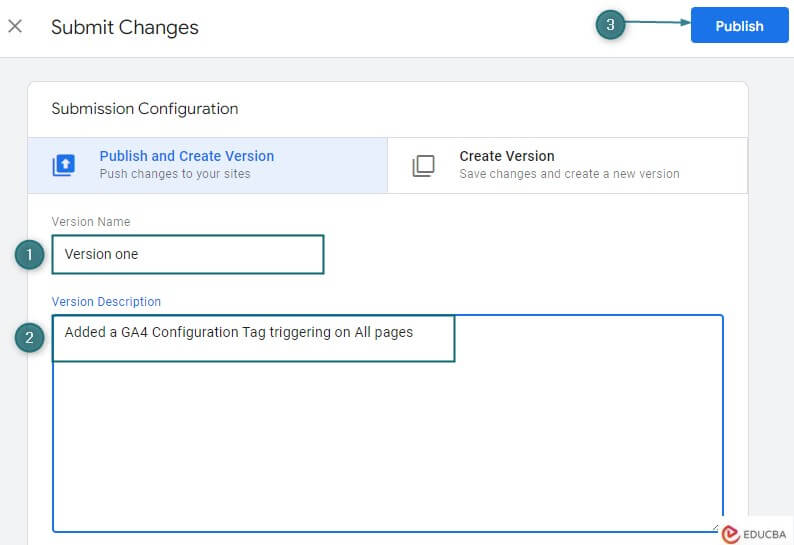
Step 13: You can update the Version Name and include an explanation of the changes performed in this version and then click on Publish button.
By following these steps, you should be able to successfully add a GA4 tracking code to your website using Google Tag Manager. Remember to test and verify the setup to ensure accurate tracking of your website data.
Conclusion
In short, installing Google Analytics Setup entails creating an account, adding a property, and collecting a tracking code. We add the tracking code to the website, whether using Universal Analytics or GA4, to start gathering data for analysis and insights.
Recommended Articles
We hope that this EDUCBA information on “Google Analytics Setup” was beneficial to you. You can view EDUCBA’s recommended articles for more information.
![Google Analytics Setup [GA4]](https://cdn.educba.com/academy/wp-content/uploads/2023/05/Google-Analytics-Setup-GA4-1.jpg)

