Updated March 17, 2023

Introduction on GridBagLayout in Java
GridBagLayout is one of the most complex, powerful, and complex layout manager Java offers. GridBagLayout aligns the components vertically, horizontally, or along the baseline. The components can be of the same width or not, based on the requirement. They maintain and manage dynamic cells where the display area is comprised of one or more cells. These components are associated with GridBagConstraints’ instance in which the objects of constraints help in arranging the display area of the components on the grid. GridBagLayout is of the package java.awt. Let us see the constructor, methods, and implementation of GridBagLayout in the following sections.
Constructors of GridBagLayout in Java
Java.awt.GridBagLayout is declared using the following syntax.
public class GridBagLayout extends Object implements LayoutManager2, SerializableGridBagLayout() is the constructor of GridBagLayout which helps in creating a grid bag layout manager. Firstly, we create the object for GridBagLayout class with the help of a no-argument constructor
GridBagLayout obj = new GridBagLayout();
setLayout(obj);
Let us see some of the fields for the class java.awt.GridBagLayout.
- PREFERRED_SIZE: It specifies the preferred grid size from the component. Here, it can also be the gap that has to be used for a particular range value.
- DEFAULT_SIZE: It specifies the grid size from the component. Here, it can also be the gap that has to be used for a particular range value.
- defaultConstraints: The instance of gridbag constraints that contains the default values is holded here.
- layoutInfo: Gridbag’s layout details are holding in this.
- rowWeights: Override to the row weights are holding here.
- MAXGRIDSIZE: It helps in backward compatibility.
- rowHeights: Overrides are held to the minimum heights of row.
Methods of GridBagLayout in Java
The following are the several methods of GridBagLayout that can be used for different purposes.
- removeLayoutComponent(Component cmpn): From the layout, the specified component is removed.
- addLayoutComponent(Component cmpn, Object objcons): The specified object of the constraint is added to the layout of the specified component.
- getLayoutAlignmentY(Container cnt): Alignment along the y-axis is returned.
- addLayoutComponent(String name, Component cmpn): The specified object of the constraint is added to the layout of the specified component with a specific name.
- toString(): Values in the grid bag layout are returned in the representation of the string.
- getLayoutAlignmentX(Container cnt): Alignment along the x-axis is returned.
- getConstraints(Component cmpn): Component’s specified constraints are returned.
- maximumLayoutSize(Container cnt): Components in the container are returned with the maximum dimensions.
- minimumLayoutSize(Container cntmin): Components in the container are returned with the minimum dimensions.
- preferredLayoutSize(Container cntpref): Components in the container are returned with the preferred dimensions.
- arrangeGrid(Container cnt): It helps in arranging the grid.
- adjustForGravity(GridBagConstraints cn, Rectangle rect): Depending on the geometry of constraints, this method adjusts the width, x, height, and y fields to the right values.
- getLayoutDimensions(): The width of the column and height of the rows are determined using this method.
- getLayoutInfo(Container cnt, int sizeflag): It is obsolete and used for backward compatibility.
- getLayoutOrigin(): It determines the origin of the layout area, in the graphics coordinate space of the target container.
- getLayoutWeights(): Weights of the column and height of the rows are determined using this method.
- getMinSize(Container cnt, GridBagLayoutInfo inf): Based on the details obtained from getLayoutInfo, the minimum size of the master is returned.
- invalidateLayout(Container cnt): If some cached information is present in the layout manager, it invalidates the layout.
- layoutContainer(Container cnt): The specified container will be laid out using this grid bag layout.
- Point location(int x, int y): This method identifies the cell that contains the point mentioned using x and y.
- lookupConstraints(Component cmp): Constraints of the mentioned component are retrieved.
- setConstraints(Component cmp, GridBagConstraints const): Constraints of the mentioned component are set in the layout.
Program to implement GridBagLayout in Java
Now, let us see the programs to implement GridBagLayout in Java.
Program #1
// Java program to implement GridBagLayout layout manager
//import the packages needed
import java.awt.Button;
import java.awt.GridBagConstraints;
import java.awt.GridBagLayout;
import javax.swing.*;
//GridExample class extends JFrame
public class GridExample extends JFrame{
//main method
public static void main(String[] args) {
//object of the class GridExample
GridExample ge = new GridExample();
}
//constructor of class GridExample
public GridExample() {
// Object of GridBagLayout
GridBagLayout gl = new GridBagLayout();
// Object of GridBagConstraints
GridBagConstraints gc = new GridBagConstraints();
// GridBagLayout is set
setLayout(gl);
// Method to set JFrame Title.
setTitle("Example for GridBag Layout ");
GridBagLayout ll = new GridBagLayout();
this.setLayout(ll);
//components in horizontal
gc.fill = GridBagConstraints.HORIZONTAL;
//left most row and top most column
gc.gridx = 0;
gc.gridy = 0;
//Button A added
this.add(new Button("Button A"), gc);
gc.gridx = 1;
gc.gridy = 0;
//Button B added
this.add(new Button("Button B"), gc);
gc.fill = GridBagConstraints.HORIZONTAL;
//increase component height by 20 pixels
gc.ipady = 20;
gc.gridx = 0;
gc.gridy = 1;
//Button C added
this.add(new Button("Button C"), gc);
gc.gridx = 1;
gc.gridy = 1;
///Button D added
this.add(new Button("Button D"), gc);
gc.gridx = 0;
gc.gridy = 2;
gc.fill = GridBagConstraints.HORIZONTAL;
gc.gridwidth = 2;
//Button E added
this.add(new Button("Button E"), gc);
// set the size
setSize(200, 300);
setPreferredSize(getSize());
//GUI visible to user
setVisible(true);
//exit on clicking close button
setDefaultCloseOperation(EXIT_ON_CLOSE);
}
}
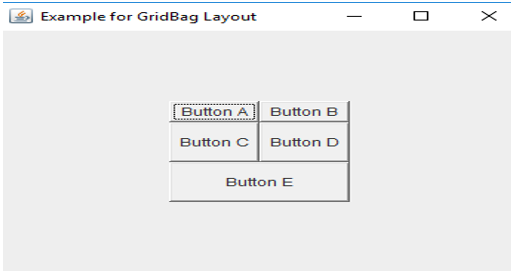
Sample Output:
Here, a GridBagLayout with five buttons such as A, B, C, D, and E are created. Several methods are used for setting size, title, GUI visibility, etc.
Program #2
//Java program to implement GridBagLayout
import java.awt.*;
import javax.swing.*;
public class GridExample {
//main method
public static void main(String[] args) {
//object of JFrame
JFrame jf = new JFrame();
//exit on clicking close button
jf.setDefaultCloseOperation(JFrame.EXIT_ON_CLOSE);
//object of container
Container cn = jf.getContentPane();
//set layout
cn.setLayout(new GridBagLayout());
//object of constraints
GridBagConstraints gc = new GridBagConstraints();
gc.gridx = 0;
gc.gridy = GridBagConstraints.RELATIVE;
cn.add(new JButton("Button A"));
cn.add(new JButton("Button B"));
gc.fill = GridBagConstraints.HORIZONTAL;
cn.add(new JButton("Button c"));
// set the size
jf.setSize(400, 300);
//GUI visible to user
jf.setVisible(true);
}
}
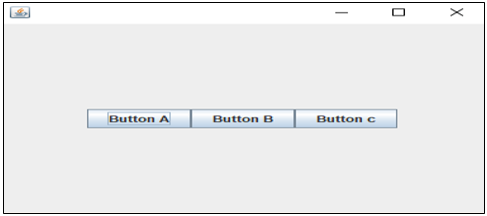
Sample Output:
This program implements the GridBagLayout in another method. But, here the title is not set and only 3 buttons are present.
Conclusion
GridBagLayout is one of the powerful, flexible and complex layout managers in Java which is offered java.awt package. It aligns the components vertically, horizontally or along the line. Syntax, constructor, methods, and implementation of GridBagLayout are explained in this document.
Recommended Articles
This is a guide to GridBagLayout in Java. Here we discuss the Methods and Program to implement GridBagLayout in Java. You may also have a look at the following articles to learn more –


