Introduction to GridLayout in Java
Layout managers are used in Graphic programming to arrange components in a specific manner. They are used to determine the size and position of a component in a container. There are different types of layout managers available. GridLayout is one of them. GridLayout in java divides the container into a grid of cells called rows and columns. It arranges the components in a rectangular grid. Each cell can accommodate only one component, equally sized and equispaced with each other.
Example: 3 rows and 4 columns
| 1 | 2 | 3 | 4 |
| 5 | 6 | 7 | 8 |
| 9 | 10 | 11 | 12 |
Common Steps-Gridlayout in Java
Following are some common steps-gridlayout on java:
1. Setting the container using the JFrame constructor:
JFrame frame = new JFrame();2. Setting the panel’s layout manager using the JPanel constructor:
JPanel panel = new JPanel();3. Adding components to the container:
panel.add(button);frame.add(panel);4. Setting the component orientation:
panel.setComponentOrientation(ComponentOrientation.LEFT_TO_RIGHT);The ComponentOrientation property’s default value is that the components’ orientation is horizontal and left-to-right.
Types of Constructors with Examples
Below are the types of constructors with examples and code.
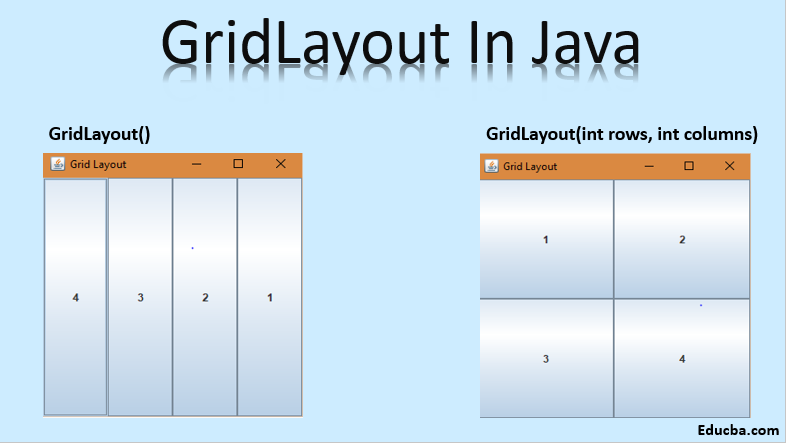
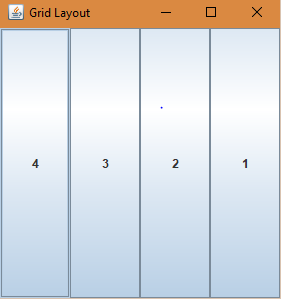
1. GridLayout()
Empty constructor with one column per component in a single row.
Code:
import java.awt.*;
import javax.swing.*;
public class GridLayoutDemo {
public static void main(String[] args) {
JFrame frame = new JFrame("Grid Layout");
frame.setVisible(true);
frame.setDefaultCloseOperation(JFrame.EXIT_ON_CLOSE);
frame.setSize(200,200);
JPanel panel = new JPanel();
panel.setLayout(new GridLayout());JButton button1 = new JButton("1");
JButton button2 = new JButton("2");
JButton button3 = new JButton("3");
JButton button4 = new JButton("4");
panel.setComponentOrientation(ComponentOrientation.RIGHT_TO_LEFT);
panel.add(button1);
panel.add(button2);
panel.add(button3);
panel.add(button4);
frame.add(panel);
}
}
Output:
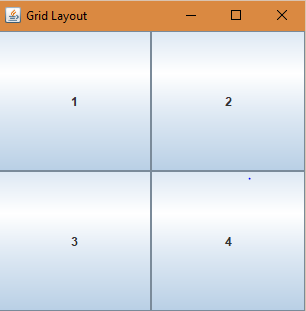
2. GridLayout(int rows, int columns)
Constructor with a specified number of rows and columns.
Parameters:
- rows- the number of rows (value zero, meaning any number of rows).
- columns- the number of columns (value zero, meaning any number of columns).
Code:
import java.awt.*;
import javax.swing.*;
public class GridLayoutDemo {
public static void main(String[] args) {
JFrame frame = new JFrame("Grid Layout");
frame.setVisible(true);
frame.setDefaultCloseOperation(JFrame.EXIT_ON_CLOSE);
frame.setSize(200,200);
JPanel panel = new JPanel();
panel.setLayout(new GridLayout(2,2));
JButton button1 = new JButton("1");
JButton button2 = new JButton("2");
JButton button3 = new JButton("3");
JButton button4 = new JButton("4");
panel.setComponentOrientation(ComponentOrientation.LEFT_TO_RIGHT);
panel.add(button1);
panel.add(button2);
panel.add(button3);
panel.add(button4);
frame.add(panel);
}
}
Output:
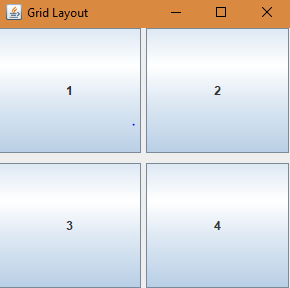
3. GridLayout(int rows, int columns, int horizontal gap, int vertical gap)
Constructor with a specified number of rows and columns, horizontal and vertical gaps between rows and columns.
Parameters:
- rows- the number of rows (value zero, meaning any number of rows).
- columns- the number of columns (value zero meaning any number of columns).
- horizontal gap- between each of the columns
- vertical gap- between each of the rows
Throws:
IllegalArgumentException- if the value of both rows and columns is set to zero.
Code:
import java.awt.*;import javax.swing.*;
public class GridLayoutDemo {
public static void main(String[] args) {
JFrame frame = new JFrame("Grid Layout");
frame.setVisible(true);
frame.setDefaultCloseOperation(JFrame.EXIT_ON_CLOSE);
frame.setSize(200,200);
JPanel panel = new JPanel();
panel.setLayout(new GridLayout(2,2,5,10));
JButton button1 = new JButton("1");
JButton button2 = new JButton("2");JButton button3 = new JButton("3");
JButton button4 = new JButton("4");
panel.setComponentOrientation(ComponentOrientation.LEFT_TO_RIGHT);
panel.add(button1);
panel.add(button2);
panel.add(button3);
panel.add(button4);
frame.add(panel);
}
}
Output:
Example with Implementation
Case: In the below program, whenever the mouseover effect happens over the cell of a grid, its color changes from black to white.
Code:
import java.awt.*;
import javax.swing.*;
import java.awt.event.MouseAdapter;
import java.awt.event.MouseEvent;
public class gridLayout extends JPanel{
public gridLayout() {
super(new GridLayout(3,3));
JLabel label1, label2, label3, label4, label5, label6, label7, label8, label9;
//create the lables
label1 = new JLabel();
label2 = new JLabel();
label3 = new JLabel();
label4 = new JLabel();
label5 = new JLabel();
label6 = new JLabel();
label7 = new JLabel();
label8 = new JLabel();
label9 = new JLabel();
//set the background color for each label
label1.setBackground(Color.BLACK);
label1.setOpaque(true);
label2.setBackground(Color.BLACK);
label2.setOpaque(true);
label3.setBackground(Color.BLACK);
label3.setOpaque(true);
label4.setBackground(Color.BLACK);
label4.setOpaque(true);
label5.setBackground(Color.BLACK);
label5.setOpaque(true);
label6.setBackground(Color.BLACK);
label6.setOpaque(true);
label7.setBackground(Color.BLACK);
label7.setOpaque(true);
label8.setBackground(Color.BLACK);
label8.setOpaque(true);
label9.setBackground(Color.BLACK);
label9.setOpaque(true);
//add mouse listeners for each label
label1.addMouseListener(new MouseAdapter() {
public void mouseEntered(MouseEvent me) {
label1.setBackground(Color.WHITE);
}
public void mouseExited(MouseEvent me) {
label1.setBackground(Color.BLACK);
}
});
label2.addMouseListener(new MouseAdapter() {
public void mouseEntered(MouseEvent me) {
label2.setBackground(Color.WHITE);
}
public void mouseExited(MouseEvent me) {
label2.setBackground(Color.BLACK);
}
});
label3.addMouseListener(new MouseAdapter() {
public void mouseEntered(MouseEvent me) {
label3.setBackground(Color.WHITE);}
public void mouseExited(MouseEvent me) {
label3.setBackground(Color.BLACK);
}
});
label4.addMouseListener(new MouseAdapter() {
public void mouseEntered(MouseEvent me) {
label4.setBackground(Color.WHITE);
}
public void mouseExited(MouseEvent me) {
label4.setBackground(Color.BLACK);}
});
label5.addMouseListener(new MouseAdapter() {
public void mouseEntered(MouseEvent me) {
label5.setBackground(Color.WHITE);
}
public void mouseExited(MouseEvent me) {
label5.setBackground(Color.BLACK);
}});
label6.addMouseListener(new MouseAdapter() {
public void mouseEntered(MouseEvent me) {
label6.setBackground(Color.WHITE);
}
public void mouseExited(MouseEvent me) {
label6.setBackground(Color.BLACK);
}
});
label7.addMouseListener(new MouseAdapter() {
public void mouseEntered(MouseEvent me) {
label7.setBackground(Color.WHITE);
}
public void mouseExited(MouseEvent me) {
label7.setBackground(Color.BLACK);
}
});
label8.addMouseListener(new MouseAdapter() {
public void mouseEntered(MouseEvent me) {
label8.setBackground(Color.WHITE);
}
public void mouseExited(MouseEvent me) {
label8.setBackground(Color.BLACK);
}
});label9.addMouseListener(new MouseAdapter() {
public void mouseEntered(MouseEvent me) {
label9.setBackground(Color.WHITE);
}
public void mouseExited(MouseEvent me) {
label9.setBackground(Color.BLACK);
}
});
//add the labels
add(label1);
add(label2);
add(label3);
add(label4);
add(label5);
add(label6);
add(label7);
add(label8);
add(label9);
}
private static void createAndShowGUI() {
//create and setup the container
JFrame frame = new JFrame("Gridlayout Demo");
frame.setDefaultCloseOperation(JFrame.EXIT_ON_CLOSE);
frame.setSize(300,300);
//add content to the container
frame.add(new gridLayout());
//display the container
frame.pack();
frame.setVisible(true);
}public static void main(String[] args) {
createAndShowGUI();
}
}
Output:
Conclusion
Gridlayout in java is useful when you want to make grids in a container along with one condition, i.e., each of the cells of the grid is of equal size and equally spaced.
There are other available methods also, as mentioned below:
1. getRows()– Get the number of rows.
2. setRows(int i)– Set the number of rows to the specified value.
3. getColumns()– Get the number of columns.
4. setColumns(int i)– Set the number of columns to the specified value.
5. getHgap()– Gets the horizontal gap between components.
6. setHgap(int i)– Set the horizontal gap between components to the specified value.
7.getVgap()- Gets the vertical gap between components.
8. setVgap(int i)– Set the vertical gap between components to the specified value.
9. addLayoutComponent(String name, Component comp)– Adds the specified component with the specified name to the layout.
10. removeLayoutComponent(Component comp)- removes the specified component from the container layout.
11. preferredLayoutSize(Container parent)- Determines the preferred size of the container.
12. minimumLayoutSize(Container parent)- Determines the container’s minimum size.
13. layoutContainer(Container parent)- Lays out the specified container.
14. toString()– Returns the string representation of grid layout values.
Recommended Articles
This is a guide to Gridlayout in Java. Here we have discussed the basic concept, types of constructors with examples, and codes with implementation. You can also go through our other related articles to learn more –


