Updated March 17, 2023
Introduction to GroupLayout in Java
In GroupLayout in Java, Layout managers are like different types of “Word wraps” for java components. In the same way that the “Word Wrap” feature wraps the characters of text around to the next line in a word processor, layout managers wrap “Swing components” around the visible area of a JFrame or JApplet. Layout managers are derived from the AWT package. GroupLayout managers is a LayoutManager that groups the components and arrange them in a JFrame or JApplet. It is used for developing Graphical User Interface.
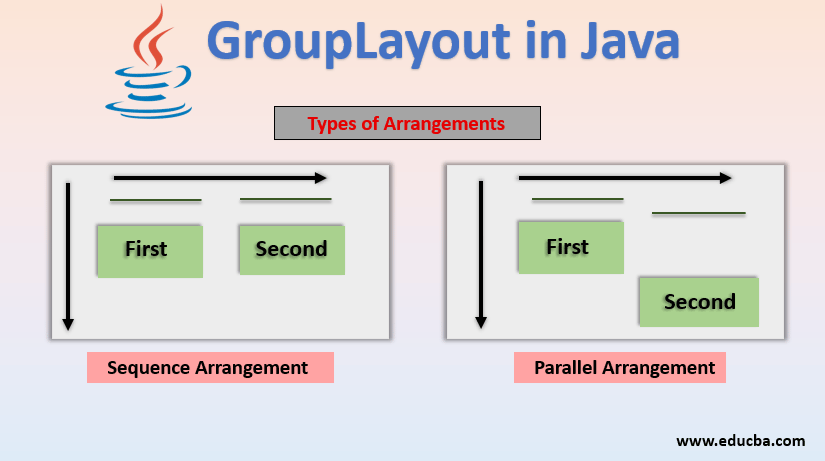
For the components, GroupLayout is using Two Types of Arrangements:
- Sequential Arrangement: In this arrangement, the components are arranged one after the other in sequence.
- Parallel Arrangement: In this arrangement, the components are placed parallelly in the same place.
When they are nested hierarchically, these two arrangements become more powerful for which GroupLayout defines layout groups. A group can be either parallel or sequential and may contain components, other groups, and gaps.
- Size of Sequential Group: Sum of the sizes of all the contained components in a container.
- Size of parallel Group: Size of the largest component in a container.
Constructor of GroupLayout Class in Java
Below is the constructor of grouplayout class:
GroupLayout(Container Host): For the specified Container, it creates a GroupLayout.
Example:
import java.awt.*;
import javax.swing.*;
public class GroupLayoutExample extends JFrame{
JPanel grpPanel = new JPanel();
GroupLayout grpLayout = new GroupLayout(grpPanel);
}
Defining a Layout: Way of arranging the components inside the JFrame or JApplet by combining sequential & parallel groups.
Examples to Implement GroupLayout in Java
Below are the different examples to implement GroupLayout in Java:
Example #1
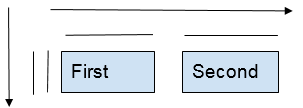
Let start with a simple example, having two components in a row.
We will describe this layout using groups. Starting with the horizontal axis, a sequential group of two components starting from left to right. Starting with the vertical axis, a parallel group of two components with the same position.
Code:
import java.awt.*;
import javax.swing.*;
public class GroupLayoutExample extends JFrame{
JPanel panel = new JPanel();
JButton BFirst = new JButton("First");
JButton BSecond = new JButton("Second");
GroupLayout gl = new GroupLayout(panel);
public GroupLayoutExample() {
panel.setLayout(gl);
SetButton(BFirst,100,30);
SetButton(BSecond,100,30);
SetLayout();
Build();
}
public void SetButton(JButton button, int width, int height) {
button.setMinimumSize(new Dimension(width,height));
}
public void SetLayout() {
gl.setHorizontalGroup(gl.createSequentialGroup()
.addComponent(BFirst)
.addComponent(BSecond));
gl.setVerticalGroup(gl.createParallelGroup()
.addComponent(BFirst)
.addComponent(BSecond));
}
public void Build() {
setContentPane(panel);
pack();
setDefaultCloseOperation(JFrame.EXIT_ON_CLOSE);
setLocationRelativeTo(null);
setTitle("GroupLayout Example");
setVisible(true);
}
public static void main(String[] args) {
new GroupLayoutExample();
}
}
Output:
Example #2
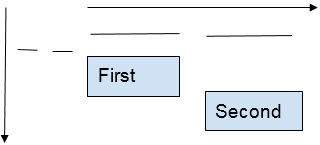
Let suppose having two components like below:
We will describe this layout using groups. Starting with the horizontal axis, a sequential group of two components starting from left to right. Starting with the vertical axis, a sequential group of two components from left to right.
Code:
import java.awt.*;
import javax.swing.*;
public class GroupLayoutExample extends JFrame{
JPanel panel = new JPanel();
JButton BFirst = new JButton("First");
JButton BSecond = new JButton("Second");
GroupLayout gl = new GroupLayout(panel);
public GroupLayoutExample() {
panel.setLayout(gl);
SetButton(BFirst,100,30);
SetButton(BSecond,100,30);
SetLayout();
Build();
}
public void SetButton(JButton button, int width, int height) {
button.setMinimumSize(new Dimension(width,height));
}
public void SetLayout() {
gl.setHorizontalGroup(gl.createSequentialGroup()
.addComponent(BFirst)
.addComponent(BSecond));
gl.setVerticalGroup(gl.createSequentialGroup()
.addComponent(BFirst)
.addComponent(BSecond));
}
public void Build() {
setContentPane(panel);
pack();
setDefaultCloseOperation(JFrame.EXIT_ON_CLOSE);
setLocationRelativeTo(null);
setTitle("GroupLayout Example");
setVisible(true);
}
public static void main(String[] args) {
new GroupLayoutExample();
}
}
Output:
Example #3
A Gap is like an invisible component of a certain size.
They are often used to control the distance between components or from the container border. It also defines automatic gaps as preferred distances between neighboring components. It uses three types of gaps between components or components and borders: RELATED, UNRELATED, and INDENTED. Something exclusive to sequential groups is gaps. Gaps separate the components by the number of pixels indicated. Now we will give a horizontal gap of 20 and a vertical gap of 30.
Code:
import java.awt.*;
import javax.swing.*;
public class GroupLayoutExample extends JFrame{
JPanel panel = new JPanel();
JButton BFirst = new JButton("First");
JButton BSecond = new JButton("Second");
GroupLayout gl = new GroupLayout(panel);
public GroupLayoutExample() {
panel.setLayout(gl);
SetButton(BFirst,100,30);
SetButton(BSecond,100,30);
SetLayout();
Build();
}
public void SetButton(JButton button, int width, int height) {
button.setMinimumSize(new Dimension(width,height));
}
public void SetLayout() {
gl.setHorizontalGroup(gl.createSequentialGroup()
.addComponent(BFirst)
.addGap(20)
.addComponent(BSecond));
gl.setVerticalGroup(gl.createSequentialGroup()
.addComponent(BFirst)
.addGap(30)
.addComponent(BSecond));
}
public void Build() {
setContentPane(panel);
pack();
setDefaultCloseOperation(JFrame.EXIT_ON_CLOSE);
setLocationRelativeTo(null);
setTitle("GroupLayout Example");
setVisible(true);
}
public static void main(String[] args) {
new GroupLayoutExample();
}
}
Output:
Example #4
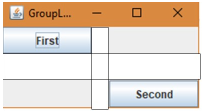
But what if we want a gap in a parallel-group?
But gaps can’t be used in parallel groups. So, a different method is used to create a gap. It uses a combination of parallel and sequential groups. It starts off with a parallel-group and the first component. Then, it has a sequential group inside the parallel group. And adds a gap inside this sequential group and finally adds the second component. The vertical groups contain both components in a sequential manner.
Code:
import java.awt.*;
import javax.swing.*;
public class GroupLayoutExample extends JFrame{
JPanel panel = new JPanel();
JButton BFirst = new JButton("First");
JButton BSecond = new JButton("Second");
GroupLayout gl = new GroupLayout(panel);
public GroupLayoutExample() {
panel.setLayout(gl);
SetButton(BFirst,100,30);
SetButton(BSecond,100,30);
SetLayout();
Build();
}
public void SetButton(JButton button, int width, int height) {
button.setMinimumSize(new Dimension(width,height));
}
public void SetLayout() {
gl.setHorizontalGroup(gl.createParallelGroup()
.addComponent(BFirst)
.addGroup(gl.createSequentialGroup()
.addGap((int)(BFirst.getMinimumSize().getWidth()/2))
.addComponent(BSecond))
);
gl.setVerticalGroup(gl.createSequentialGroup()
.addComponent(BFirst)
.addComponent(BSecond));
}
public void Build() {
setContentPane(panel);
pack();
setDefaultCloseOperation(JFrame.EXIT_ON_CLOSE);
setLocationRelativeTo(null);
setTitle("GroupLayout Example");
setVisible(true);
}
public static void main(String[] args) {
new GroupLayoutExample();
}
}
Output:
Example #5
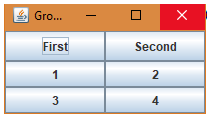
Now we will create compounding layouts.
We need to create a grid layout and JPanel to support the layout and set up four buttons in a (2,2) pattern. First off, we start with a parallel-group in the horizontal group followed by adding the grid layout panel. And the sequential group in the parallel group and adding the two buttons in sequential order horizontally. Next, in the vertical group, it starts with a sequential group. Then we will add the grid layout JPanel. Next, comes a parallel-group for the two buttons. And finally, the finished build method.
Code:
import java.awt.*;
import javax.swing.*;
public class GroupLayoutExample extends JFrame{
JPanel grpPanel = new JPanel(), grdPanel = new JPanel();
JButton BFirst = new JButton("First"), BSecond = new JButton("Second"), BGrid[] = new JButton[4];
GroupLayout grpLayout = new GroupLayout(grpPanel);
GridLayout grdLayout = new GridLayout(2,2);
public GroupLayoutExample() {
grpPanel.setLayout(grpLayout);
SetButton(BFirst,100,30);
SetButton(BSecond,100,30);
SetLayout();
Build();
}
public void SetButton(JButton button, int width, int height) {
button.setMinimumSize(new Dimension(width,height));
}
public void SetLayout() {
for(int i=0; i<4; i++) {
BGrid[i] = new JButton(String.valueOf(i+1));
grdPanel.add(BGrid[i]);
}
grdPanel.setLayout(grdLayout);
grpLayout.setHorizontalGroup(grpLayout.createParallelGroup()
.addComponent(grdPanel)
.addGroup(grpLayout.createSequentialGroup()
.addComponent(BFirst)
.addComponent(BSecond))
);
grpLayout.setVerticalGroup(grpLayout.createSequentialGroup()
.addGroup(grpLayout.createParallelGroup()
.addComponent(BFirst)
.addComponent(BSecond))
.addComponent(grdPanel)
);
}
public void Build() {
setContentPane(grpPanel);
pack();
setDefaultCloseOperation(JFrame.EXIT_ON_CLOSE);
setLocationRelativeTo(null);
setTitle("GroupLayout Example");
setVisible(true);
}
public static void main(String[] args) {
new GroupLayoutExample();
}
}
Output:
Conclusion
GroupLayout is useful when you want to hierarchically group your components into a container. Some of the useful methods that we have used in this article are:
- Java GroupLayout .createParallelGroup (): Creates and returns a Parallel Group.
- Java GroupLayout .createSequentialGroup (): Creates and returns a SequentialGroup.
Recommended Articles
This is a guide to GroupLayout in Java. Here we discuss the basic concept, constructor of grouplayout class in five different examples. You can also go through our other related articles to learn more –

