Introduction to Photoshop Software
Thomas and John Knoll developed Photoshop in 1988. He was a Ph.D. student at the University of Michigan. He wrote the code on Macintosh Plus to display a grayscale image on a monochrome display. His brother John who works in Industrial Light and Magic, helps him in developing the code. Thomas took a break-up of 6 months to launch Photoshop. Thomas first named this software as ImagePro. But he later names it as Photoshop. After that, John traveled to Silicon Valley to show his program to the engineers in Apple and Russell Brown. Russell Brown was the art director at Adobe. The latest version of Photoshop available in the market is Photoshop Mix. Features of Photoshop includes shape, measuring and navigation, selection, cropping, slicing, moving, marquee, lasso, magic wand, eraser, video editing, Pen, Clone stamp, 3D extrusion, mobile integration, camera raw, 3D printing tool, color replacement tool, etc. In this article, we will learn about How to Change Shirt Color in Photoshop?.
How to Change Shirt Color in Photoshop?
We will explain “How to change shirt color in Photoshop”. To change the color of a shirt or clothes will be a quiet time saver if you have identical shirts or clothes available in different colors:
Step 1: Open Photoshop software by clicking on the Photoshop Icon.
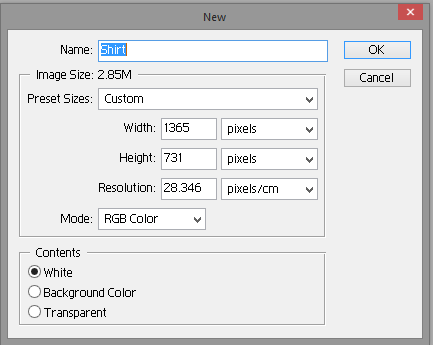
Step 2: First, we need to create a New Document. For that, click on the “File” option provided on the top left corner of the screen. Select the “new” file option from there. Pop up window will appear. Name the file by which you need to save the document. Also, adjust the width, height in pixels. Select a suitable resolution of the screen, black ground color.
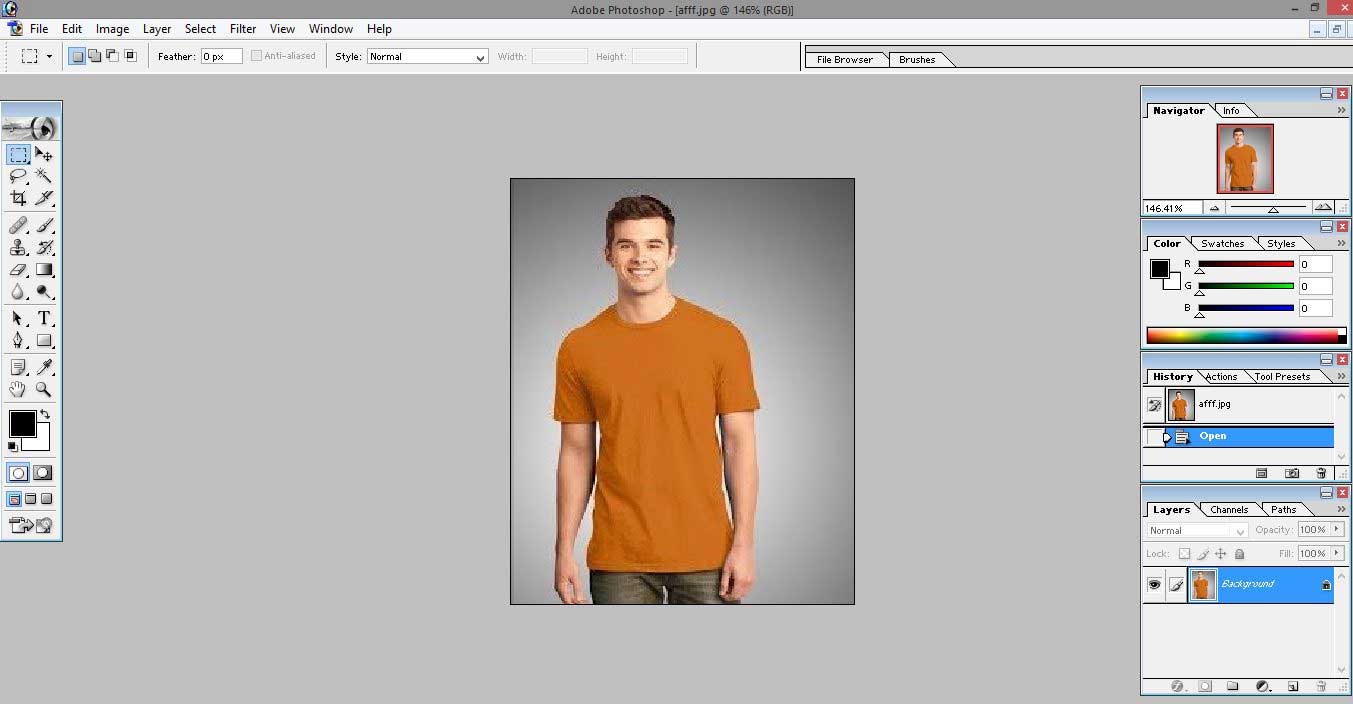
Step 3: Now, open the image of a shirt for which you need to change the color by just dragging it into Photoshop software. The image will get imported into your desktop.
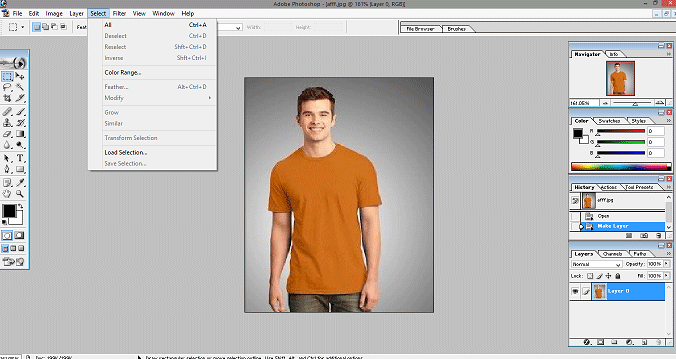
Step 4: Now click on the Select option provided on the top of the screen in the taskbar and click on Color Range.
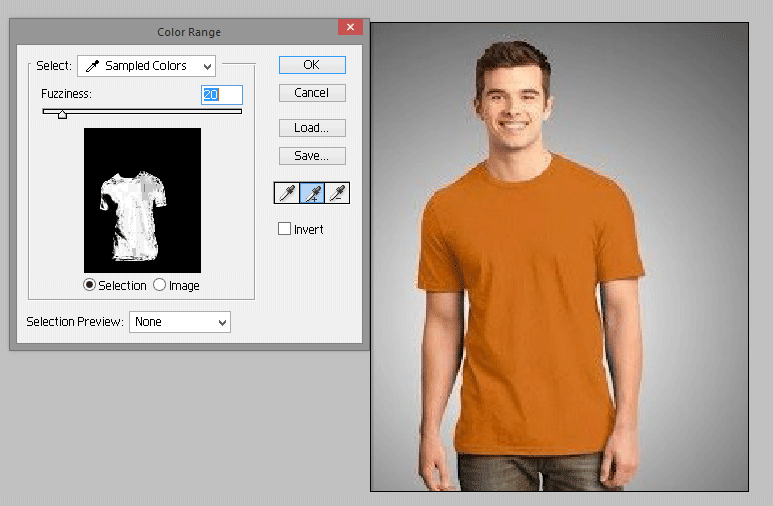
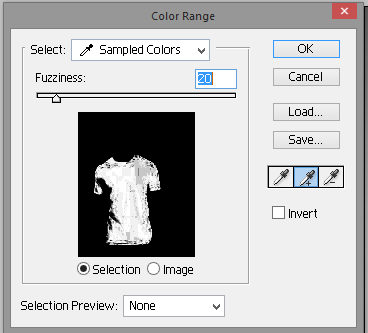
Step 5: A popup window will appear, which allows you to select the colors in your image using an eyedropper. You also need to select the fuzziness level. This level basically tells the software about how closely it needs to match the color. The greater the fuzziness level more it picks up different shades of the color. Select a suitable range of fuzziness levels. If you select more fuzziness, the eye dropper will pick unwanted areas that we need to pick up. We can able to see three types of eye droppers. Eyedropper with the plus sign allows the user to select multiple colors, one with the minus sign allows us to remove the colors and one with no symbol selects only one color at a time.
Step 6: In this tutorial, we had selected an eyedropper with the plus sign while holding down the shift key. By doing this, we can select multiple colors at once. The goal was to pick up all shades of shirt orange color, and due to lightning and shadows, there were different shades of shirt orange color. By using an eye dropper with the plus sign and holding down the shift key, we will able to select the entire shirt. The preview screen shows you the area that we are selected. Press ok to complete the process.
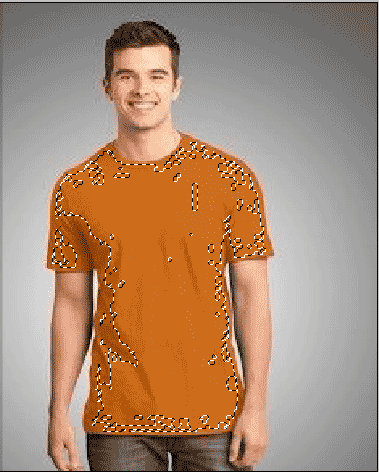
Step 7: After pressing on Ok, the shirt will appear as shown below.
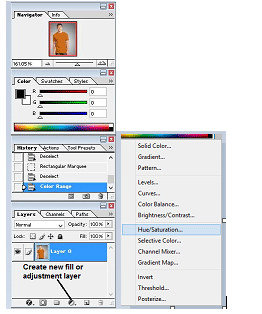
Step 8: Now next task is to click on the two-tone circle, which reads “create new fill or adjustment layer”. Hold the shift key and click on the two-tone circle. Select “Hue and saturation” from the dialog box while holding the shift key.
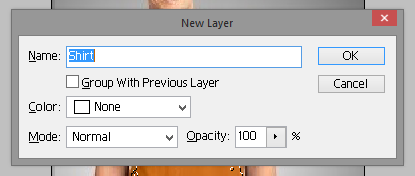
Step 9: A dialog window will appear. We can rename the layer as a shirt or leave it as default. Press Ok after naming the new layer.
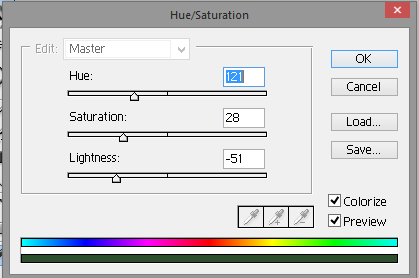
Step 10: A color window will appear. Tick mark the colorize option in the window and select the suitable requirement of “hue”, “saturation”, and lightness to the level of your choice.
Step 11: The final image will appear as shown below.
We can change more shirt color and create more images by right-clicking on the “hue/saturation” layer and duplicate it. After that, we can adjust the colors by clicking the layer thumbnail. Remember to hide the other “hue/saturation” layers by clicking on the “eye” icon. After we had created all the color layers, we can switch between different color images by hiding and unhiding the layers.
Conclusion – How to Change Shirt Color in Photoshop?
Above, it has been explained how we can edit the color in the shirt. We can edit the whole image also using Adobe Photoshop software. If we have multiple images with no major differences between each other, we can record the steps used in creating them. Then we can apply it to all images and save a lot of time. This is the most interesting software to learn as a beginner. There are many steps involved in creating or editing one photo, but if we do it sequentially, we can learn a lot from this software.
Recommended Articles
This is a guide to How to Change Shirt Color in Photoshop?. Here we discuss changing the shirt color in a simple way in a step-by-step manner. You can also go through our other related articles to learn more –
