Updated April 1, 2023

Introduction to HTML Input Placeholder
HTML input placeholder work as a hint to a given element which helps to identify the required value of the given input field. This can be used for input textfield or textarea before the user is actually entering their input. It selects the value from the respective selector element included as a placeholder text and displayed it as a suggestion when the user enters the input into the input field. Placing placeholders into the input field makes it the user easy to enter the required value into the given input field. So it minimizes the user’s efforts. Basically, the placeholder is in lighter grey color, but we can also able to change its color by using some CSS properties.
Syntax:
Let’s see the syntax for the placeholder, how exactly it is going to be used in the input field.
<element placeholder="placeholder_text">The attribute for <textfield> and <textarea> element is placeholder. The placeholder is treated as some hint to the user to enter actual input value into the input field.
The placeholder can be styled by using some CSS code s follows:
::placeholder{
//CSS code;
}
The placeholder can be implemented by using features like contrast ratio which is describing that your placeholder color is lighter than the background of the input field, usability defines the text you are using as a placeholder must disappear whenever entering input in the input field.
By defining placeholders besides the input field is also treated as the best way of using a placeholder for the input field.
Those input fields are going to be used with some pseudo-classes like enabled, disabled, read-only, read-write, placeholder-shown, default, checked, indeterminate, valid, invalid, in-range, out-of-range, required, optional, blank, and more other classes also.
Like classes there are many attributes also going to be used like max, maxlength, min, minlength, pattern, required, step, type, etc.
Let’s see how placeholder going to be used with the input text:
<input type="text " placeholder="placeholder-text">This syntax is for simple input textfield, so you will help the user to add proper input into the input field by using the placeholder attribute. Placeholder–text is nothing but a suggestion about what actually the user is going to enter in this input field.
One another thing where we are using placeholder is input textarea. In this input field, we can suggest what exactly one can give as an input by using placeholder so it will be helpful for both people who are taking input for appropriate input value as well as for user who is entering input for better user experience.
<input type="textarea" placeholder="placeholder-text">There are two different things in the placeholder, one is :placeholder-shown which gives the meaning that selection of input is done when it’s through placeholder text which is available in the input field whereas another one is::placeholder which is used to give styles to the placeholder.
Placeholder doesn’t work as a title or label attribute or neither it’s treated as a replacement for both of them.
One can change the style of placeholder to display placeholder same in any browser, for this scenario we have to apply CSS code for the specific browser so it will display the same thing in each browser.
Examples of HTML Input Placeholder
Here are the following examples mentioned below.
Example #1
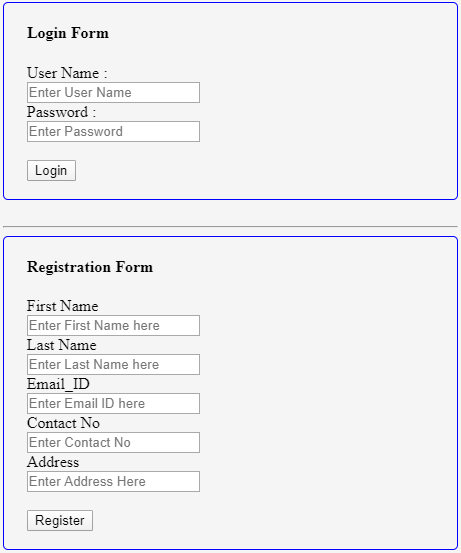
In this example we are going to create one Login form and one Registration form in which we are using a placeholder for all input field so HTML code and output for this is as follows:
Code:
<!DOCTYPE html>
<html>
<head>
<meta name="viewport" content="width=device-width, initial-scale=1">
<style>
.container {
padding: 2px 12px;
}
.card {
border: 1px solid blue;
border-radius: 5px;
padding-left: 5%;
}
</style>
</head>
<body >
<div class="card">
<h4>Login Form</h4>
<form action="#">
<label for="username">User Name : </label><br>
<input type="text" name="username" placeholder="Enter User Name"><br>
<label for="pw">Password : </label><br>
<input type="password" name="pw" placeholder="Enter Password" ><br><br>
<input type="submit" value="Login"><br><br>
</form>
</div>
<br><hr>
<div class="card">
<h4>Registration Form</h4>
<form>
<label for="fname">First Name</label><br>
<input type="text" name="fname" placeholder="Enter First Name here"><br>
<label for="lname">Last Name</label><br>
<input type="text" name="lname" placeholder="Enter Last Name here"><br>
<label for="email">Email_ID</label><br>
<input type="email" name="email" placeholder="Enter Email ID here"><br>
<label for="mobileno">Contact No</label><br>
<input type="number" name="fname" placeholder="Enter Contact No"><br>
<label for="address">Address</label><br>
<input type="textarea" name="address" placeholder="Enter Address Here"><br><br>
<input type="submit" value="Register"><br><br>
</form>
</div>
</body>
</html>
Output:
Example #2
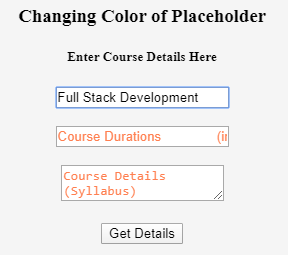
In this example, we are going to see how to change the color of the placeholder.
Code:
<!DOCTYPE html>
<html>
<head>
<title>Placeholder Color Demo</title>
</head>
<style>
::placeholder{
color: coral;
}
</style>
<body>
<center>
<h3> Changing Color of Placeholder </h3>
<h5>Enter Course Details Here</h5>
<form action="#">
<input type="text" name="cname" placeholder="Course Name">
<br> <br>
<input type="text" name="duration" placeholder="Course Durations
(in Months)">
<br> <br>
<textarea placeholder="Course Details (Syllabus)"></textarea>
<br><br>  <input type="submit" value="Get Details">
</form>
</center>
</body>
</html>
Output:
Example #3
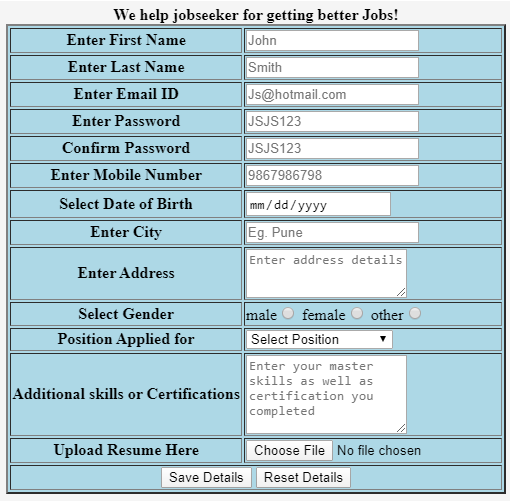
This is one more example of an HTML placeholder, which will work on the input field as well as on textarea also.
Code:
<html>
<head>
<title>HTML Placeholder</title>
</head>
<body>
<form >
<table border="2" align="center" width="500" bgcolor="lightblue" >
<caption><b>We help jobseeker for getting better Jobs!</b></caption>
<tr>
<th>Enter First Name</th>
<td><input type="text" name="fn" placeholder="John" required/></td>
</tr>
<tr>
<th>Enter Last Name</th>
<td><input type="text" placeholder="Smith" required/ ></td>
</tr>
<tr>
<th>Enter Email ID</th>
<td><input type="email" placeholder="Js@hotmail.com" required/></td>
</tr>
<tr>
<th>Enter  Password</th>
<td><input type="password" placeholder="JSJS123" required/></td>
</tr>
<tr>
<th>Confirm Password</th>
<td><input type="password" placeholder="JSJS123" required/></td>
</tr>
<tr>
<th>Enter Mobile Number</th>
<td><input type="number" placeholder="9867986798" required/></td>
</tr>
<tr>
<th>Select Date of Birth</th>
<td><input type="date" placeholder="30-04-1994"/></td>
</tr>
<tr>
<th>Enter City</th>
<td><input type="city" placeholder="Eg. Pune"/></td>
</tr>
<tr>
<th>Enter Address</th>
<td><textarea rows="3" cols="20" placeholder="Enter address details"></textarea></td>
</tr>
<tr>
<th>Select Gender</th>
<td>
male<input type="radio" name="g" />
female<input type="radio" name="g" />
other<input type="radio" name="o"/>
</td>
</tr>
<tr>
<th>Position Applied for</th>
<td>
<select name="position">
<option value="" selected="selected" disabled="disabled">Select Position</option>
<option value="1">.NET Developer</option>
<option value="2">UX-UI Designer</option>
<option value="3">Full Stack Developer</option>
<option value="4">Digital Marketing</option>
</select>
</td>
</tr>
<tr>
<th>Additional skills or Certifications</th>
<td><textarea rows="5" cols="20" placeholder="Enter your master skills as well as certification you completed"></textarea></td>
</tr>
<tr>
<th>Upload Resume Here</th>
<td><input type="file"/ ></td>
</tr>
<tr>
<td colspan="2" align="center"><input type="submit" value="Save Details"/>
<input type="reset" value="Reset Details"/>
</td>
</tr>
</table>
</form>
</body>
</html>
Output:
Conclusion
From all the above information, we can say that an HTML placeholder is nothing but a kind of related text, suggestion, or hint into the input field like text input field or textarea. So the user can catch things easily from the placeholder and give appropriate input into the input field.
Recommended Articles
This is a guide to HTML Input Placeholder. Here we discuss the Examples of HTML Input Placeholder along with the codes and outputs. You may also have a look at the following articles to learn more –


