Updated April 7, 2023

How to Install Kafka?
Kafka is a distributed streaming platform. It helps in publishing and subscribing to streams of records. Kafka is usually used for building real-time streaming data pipelines that reliably get data between different systems and applications. It can also help build real-time streaming applications that help transform or make changes with the streams of data. Kafka enables to store of streams of records in different categories called topics. Each record consists of a key, a value, and a timestamp. It has four major components like Producer API, Consumer API, Streams API, and Connector API. It uses the TCP protocol, which is good communication between clients and servers with high performance. In order to install Kafka, the following steps can be followed.
Install Kafka on Windows OS
For installing Kafka on Windows, follow the below steps:
Step 1: Download Zookeeper from the following link: HTTP: //zookeeper.apache.org/releases.html
Once this is done, download Kafka from following the link: https://kafka.apache.org/downloads.html.
Also, download JRE as per your operating system and CPU architecture from the below link: https://www.oracle.com/java/technologies/downloads/#java8.
Step 2: JDK Setup
Start JRE Installation and then click on the ‘Change Destination folder’ checkbox. Now, click on Install.
Once this is done, change the directory to any path without spaces in the folder name.
Step 3: Once this is done open the environment variables from Control Panel -> System -> Advanced system settings -> Environment variables.
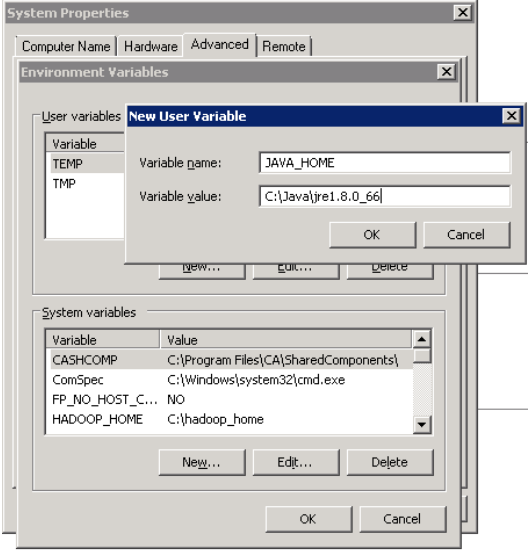
Step 4: Click on New User Variable in the User Variable tab and then type JAVA_HOME in the variable name. Enter your JRE path in the Variable value section.
It should be as below:
Step 5: Now click on, OK.
Step 6: Search a path variable in the System Variable’ section in the “Environment Variable” dialogue box, which is opened.
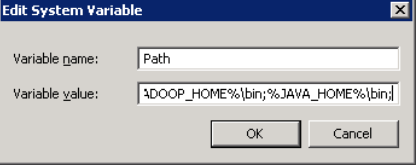
Step 7: Edit the path and type “;%JAVA_HOME%\bin” at the end of the text already written there, just like the image below:
Step 8: To check if Java is installed properly, go to Command Prompt and type ‘java – version’. The version of Java that is installed will be displayed on the screen.
If you see the above details on the command prompt, then you are good from the Java side.
Once Java is installed, you can now move to get the setup of Zookeeper done.
Install Zookeeper:
Follow the below steps to get Zookeeper installed on your system:
- Open the directory where the Zookeeper config directory is there. It can be C:\zookeeper-3.4.7\conf.
- Now rename file “zoo_sample.cfg” to “cfg”
- Open this renamed file in Notepad.
- Find and edit the following: dataDir=/tmp/zookeeper to \zookeeper-3.4.7\data.
- Just like we added an environment variable for Java, add an environment variable for Zookeeper.
- Set the system variable path as: dataDir=/tmp/zookeeper to :\zookeeper-3.4.7\data
- Edit the system variable named ‘Path’ and add; %ZOOKEEPER_HOME%\bin;
- The default port for Zookeeper is 2181, which can be changed to any other port by going to the zoo.cfg file.
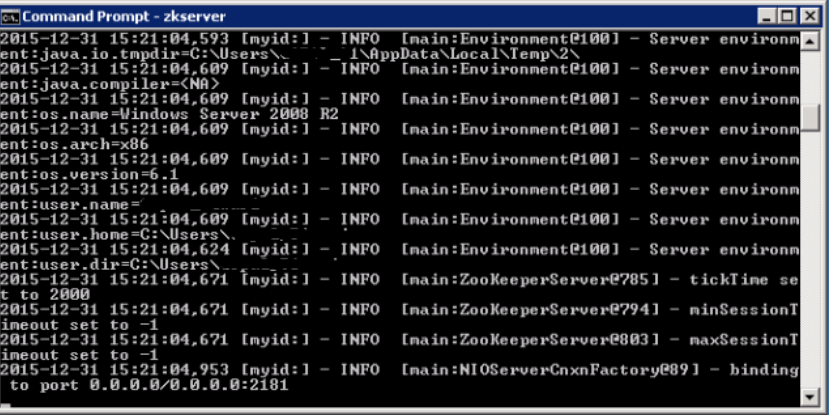
- Run Zookeeper by opening a new cmd and type ‘zkserver’. You will see the below details.
Once you see this screen, you should be sure that Zookeeper has been installed successfully.
Setting up Kafka:
Once you have Java and Zookeeper up and running on your system, you can go ahead to set up Kafka.
- Go to Kafka config directory.
- Edit the file “server.properties”.
- Once this is done, you can find and edit the line where you see: dirs=/tmp/Kafka-logs to “log.dir= C:\kafka_2.11-0.9.0.0\kafka-logs
- If you have your Zookeeper running on some other machine, then you can change this path to “zookeeper.connect:2181” to a customized IP and port id.
- The default port for Kafka is port 9092, and to connect to Zookeeper, it is 2181.
Running a Kafka Server:
Once the initial setup is done, you can easily run a Kafka server.
Before running the Kafka server, one must ensure that the Zookeeper instance is up and running.
1. Go to Kafka installation directory: C:/kafka_2.11-0.9.0.0
2. Open the command prompt, and press Shift+right click and choose the ‘Open command window here option.
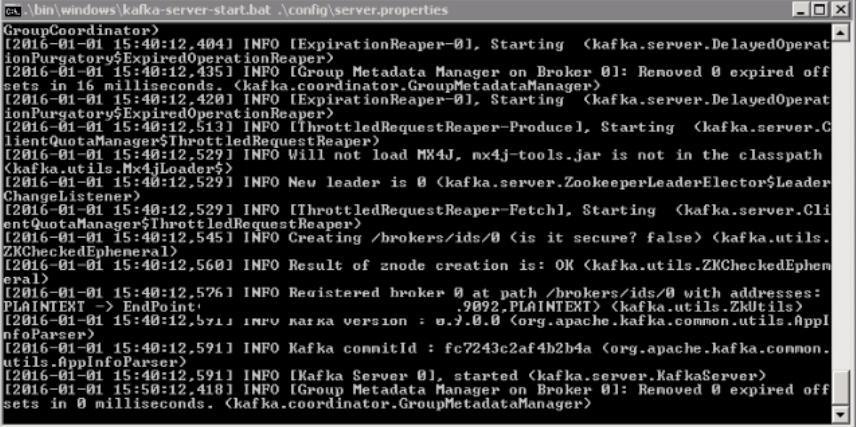
3. Now type .\bin\windows\kafka-server-start.bat .\config\server.properties and press Enter.
Once you run this and everything is fine, then your screen should look as below:
4. Now, your Kafka server is up and running. You can create your own topics to store different messages. Once this is done, you can produce and consume Java or Scala code data or directly run from a command prompt.
Install Kafka on Linux
Follow the steps below to install Kafka on Linux:
Step 1: Download and extract Kafka binaries and store them in directories.
Step 2: Extract the archive you download using the tar command.
Step 3: To configure Kafka, go to server.properties. Open this file using the nano command and add the following at the bottom of the file.
Code:
nano ~/Kafka/config/server.propertiesdelete.topic.enable = trueStep 4: Once this is done, the user will have to create system unit files for Kafka services. This helps perform common service actions like starting up, stopping, and consistently restarting Kafka with other Linux services. Zookeeper is a service that Kafka uses in order to manage its cluster and configurations.
Step 5: To create a unit file for Zookeeper follows below:
Code:
sudo nano /etc/systemd/system/zookeeper.serviceStep 6. Once this zookeeper file is created, paste below in it:
Code:
[Unit]
Requires=network.target remote-fs.target
After=network.target remotefs.target
[Service]
Type=simple
User=kafka
ExecStart=/home/kafka/kafka/bin/zookeeper-server-start.sh /home/kafka/kafka/config/zookeeper.properties
ExecStop=/home/kafka/kafka/bin/zookeeper-server-stop.sh
Restart=on-abnormal
[Install]
WantedBy=multi-user.target
This [Unit] section here specifies that Zookeeper requires networking and filesystem to be ready before it can start.
The [Service] section lets the system know that zookeeper-server-start.sh and zookeeper-server-stop.sh files are present for starting and stopping the services.
Step 7. Now the user should create a system file for Kafka as below:
Code:
sudo nano /etc/system/system/Kafka.serviceStep 8. In this file, paste below:
Code:
[Unit]
Requires=zookeeper.service
After=zookeeper.service
[Service]
Type=simple
User=kafka
ExecStart=/bin/sh -c '/home/kafka/kafka/bin/kafka-server-start.sh
/home/kafka/kafka/config/server.properties >
/home/kafka/kafka/kafka.log 2>&1'
ExecStop=/home/kafka/kafka/bin/kafka-server-stop.shRestart=on-abnormal
[Install]
WantedBy=multi-user.target
Here the [Unit] specifies that the unit file is dependent on zookeeper.service. This ensures that the zookeeper is started before Kafka starts.
Step 9: You now need to enable Kafka and reboot the server. Run: sudo systemctl enable Kafka.
Step 10: Testing Installation.
You can test your Kafka Installation by creating a topic and then publishing it to consumers.
Create a topic by: ~/Kafka/bin/Kafka-topics.sh –create –zookeeper localhost:2181 –replication-factor 1 –partitions 1 –topic TutorialTopic.
Post this; the user can create producers and consumers and then publish any data on specific topics.
Recommended Articles
We hope that this EDUCBA information on “Install Kafka” was beneficial to you. You can view EDUCBA’s recommended articles for more information.


