Updated September 1, 2023
Introduction to Linux- Installation
Linux is an open-source and free operating system to install, which allows anyone with programming knowledge to modify and create their operating system as per their requirements. Over many years, it has become more user-friendly.
Table of Contents
- Introduction to Linux- Installation
- Popular Linux Distributions and Features
- How to Install Linux Using Virtual Box VMWARE?
- Factors to Consider while Selecting a Distribution
- Prepare to Install Linux
- Configuring Boot Settings
- Post-Installation Tasks of Linux
- Troubleshooting Common Issues in Linux
Popular Linux Distributions and Features
Here are some well-known Linux distributions and some of their standout features:
- Ubuntu: Ubuntu is renowned for its simple installation process and user-friendly interface. It provides a wide variety of software programs and greatly emphasizes community support. Long-term support (LTS) versions of Ubuntu are also available for consistency and dependability.
- Fedora: Fedora strongly emphasizes using the most recent software features and technologies. Fedora is a testing ground for Red Hat Enterprise Linux and is renowned as a cutting-edge distribution. It promotes open-source software and incorporates SELinux for enhanced security.
- Debian: Debian has a reputation for being reliable and stable. It supports several hardware architectures and has a sizable package repository. Debian has several release branches, including stable, testing, and unstable, and adheres strictly to free and open-source software principles.
- CentOS: A free and community-driven reconstruction of RHEL is what CentOS intends to be. It is noted for its stability, security, and long-term support. CentOS is commonly used in server environments and offers a consistent experience similar to RHEL.
How to Install Linux Using Virtual Box VMWARE?
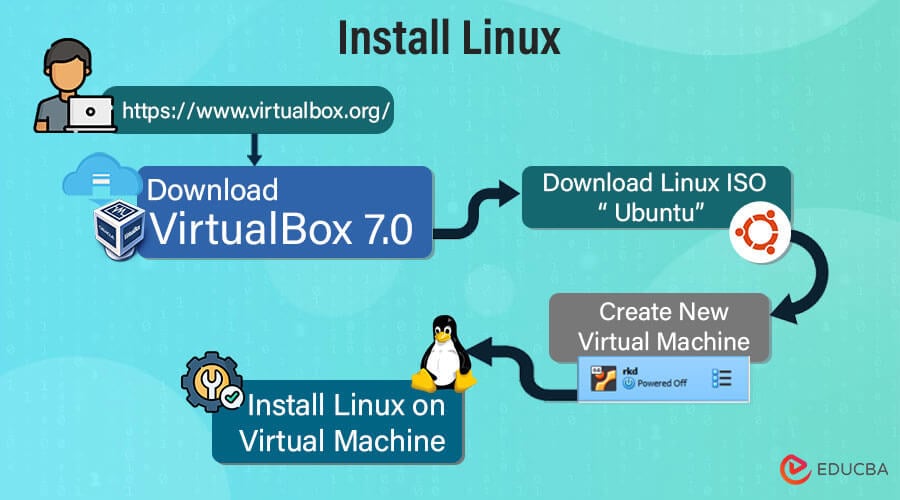
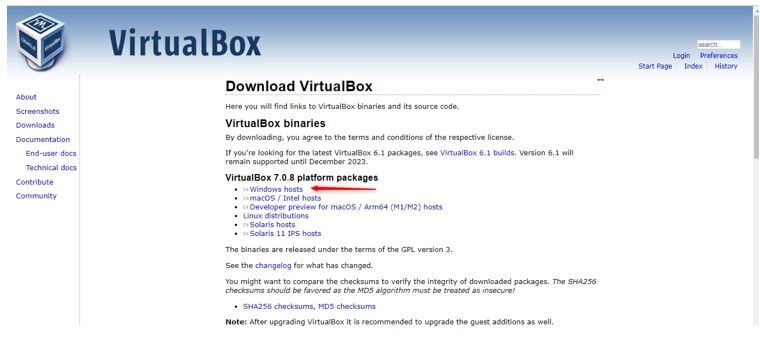
To install Linux, first, we have to install the virtual box, for that go to the official Oracle VirtualBox website at https://www.virtualbox.org/
A “Downloads” section can be found on the homepage. Click on it.
You’ll be taken to the “VirtualBox Downloads” page. On this website, you may download the most recent version of VirtualBox for various operating systems. Choose the version that is agreeable to the operating system. For example, if you’re using Windows, select the Windows version. Once you’ve decided on a version, click the “Download” button to download the VirtualBox installation.
Once the download is complete, locate the downloaded file on the computer and double-click on it to begin the installation process.
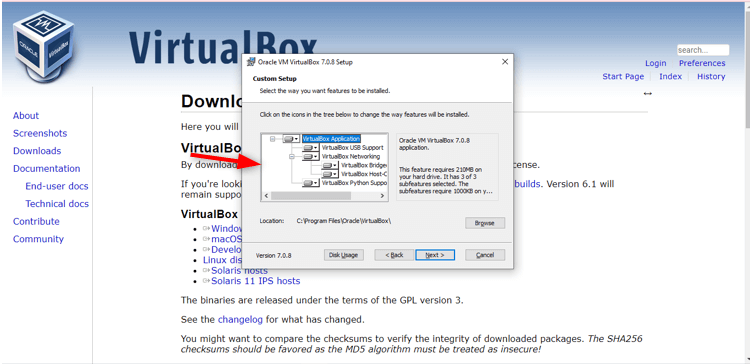
The “Custom Setup” box contains numerous options for installing VirtualBox on your Windows PC. To proceed with the installation using the recommended options, ensure all the checkboxes are ticked. These options often involve creating desktop shortcuts and adding shortcuts to the quick launch bar, which are useful for gaining quick access to VirtualBox. Click on the next button to proceed.
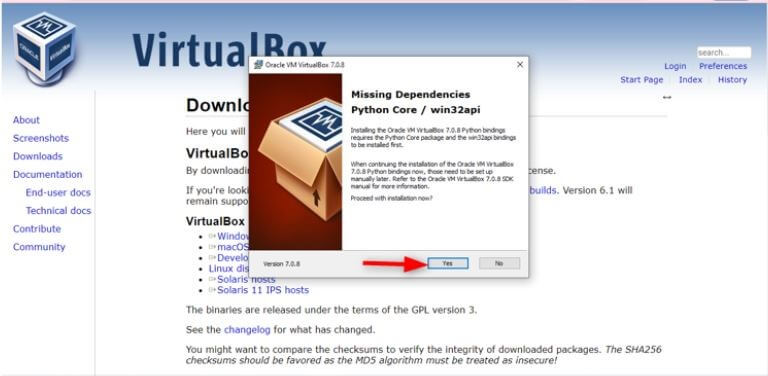
After that, Click on Yes.
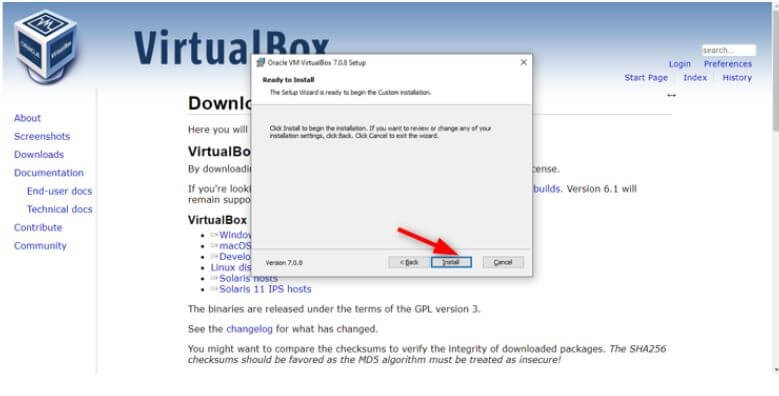
The installation process of Virtual Box will start after you click on the Install button.
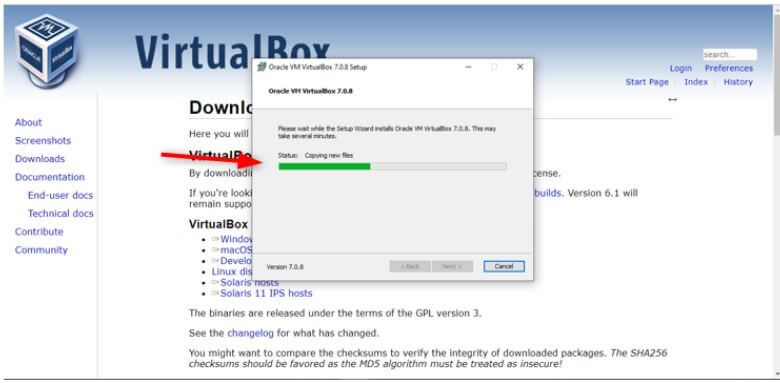
You can see that the virtual box installation process has started, and you must wait until the installation is finished.
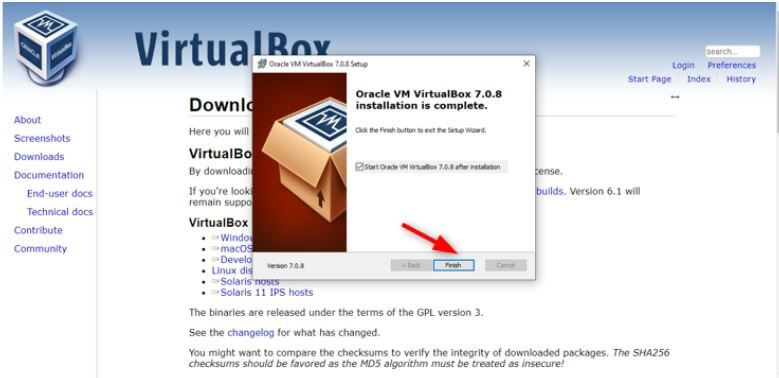
You can see that the virtual box icon is created, and after a few seconds, you will see a message that says Oracle virtual box installation is complete. Leave this checkbox as checked, which will launch the Virtual box, and then click on finish.
You can see the virtual box is installed successfully.
Now we want to download Ubuntu. To do so, follow these steps:
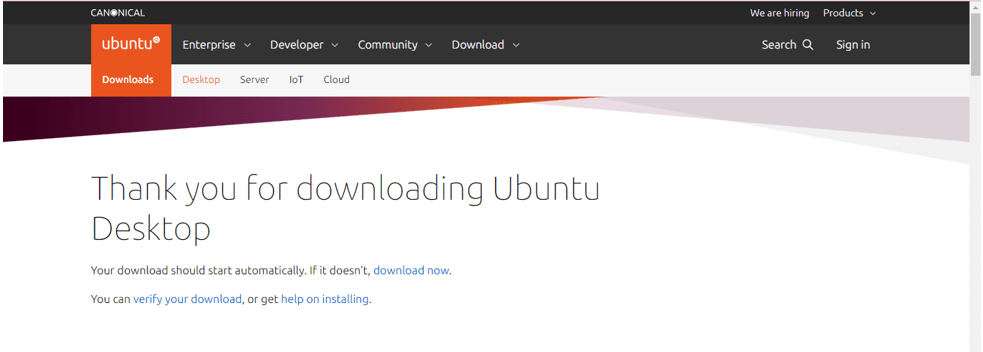
Go to the Ubuntu website in your web browser: https://ubuntu.com/download/desktop
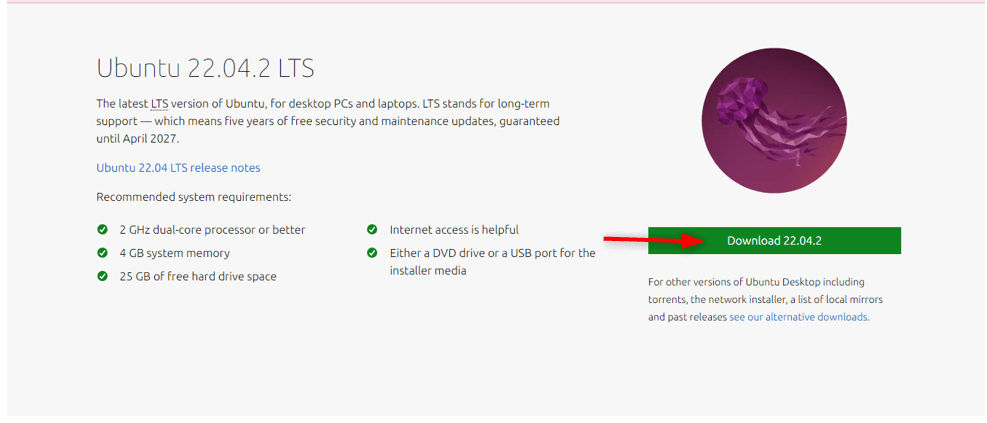
The current version is available for download on the Ubuntu Desktop download page. To download the Ubuntu desktop ISO file, click the “Download” button. The download may take time, depending on your internet connection speed.
When the download is finished, you will have the Ubuntu ISO file on your PC.
Launch VirtualBox on your machine. You can find the VirtualBox icon on your desktop or in the Start menu. When VirtualBox is open, click the “New” button. This will launch the virtual machine creation wizard.
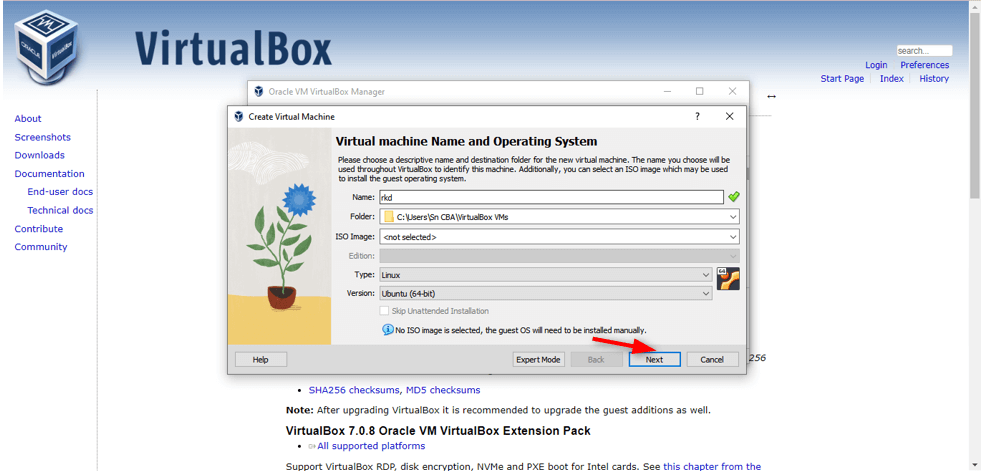
You must give your virtual machine a name in the “Create Virtual Machine” window. You mentioned naming it “rkd.”
Then, choose the operating system type and version. Because you’re installing Ubuntu, select “Linux” as the type and “Ubuntu (64-bit)” as the version. To proceed, after selecting the type and version, click the “Next” button.
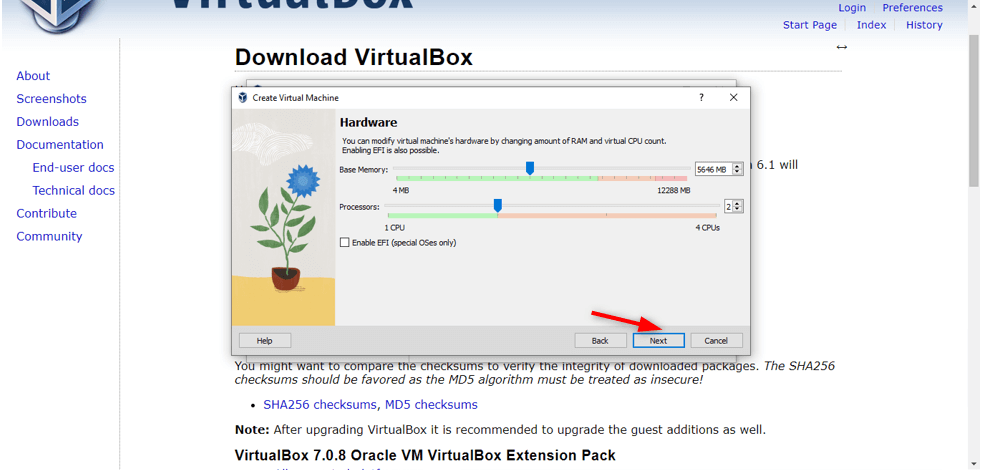
The wizard will prompt you to allocate memory (RAM) to the virtual machine. The recommended value is usually sufficient, but you can change it to suit your system’s capabilities.
Click “Next” to go to the next step.
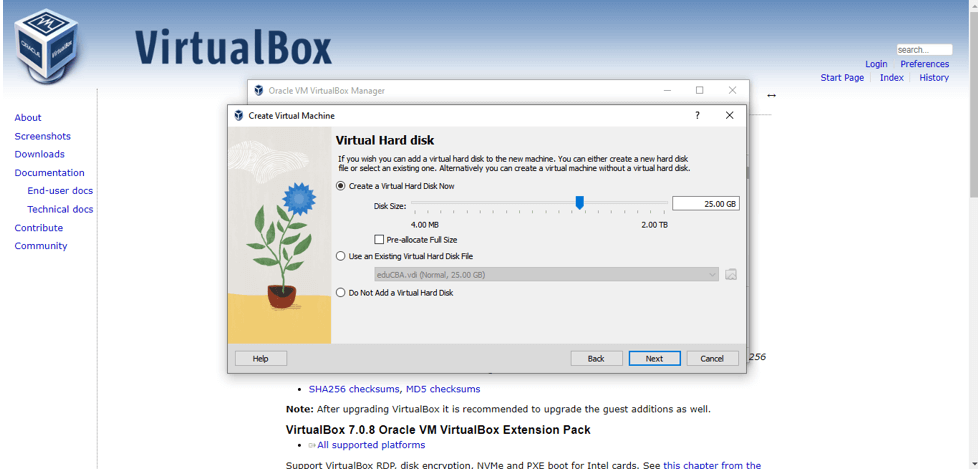
You will now be asked to create a virtual hard disk. Select “Create a virtual hard disc now” and press “Next”.
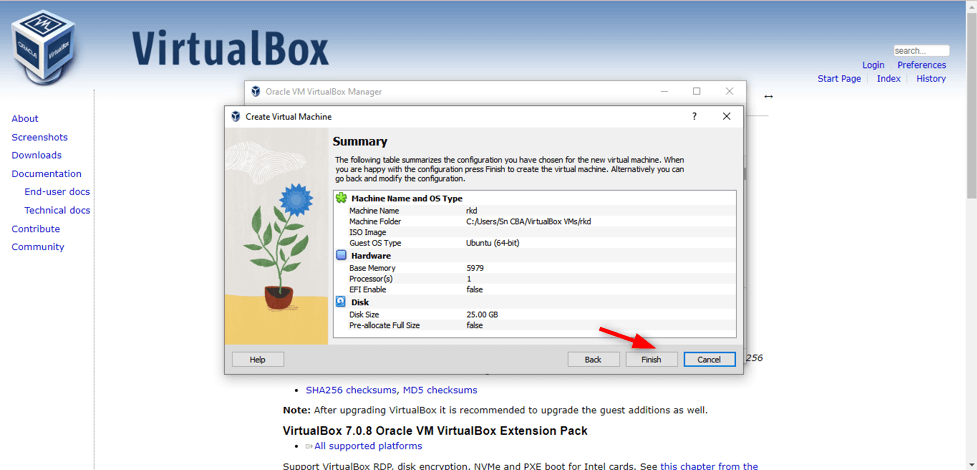
If everything seems correct, you can proceed with the final steps to complete the installation:
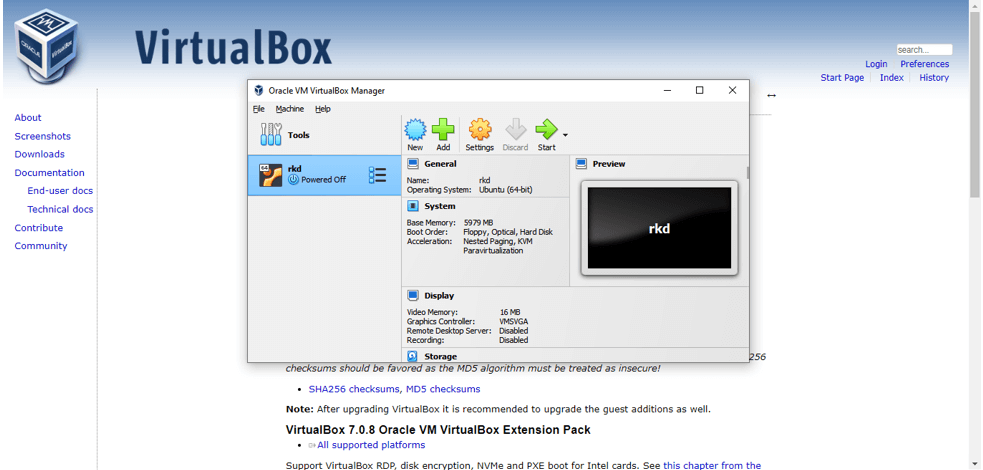
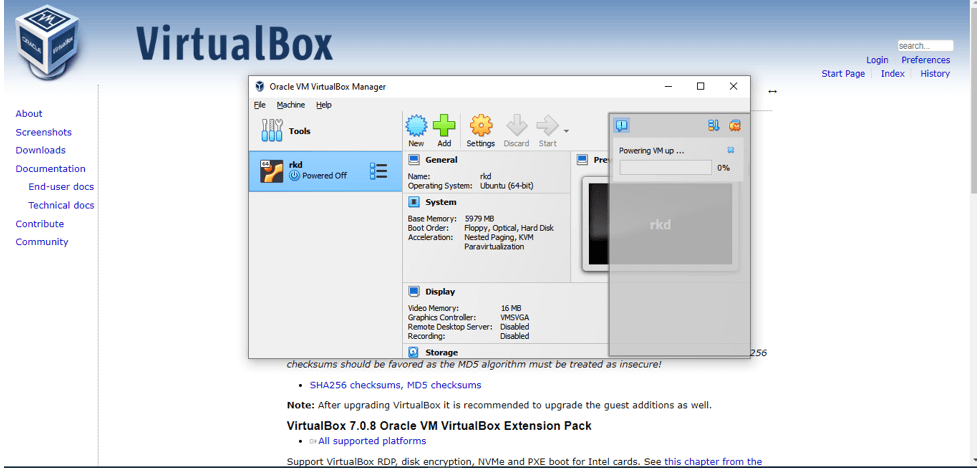
Congratulations! You’ve created a new virtual machine called “rkd,” a 64-bit Linux computer in VirtualBox. By attaching the Ubuntu ISO file and launching the virtual system, you can now use it to install Ubuntu. Now click on the Start button.
This task will require some time to complete, so we must be patient and wait until it’s finished.
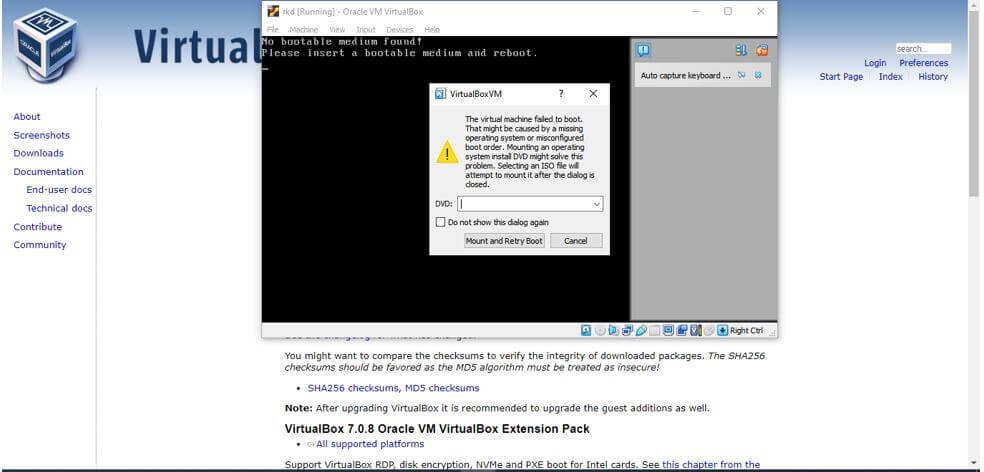
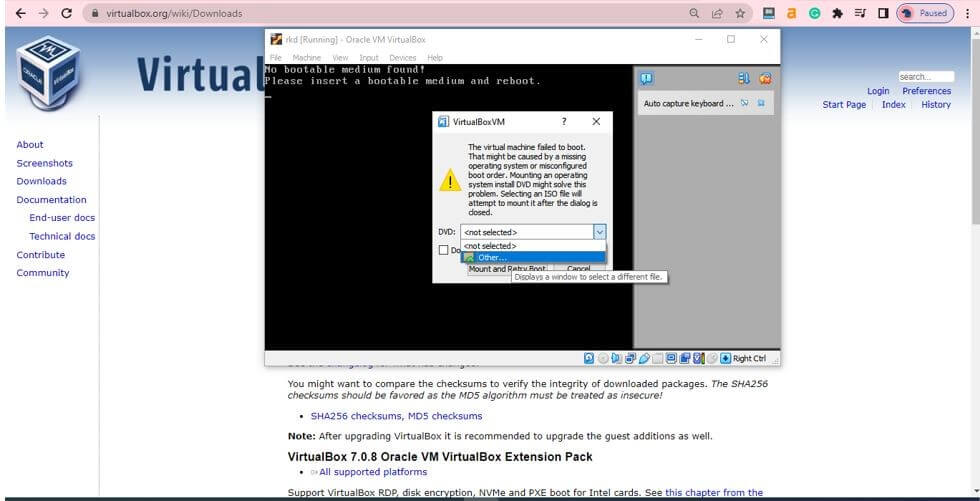
After that, a pop will come, and then we can open and select the Ubuntu file we downloaded.
For that, we must click the dropdown button and select Others.
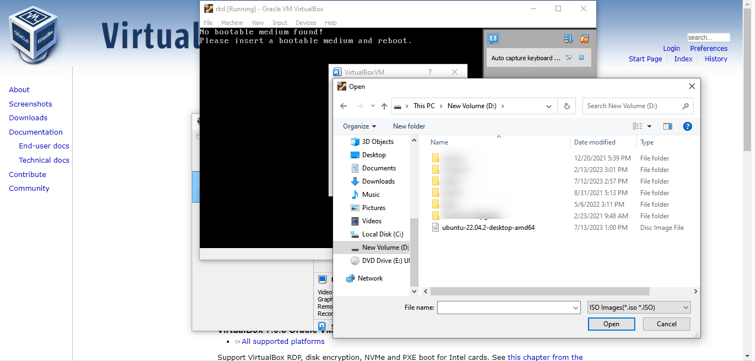
Navigate to the location on your computer where you downloaded the Ubuntu ISO file, select it, and then click the “Open” button.
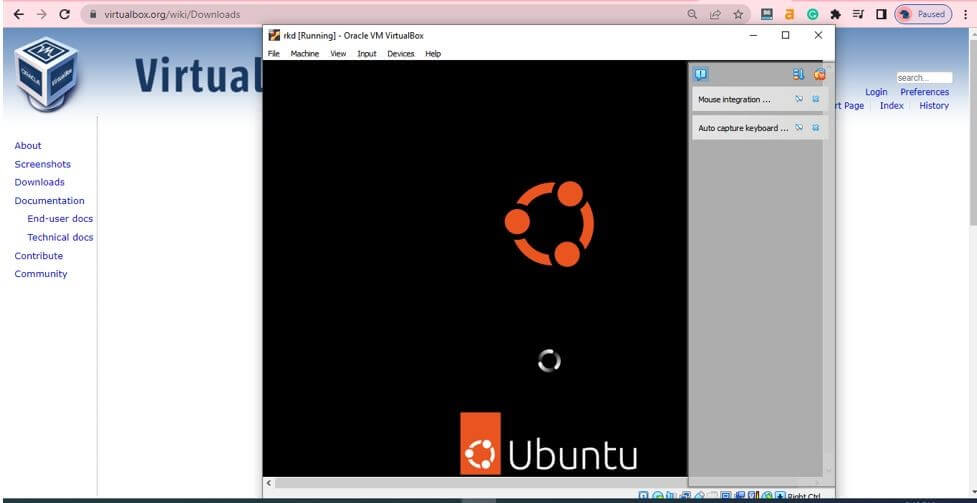
Now the virtual machine will boot from the Ubuntu ISO file, and the installation of Ubuntu begins.
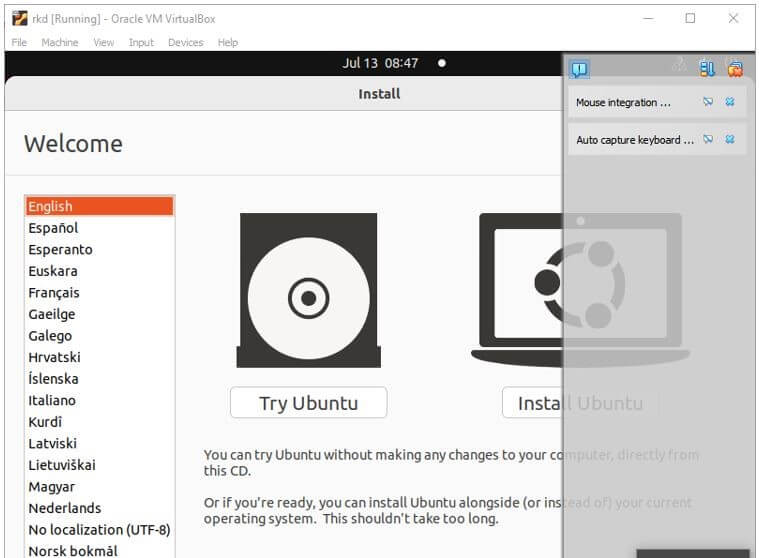
A window has appeared. Please select “Install Ubuntu” by clicking on it.
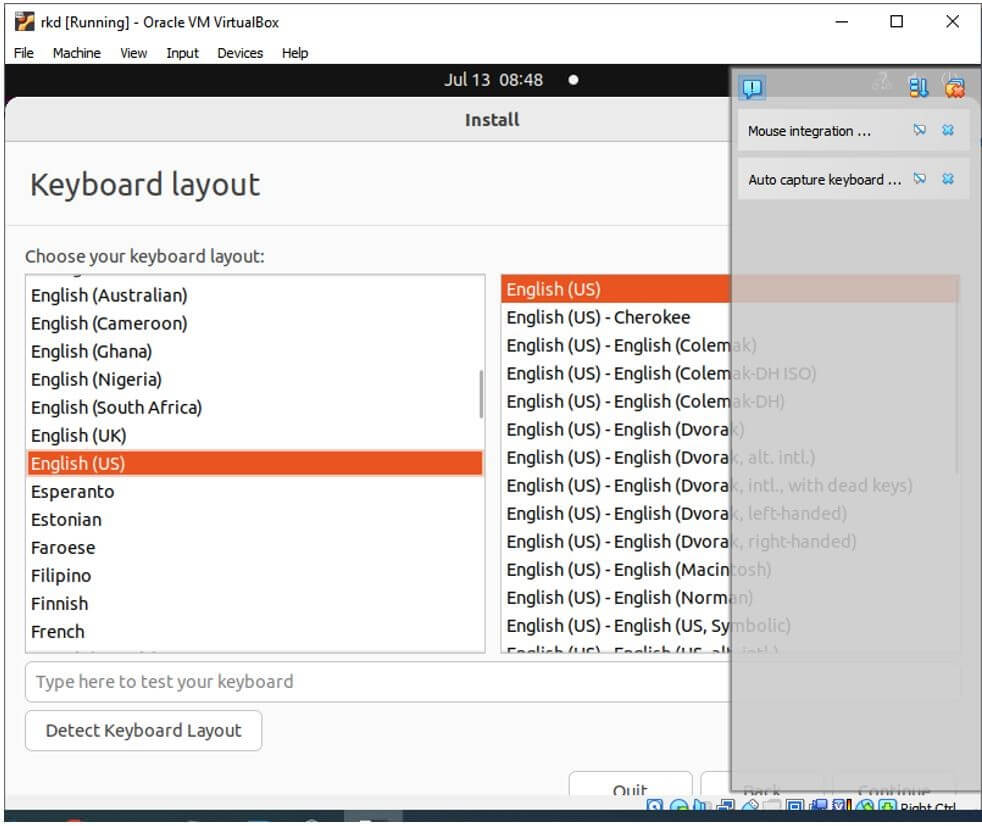
Once the “Install Ubuntu” option is chosen, you’ll be prompted to select a language. In this case, you can choose “English (US)” as your preferred language.
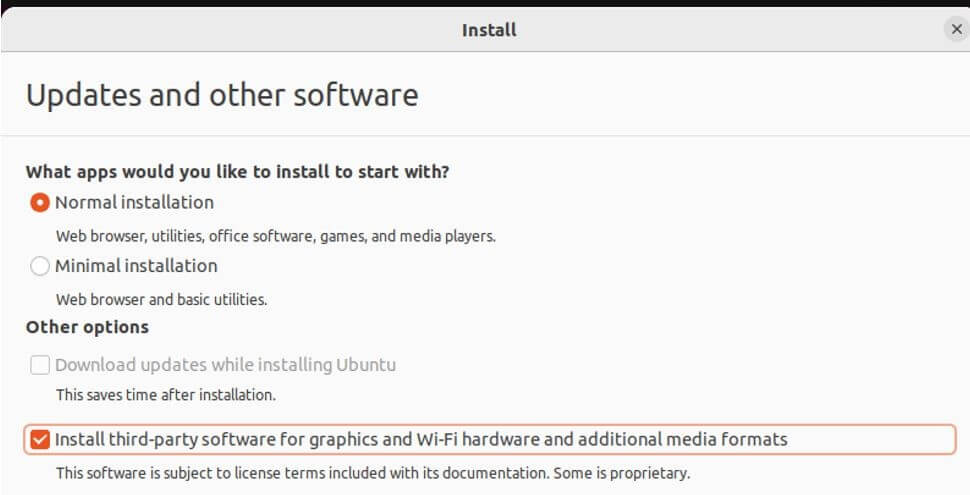
Please click the “Install 3rd party software” option and proceed by clicking “Continue.”
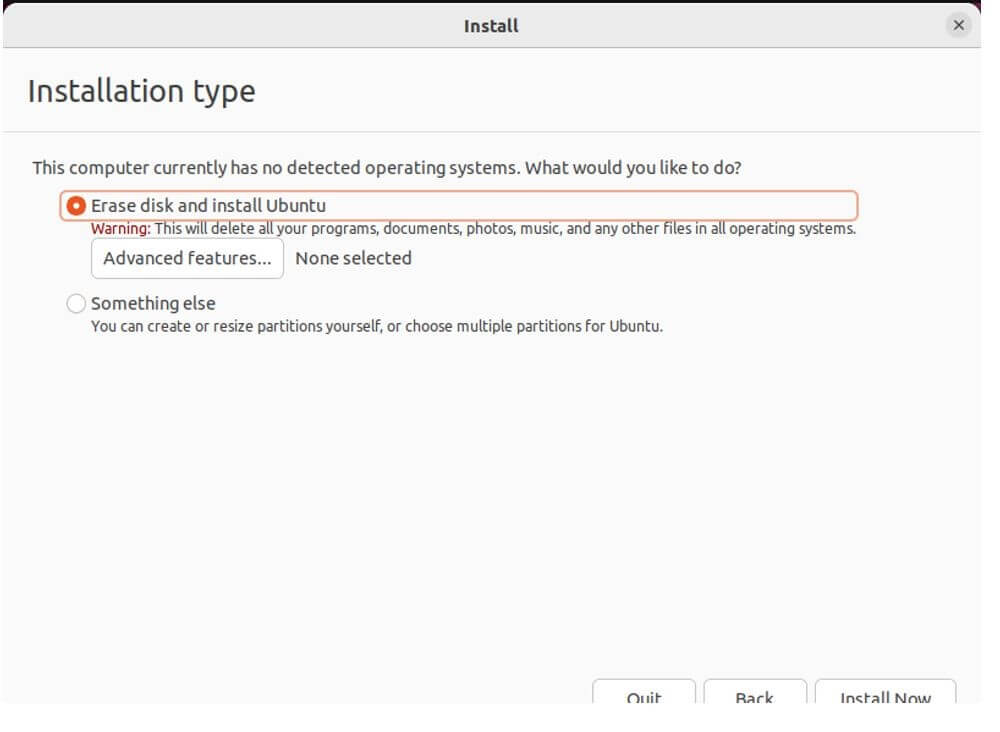
Now, choose the “Erase Disk and Install Ubuntu” option. Don’t worry; this won’t affect your Windows installation, as you install Ubuntu in your created virtual machine. Now click on “Install Now” to proceed.
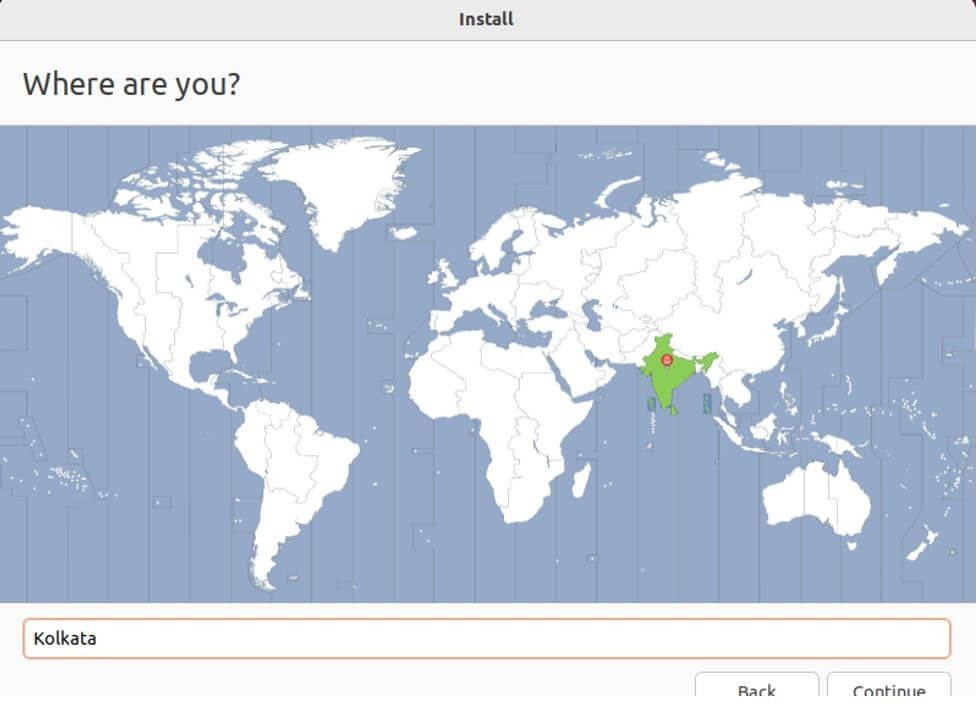
After clicking “Install Now,” continue with the installation process by clicking “Continue.” Next, you’ll be prompted to select your time zone. Please choose the appropriate time zone for your location.
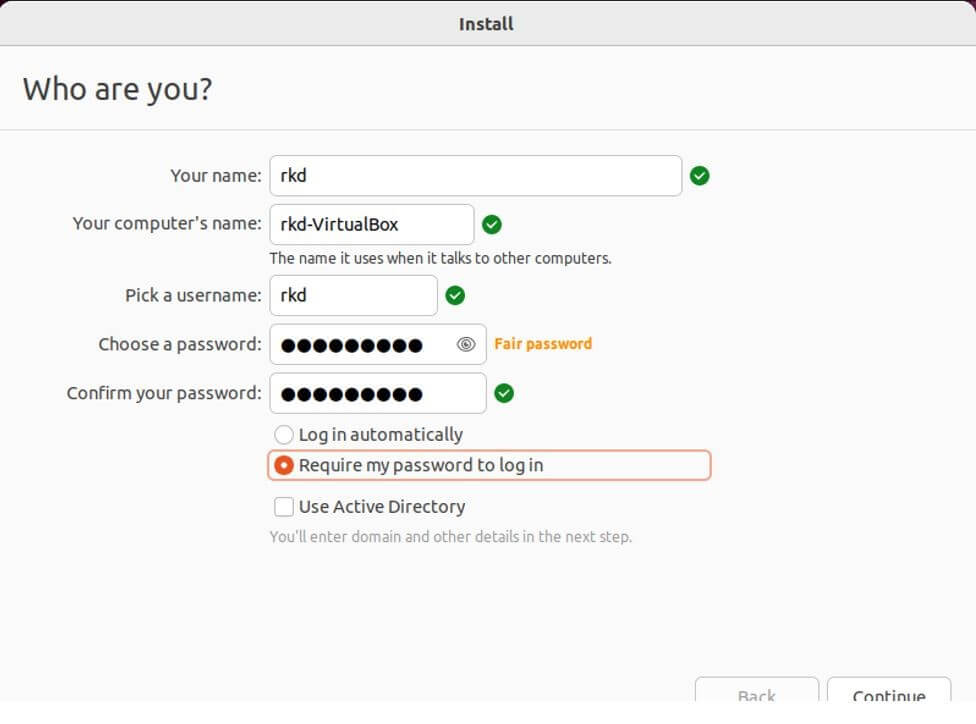
Enter your desired user name and fill in all the necessary details as required during the setup. If you wish to have a password for added security each time you log in to your Linux machine, select the option to set a password. Alternatively, you can log in automatically if you prefer not always to enter a password. Once you’ve chosen, click the “Login” or “Continue” button to proceed with the installation process.
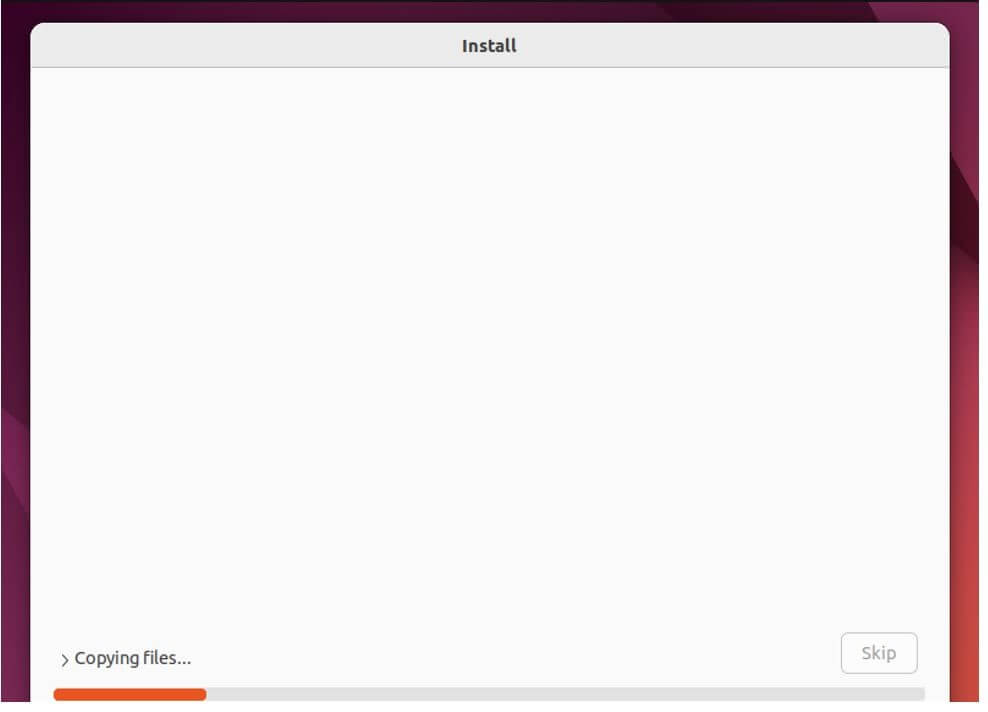
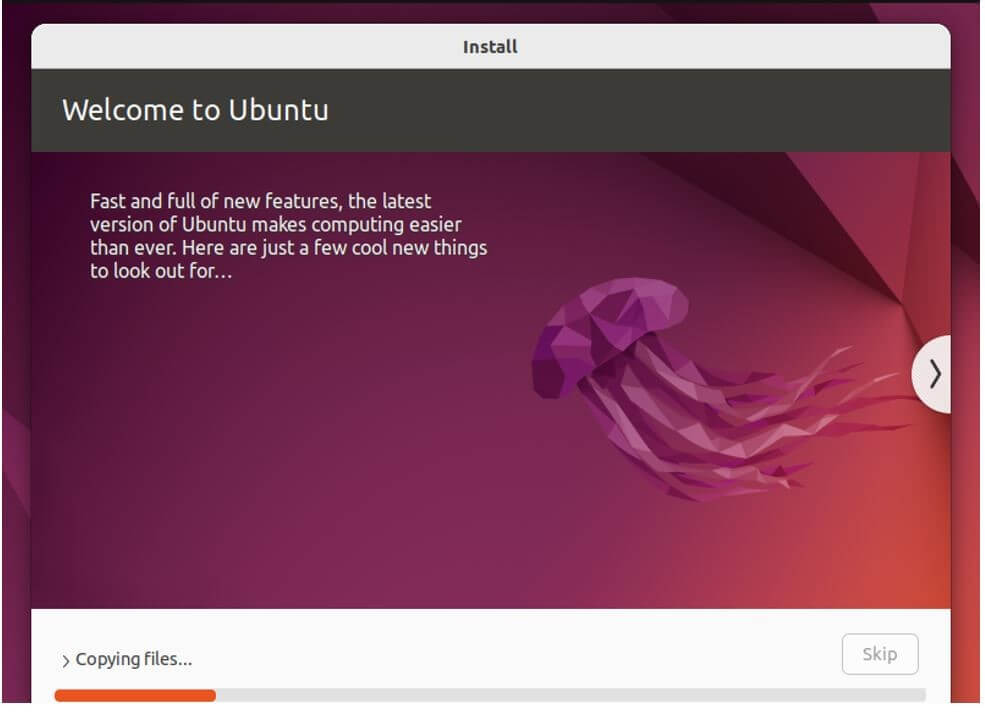
Indeed, specific steps during the installation process may take some time to complete. Being patient and allowing the installation to proceed without interruption is essential. The exact time required can depend on your system’s specifications and the complexity of the installation. So, please let the process run its course until it finishes successfully.
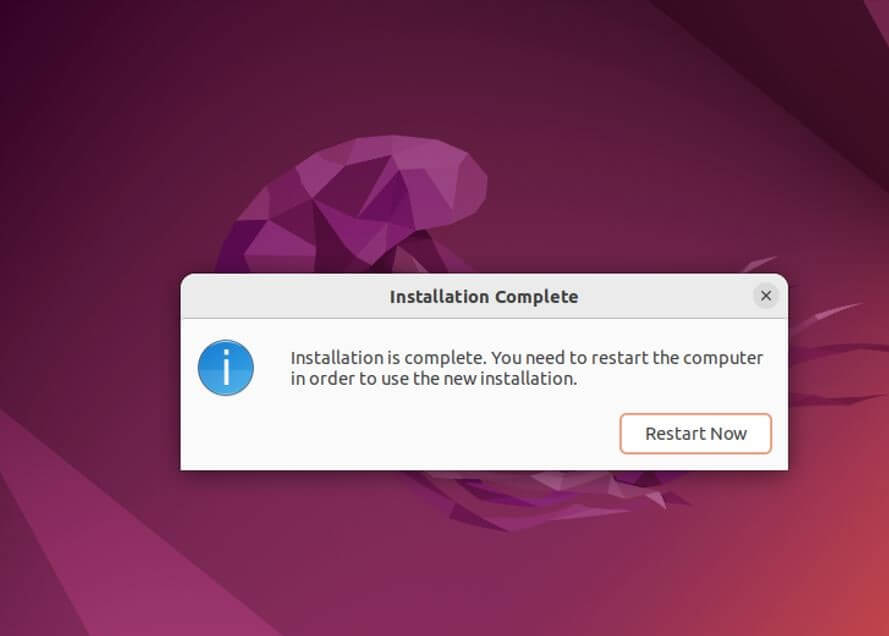
The installation is now complete. After the successful installation, you will receive a prompt to restart your computer. Please restart your system to finalize the Ubuntu setup and begin using your newly installed operating system.
Factors to Consider while Selecting a Distribution
When selecting a Linux distribution, there are various variables to consider.
- Purpose: Determine the objective of your Linux installation. Are you creating a server, a desktop workstation, a multimedia system, or a development environment? Different distributions are optimized for specific use cases, so choosing one that aligns with your intended purpose is crucial.
- User-Friendliness: Consider your level of experience with Linux. If you are new to Linux, you may choose a distribution with a user-friendly interface, substantial documentation, and a helpful community. Look for distributions that offer intuitive installation processes and give a smooth transition from other operating systems.
- Hardware Compatibility: Check the hardware requirements and compatibility of the distribution. Some distributions may operate better with specific hardware setups or have superior driver support for certain components. Ensure that your hardware is compatible with the distribution you selected.
- Package Management: Consider the package management system of the distribution. Package managers handle program installation, updates, and dependency management. Different distributions utilize different package managers, such as APT (Debian-based), Pacman (Arch-based), or Zypper (openSUSE). Consider the package management system’s simplicity of use, availability of software packages, and community support.
Prepare to Install Linux
To prepare for installing Linux on your computer, follow these steps:
- Backup Your Data: Back up any vital data from your current operating system before installing it.
- Check the System Requirements: Review the Linux distribution’s requirements. Ensure your computer complies with the hardware requirements for a smooth installation and top performance.
- Choose a Distribution: Research the Linux release that best meets your requirements and tastes. Consider usability, hardware compatibility, software packages, and community support.
- Create Installation Media: Use the downloaded ISO image to create a bootable installation media. You can make a USB flash drive or burn the ISO to a DVD using programs like Etcher, Rufus, or UNetbootin.
Configuring Boot Settings
The boot settings, which control how your machine starts up and which operating system it boots into, can be customized when installing Linux.
1. Accessing BIOS or UEFI Settings
Follow these general steps to access the BIOS or UEFI settings:
- Wait for the manufacturer’s logo to appear on the screen before starting or restarting your computer. The key you must press to access the BIOS or UEFI settings is often displayed in the logo. F2, F10, Del, or Esc are often used keys. The precise key may change depending on the maker and type of your computer.
- Once you’ve found the right key, press it repeatedly while the computer is starting up until the BIOS or UEFI settings screen appears. Remember to press the key quickly to prevent the operating system from loading.
- Use your keyboard’s arrow keys to navigate the BIOS or UEFI settings. Depending on the maker of your computer, the precise layout and options could change.
- Look for a boot priority or order-related option. The word “Boot,” “Boot Options,” “Boot Sequence,” or another similar term might be used to describe it. Make this your choice.
- You will normally see a list of devices the computer may boot from inside the boot choices. Make your Linux installation media’s storage device (such as a USB drive) the default first boot option. By choosing the device and using the appropriate keys (often +/- or F5/F6) to move it up or down in the boot order you might need to do so.
- Exit the BIOS or UEFI settings after saving the modifications. Typically, this procedure is carried out by pressing the “F10” key or adhering to the on-screen directions. After that, your computer will restart and start up using the installation DVD for Linux. To install Linux, adhere to the on-screen directions.
2. Changing Boot Order
To change the boot order while installing Linux, you can follow these steps:
- During startup, you can start or restart your computer and access the BIOS or UEFI settings by pressing the proper key (such as F2, F10, Del, or Esc). The precise key may change depending on the maker of your machine.
- Go to the “Boot” or “Boot Order” section after entering the BIOS or UEFI settings. Depending on your system, the location and nomenclature might differ slightly.
- You may view a list of devices from which the computer can boot in the boot order settings. The alternatives include your hard disc, USB devices, a CD/DVD drive, and perhaps network boot choices.
- Put the USB drive or DVD that holds your Linux installation media at the top of the boot order after locating it. This ensures that you use the Linux installation CDs to boot the computer first.
- The +/- or F5/F6 keys are typically used to change the boot sequence. Move the Linux installation media-containing device to the top after selecting it.
- Save the changes made and exit the BIOS or UEFI settings. Save the changes using the “F10” key or following the on-screen directions. Your computer will boot using the Linux installation DVD as soon as it restarts. The installation procedure will then begin.
3. Saving and Exiting BIOS/UEFI Setting
- Navigate to the exit choices after making the appropriate modifications to the BIOS or UEFI settings. Depending on your system, the position of these options may differ, but they are normally located in a different tab or menu.
- Attempt to find a button that says “Exit,” “Exit and Save Changes,” or “Save and Exit Setup.” Choose this option to save your changes and leave the BIOS or UEFI settings.
- You might be prompted with a confirmation message asking if you want to save the changes. Select “Yes” or “Save” to accept and go.
- Then your computer will restart and boot using the new configurations you choose. The computer should boot from the Linux installation media and begin the Linux installation process if you have made that media the top boot priority.
After the machine resumes, don’t forget to remove the Linux installation media (such as a USB drive or DVD).
Post-Installation Tasks of Linux
You might wish to perform a few post-installation procedures to customize and optimize your machine after installing Linux. Here are some typical chores you might want to think about:
1. Update System Packages: It’s essential to upgrade system packages to ensure you receive the most recent security updates and bug fixes. Use the package manager created for your distribution (apt, dnf, or pacman) to update the packages.
For instance, you can use Ubuntu’s following command:
Sudo apt update && sudo apt upgrade
2. Install Additional Software: Install any extra programs or bundles required for your particular workflow or preferences. This could be any particular apps you need, such as productivity tools, media players, development environments, etc. Most distributions offer package managers for simple software installation from their repositories.
3. Configure User Accounts: Create user accounts and set user privileges under your needs. If more users are required, create new user accounts and modify access or permissions as necessary. Ascertain that each user has a strong password.
4. Set Up and Configure Network Connections: Establish and configure any wired, wireless, or VPN connections to your network. You can enable or stop network services, configure firewall rules, and configure your network settings to connect to the internet.
5. Desktop Environment Customization: Make your desktop more distinctive by changing the settings, themes, wallpapers, and icons. Investigate the personalization options in your preferred desktop environment to make it more suitable. Additionally, you can add more themes and addons to your desktop to further personalize it.
Troubleshooting Common Issues in Linux
- Check Hardware Compatibility: Ensure your hardware is compatible before installing a Linux distribution. Look over the distribution documentation’s list of compatible systems and system requirements.
- Examine the Installation Choices: Carefully review and choose the right settings during installation. Pay close attention to the file system options, disc partitioning, and installation location. Incorrect settings or disc configurations might bring on failures during installation.
- Verify BIOS/UEFI Settings: In some circumstances, improper BIOS or UEFI settings can result in installation problems. Verify that the boot order is properly configured to prioritize the installation media. If Secure Boot is causing issues during installation, disable it.
- Monitor Error Messages: If the installation experiences problems or fails, pay close attention to the error messages on the screen. They may be able to offer useful details regarding the issue’s origin. Note any particular error messages or codes to aid in debugging.
Conclusion
The Linux operating systems now offer millions of programs/applications to choose from, most of them free to install! Linux is also the OS of choice for Server environments due to its stability and reliability (Mega-companies like Amazon, Facebook, and Google use Linux for their Servers). It proves to be a good choice for everyone.
Recommended Articles
We hope that this EDUCBA information on “Install Linux” was beneficial to you. You can view recommended articles for more information.
- How to use Kali Linux Commands
- Cheat Sheet Linux
- Adobe Illustrator For Linux
- Differences between Linux vs Android
