Updated October 6, 2023
Introduction to Install python on windows
Python is a powerful and versatile programming language with applications in web development, data analysis, artificial intelligence, and automation. If you’re using a Windows operating system and want to harness the capabilities of Python, you’ll need to install it on your machine. Installing Python on Windows is a simple process. This guide will help you get started.
Table of Contents
- Introduction
- Why is it Important?
- Benefits of Using Python
- System Requirements
- How to Install Python on Windows?
- Verify Installation
Why Installing Python on Windows is Important?
Installing Python on Windows is important for several reasons:
- Versatile Language: Various applications, such as web development, data analysis, and machine learning, can utilize Python, a high-level programming language.
- Windows Compatibility: Python is compatible with Windows, making it accessible to a large user base. It works seamlessly on Windows 10, Windows 11, and older versions.
- Large Community: Python has a massive and active user community. This means you can easily find resources, libraries, and solutions for any programming challenge you encounter on Windows.
Benefits of Using Python
Using Python offers several benefits, including:
- Readability and Simplicity: Python’s clean and readable syntax allows developers to write code more efficiently, saving time and reducing errors.
- Cross-Platform: Python code can run on various operating systems, including Windows, macOS, and Linux, making it highly portable.
- Abundance of Libraries: Performing complex tasks like data analysis and machine learning is easier on Windows with Python’s numerous libraries and frameworks, such as NumPy, Pandas, and TensorFlow.
- Community and Support: The Python community earns its reputation for being helpful and providing extensive documentation. This support network ensures you can find assistance easily.
- Open Source: Python is open-source, meaning it’s free to use and has a global community of contributors continually improving it.
- Rapid Development: Python’s concise syntax and built-in features promote rapid development, making it an excellent choice for prototyping and quickly getting projects off the ground on Windows.
- Diverse Use Cases: Python serves various domains, such as web development (using Django and Flask), scientific computing, automation, and scripting, rendering it a versatile language suitable for Windows users.
System Requirements
Before installing Python on Windows, users should be aware of the following system requirements:
1. Supported Windows Versions:
- Python is compatible with Windows 7, 8, 10, and 11.
- Ensure your Windows installation has the latest service packs and updates for better compatibility.
2. Disk Space:
- Python installation typically requires around 100-200 MB of disk space.
- If you plan to install additional packages or libraries, allocate more disk space accordingly.
3. RAM (Memory):
- While the base Python installation doesn’t require much memory, the memory usage depends on the applications you run.
- For basic Python development, 4 GB of RAM is usually sufficient. However, data-intensive tasks like machine learning may require more.
4. Processor (CPU):
- Python is not CPU-intensive, but your choice of development tasks and applications may demand a faster processor.
- A modern dual-core or quad-core CPU is suitable for most Python development.
5. Permissions:
- Ensure you have administrative privileges on your Windows machine, as some installation processes may require elevated permissions.
- A best practice to avoid permission issues is to right-click the installer and select “Run as administrator.”
To ensure a smooth installation and comfortable development experience on your Windows system, Python has been designed to be lightweight and accessible, ensuring compatibility with a wide range of Windows configurations.
How to Install Python on Windows?
Below are the different methods to install Python on Windows:
1. Using Official Installer
Below are the steps to install Python on Windows using official installer:
Step 1
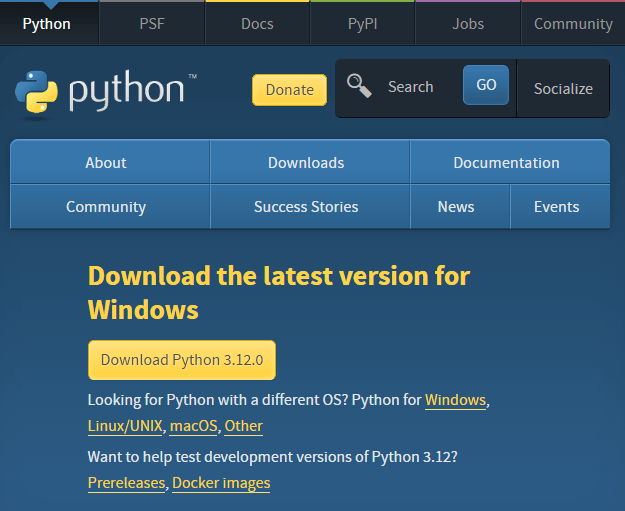
The official page link for download of Python software is below,
Link: https://www.python.org/downloads/
Step 2
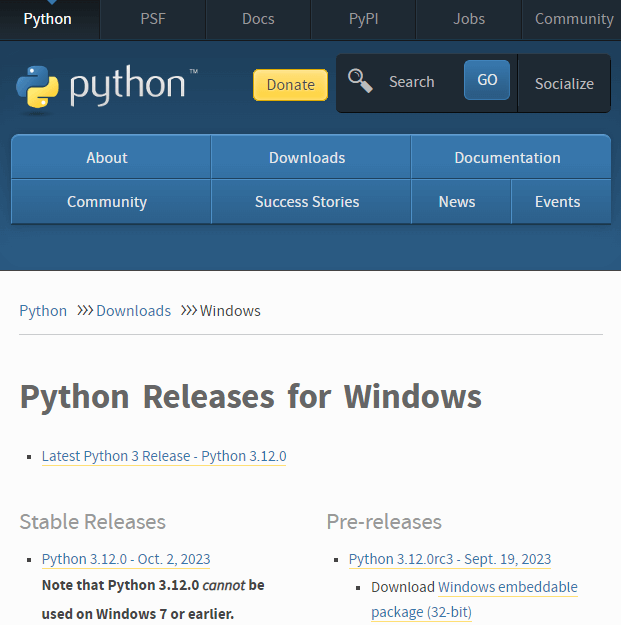
Selecting the Windows link will take you to the below sub-link. in this below sublink, we need to select the Python version. Choose the latest version.
Download and save the software to the PC. The file called python-3.12.0-amd64.exe has to commence downloading on your standard download folder. Ensure the completion of the software download before proceeding with the software installation. If needed, we can move this file to a different location which is likely more permanent for Python installation.
Step 3
Below are the instructions for the installation of Python:
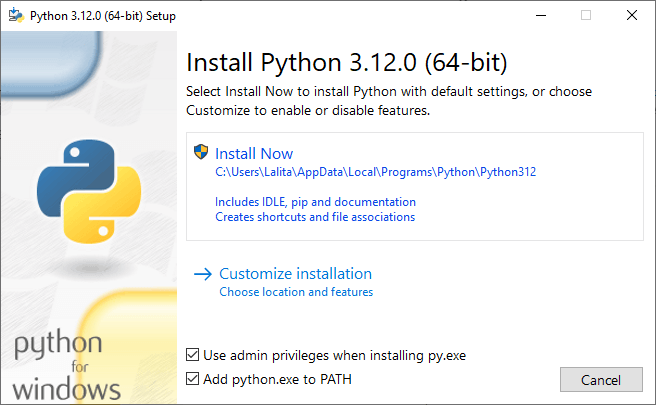
From the installed location, click on the below icon python-3.12.0-amd64.exe. Clicking on this icon pops up the installation dashboard for Python. This dashboard is also called the Python setup pop-up window, and a snap of the same is pasted below; this snap is for the popup window version Python 3.12.0. Make sure that the below-enlisted checkboxes are checkered in at the installation setup popup.
- “Use admin privileges when installing py.exe “
- “Add Python.exe to PATH “
Step 4
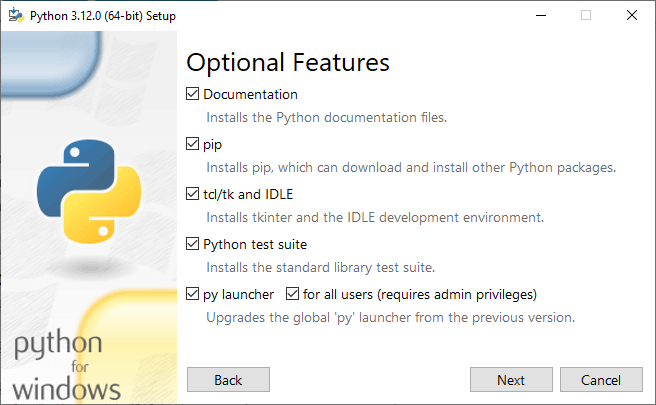
Additionally, the customized installation option will allow the user to be tailored to the various components that are installed along with the core version of the python. The below screen snaps the various options available in the customized installation screen.
The options include
- Installation of core Python documentation file.
- Pip installer is additional software that helps to install and uninstall Python-oriented packages.
- TCL / TK and IDE: this allows us to install the IDE setup for Python.
- A testing suite for Python.
- A Python launcher makes the start of Python a much easier task.
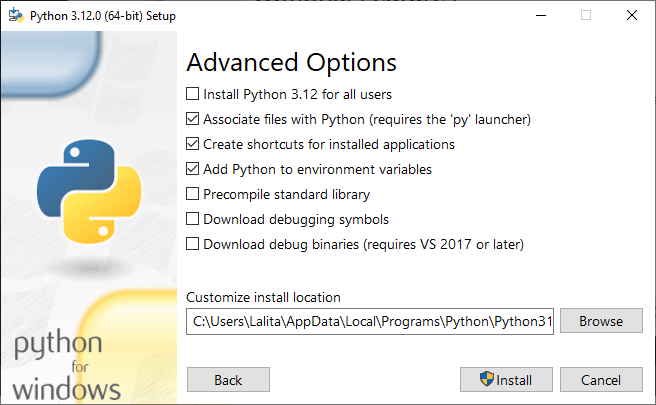
Clicking next on this customization screen will pull the user to the further advanced options in Python installation. These include the below items,
- Whether to install Python for all users on this system or to be considered for one specific user.
- Associate several Python files using a py launcher.
- Creation of necessary shortcuts.
- Automatically add Python to the system environment variables.
- Precompilation of all available standard libraries associated with Python.
- A download of all debugging symbols associated with the Python environment.
- Download debugging binaries.
We can also notice this customization section holds the option for customized install location for Python. So setting the location here allows the Python software to be installed in the very needed location was it’s expected to be.
Step 5
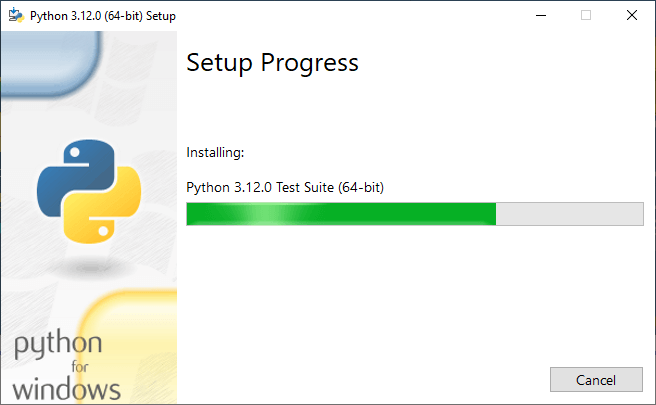
In this case, the user installs the Python software for the first time in the system, clicks on the install now message, and even from the customization perspective, clicks on the Install button at the bottom of the installation setup pop-up. This will throw the installation progression setup on the screen of the user. The installation progression setup shows the overall progress of all of the software-related files on the users’ current system and how much is expected to be implied. This is notified using the progression of the green scale on the progression screen.
Step 6
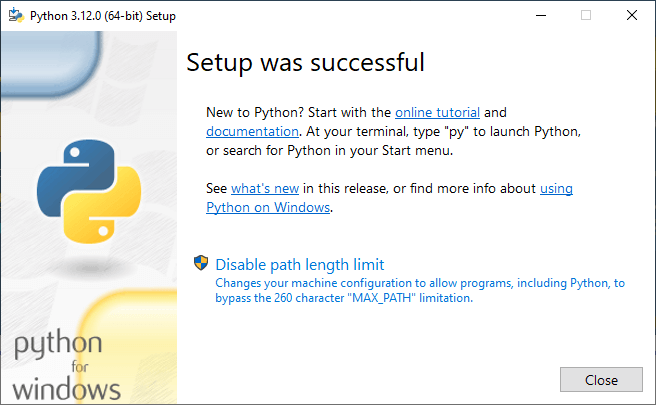
On successful completion of the setup, the below screen will be notified, stating that the setup was successfully installed. This popup also has the link for official Python documentation and online tutorial within the same also; a small representation of the add-ons associated with the currently installed release of Python is also linked.
2. Using PyCharm
PyCharm is one of the sought-after Integrated Development environments among Python programmers.
It comes in two editions:
- The Community Edition: This Python installation is free and supports only pure Python Programming but has some features like code completion, refactoring, debugging, and integration with version control systems.
- The Professional Edition: This edition of Python installation is built on top of the Community Edition and includes additional support like Django, Flash, and SQLAlchemy.
Now, we will download and install the Community edition as shown below.
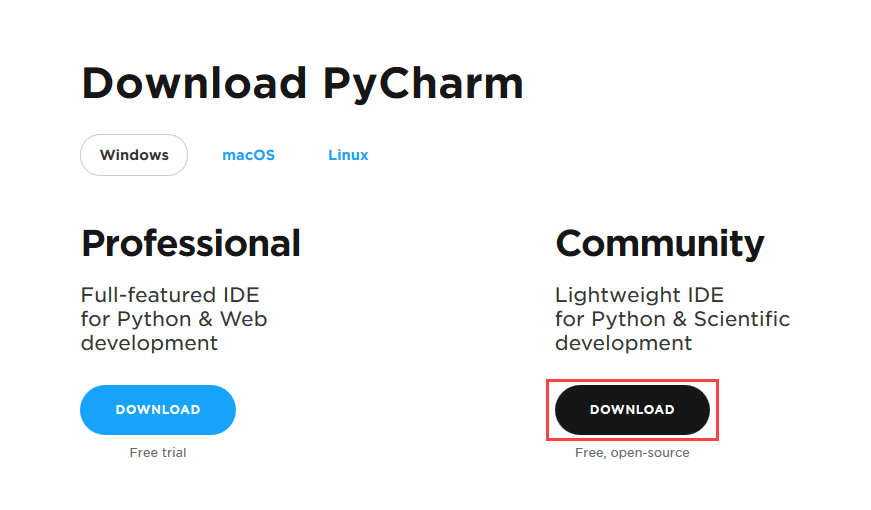
Step 1: Visit https://www.jetbrains.com/pycharm/download/ and click on the Download button below the Community.
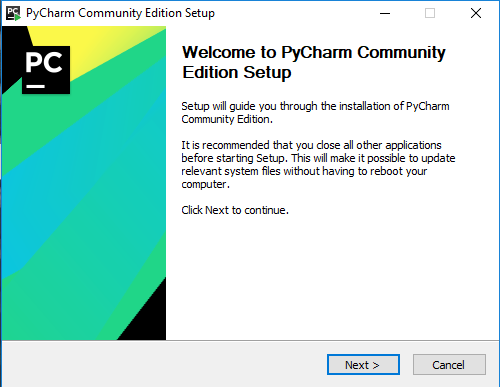
Step 2: Similar to downloading Python, we can select the location to save the file and then click on the downloaded .exe file and select next.
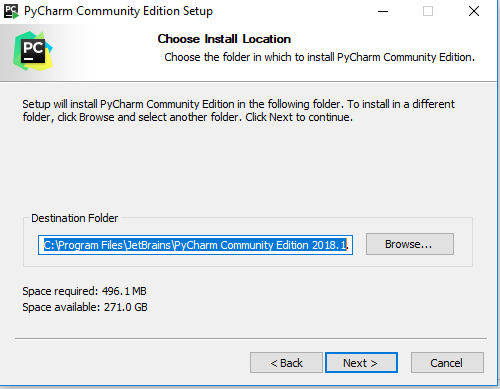
Step 3: Browse to the location where you want to install the PyCharm IDE and select Next.
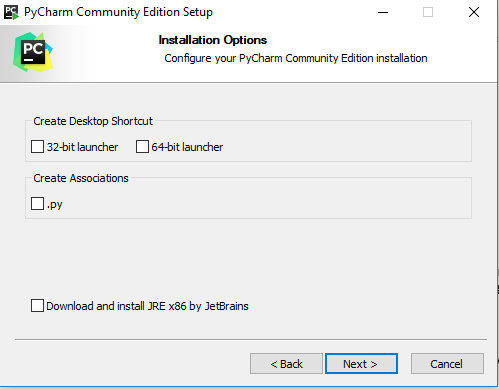
Step 4: You can create a Desktop Shortcut if you want and select either a 32-bit or 64-bit launcher based on your system’s processor.
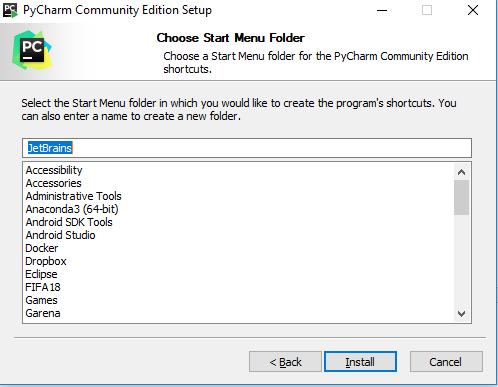
Step 5: Keep selected JetBrains in the Start Menu Folder and click Install.
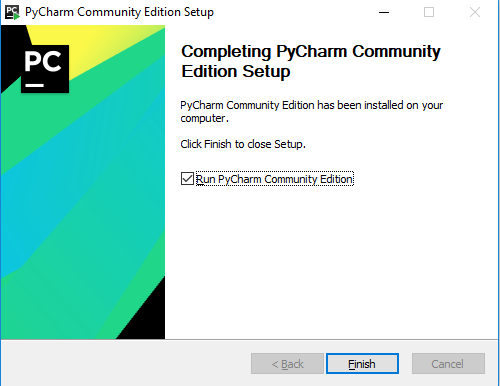
Step 6: The Installation will continue, and once finished, it will prompt with the below message screen. We will check the Run PyCharm Community Edition box and then click Finish.
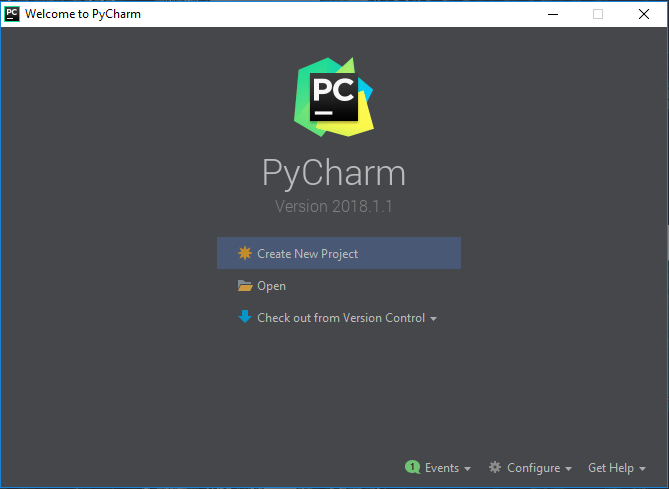
Step 7: The IDE will start, and the following screen will appear.
Thus we have successfully installed both Python and PyCharm IDE for Windows.
Verify Installation
You can verify that Python has been successfully installed on your Windows system using the Command Prompt (cmd). Here’s how to do it step by step:
1. Open the Command Prompt: To open the Command Prompt, press the Windows key, type “cmd,” and press Enter.
2. Check Python Version: To execute the desired action, open the Command Prompt window and input the following command. Press the Enter key to execute the command.:
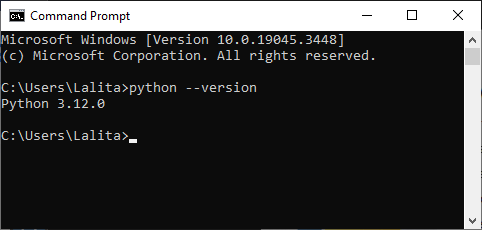
python --versionThis command will display the version of Python installed on your system. For example, if you installed Python 3.120, you should see an output similar to the following:
The display of the Python version shows that Python is installed and accessible from the command line.
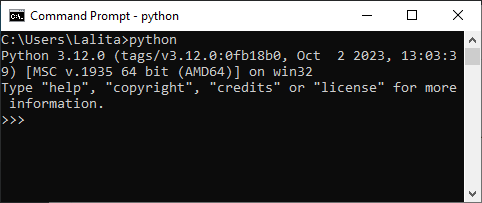
3. Test Python Interactive Shell: You can also test Python by running the Python interactive shell. In the Command Prompt, type:
pythonPress Enter, and you should see the Python prompt (usually >>>) indicating that you are now in the Python interactive shell. You can enter Python commands here to test Python functionality.
To exit the Python interactive shell, type exit() and press Enter.
These steps will help you verify if Python is installed correctly on Windows and accessible from Command Prompt. This confirmation ensures that you can use Python for your development and scripting needs.
Conclusion
To install Python on Windows, download and run the latest Python installer from the official website. Ensure the “Add Python to PATH” option is selected during installation. This makes Python accessible from the command line. After installation, verify Python by opening Command Prompt and typing python –version. If it displays the Python version, installation is successful, and you can start coding in Python on your Windows system.
FAQs
Q1. Which version of Python should I select for Windows – 32-bit or 64-bit?
Ans: If your Windows operating system is 64-bit, installing the 64-bit version of Python is recommended for better performance and compatibility. However, the 32-bit version will work on both 32-bit and 64-bit systems.
Q2. Is administrative access required to install Python on Windows?
Ans: Yes, you typically need administrative privileges to install Python on Windows. It’s a good practice to right-click the installer and choose “Run as administrator” to avoid permission issues.
Q3. Can you explain why adding Python to the PATH is essential when installing it?
Ans: Adding Python to the PATH allows you to easily run it from Command Prompt without specifying the full path.
Q4. What should I do if I encounter installation errors or issues?
Ans: If you encounter installation errors or issues, check the official Python documentation or forums for troubleshooting steps. Common problems may include conflicts with existing installations, permissions, or antivirus software blocking the installation.
Recommended Articles
We hope that this EDUCBA information on “Install Python on Windows” was beneficial to you. You can view EDUCBA’s recommended articles for more information.
