Introduction
Having a strong online presence is crucial for companies, bloggers, and individuals in today’s digital landscape. WordPress, a versatile and preeminent user-friendly content management system (CMS), empowers businesses, bloggers, and individuals to create and manage dynamic websites easily. This user-friendly platform offers unparalleled flexibility, allowing you to follow your online space to your specific needs.
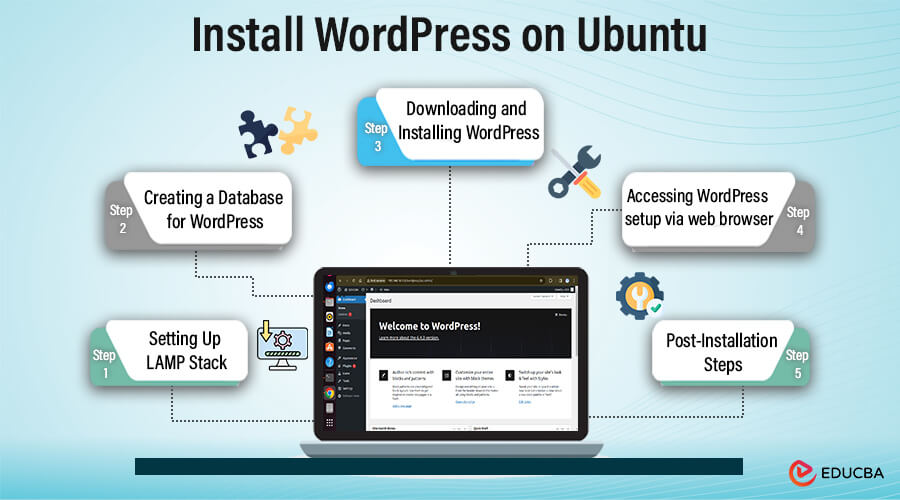
This comprehensive guide streamlines the installation of WordPress on Ubuntu, a robust and secure Linux distribution. We’ll walk you through the step-by-step process of setting up the LAMP stack (Linux, Apache, MySQL, PHP) – the core components that power WordPress – and configuring WordPress itself.
By the end of this guide, you’ll have a fully functional WordPress website ready to customize and use!
Table of Contents
Prerequisites
During the WordPress installation process on Ubuntu, it’s essential to ensure that you have the necessary prerequisites in place to guarantee a smooth and successful setup.
Recommended specifications:
- CPU: Dual-core processor or higher
- RAM: RAM of at least 1 GB is recommended, preferably 2GB or more, for smoother operation, especially if you expect high traffic.
- Storage: Sufficient disk space accommodates the WordPress installation, uploaded media files, and database backups. We recommend a minimum of 20GB of disk space. For stability and long-term support, you should prefer the Ubuntu Server LTS (LongTerm Support) edition.
WordPress can run on modest hardware configurations.
Basic knowledge of command line interface (CLI):
While optional, having a basic understanding of Linux commands will significantly facilitate the installation and management of WordPress on Ubuntu.
Step 1: Setting Up LAMP Stack
The LAMP stack is a popular open-source web development platform hosting dynamic websites and web applications. Its four main components are:
- Linux: The operating system (OS) layer of the stack. In this case, we’ll be using Ubuntu.
- Apache: The web server software serves web pages to users’ browsers. Apache supports various features and modules and is highly configurable.
- MySQL (or MariaDB): MySQL is a relational database management system (RDBMS) used for storing website data, such as posts, pages, user information, etc. MySQL and MariaDB are popular choices, with MariaDB being a community-developed fork of MySQL.
- PHP: PHP language for server-side scripting that produces dynamic content on web pages. It interacts with the web server to process code and generate HTML output.
Instructions to install Apache web server:
- Open a terminal on your Ubuntu server.
- Update the package index to ensure you have the latest package information:
sudo apt update
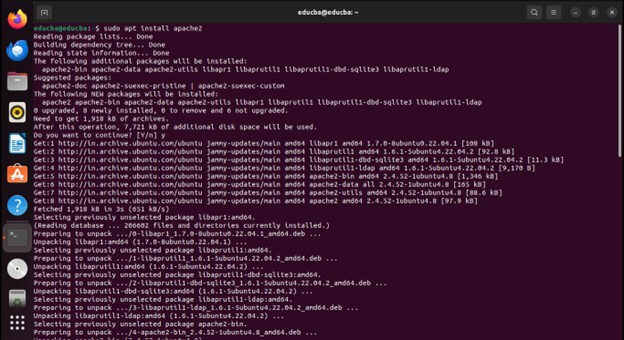
- Use this command to install the Apache web server package.
sudo apt install apache2
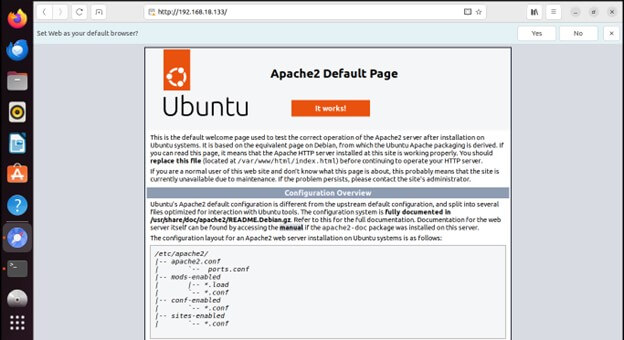
- After the installation is complete, Apache will automatically start. You can verify that Apache is running by entering IP address of your server into a web browser.
You should disallow remote root login to prevent hackers from accessing your database.
- After the installation is complete, Apache will automatically start. You can verify that Apache is running by entering IP address of your server into a web browser.
Installing MySQL/MariaDB Database Server:
MySQL (or MariaDB) serves as WordPress’s backend database management system, storing all website data.
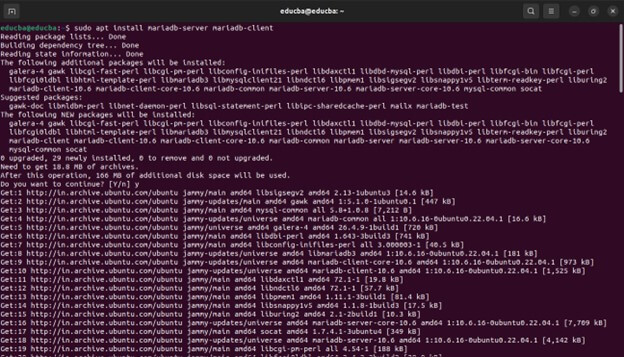
- In the terminal, run the following command to install the MySQL server package:
apt install mariadb-server mariadb-client
- After the installation is complete, MySQL should start automatically. You may verify the MySQL service’s status by running:
sudo systemctl status mysql
This command will display whether MySQL is active and running.
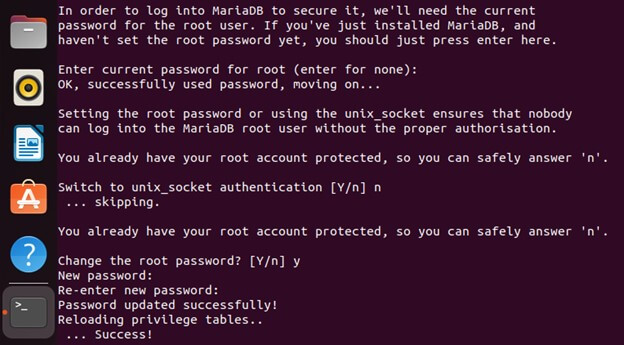
- It is recommended that you follow a series of steps during the setup process to ensure the security of your database. Firstly, you will be prompted to change the root password to log into the database. This step is essential to guaranteeing the safety of your data. You may opt to change the password or skip this step if you are convinced that your current password is secure. If you choose to skip this step, please type “n” to proceed.
- Secondly, you will be prompted to remove any anonymous users to remove any potential security risks. You can do this by typing “Y”.
- Thirdly, To prevent hackers from accessing your database, it is recommended that you disallow remote root login. However, you may want to allow remote login if configuring a virtual server for testing.
- Fourthly, you should remove the test database from your system. It will ensure your database is free from unnecessary data or security risks.
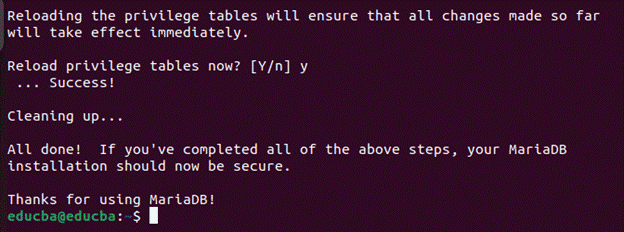
- Finally, reload the database to implement your changes. It will ensure that your database is secure and ready to use.
Installing PHP and necessary modules
PHP a server-side scripting language used by WordPress to generate dynamic content
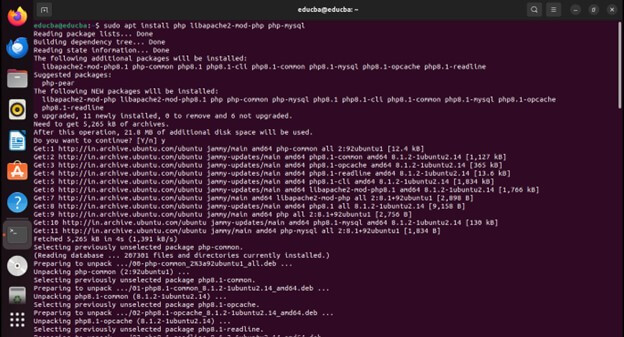
- Install PHP and common PHP modules by running
sudo apt install php libapache2-mod-php php-mysql
- This command installs PHP, the PHP module for Apache, and the MySQL extension for PHP, allowing PHP to communicate with MySQL databases.
- After installation, restart the Apache web server to apply the changes:
sudo systemctl restart apache2
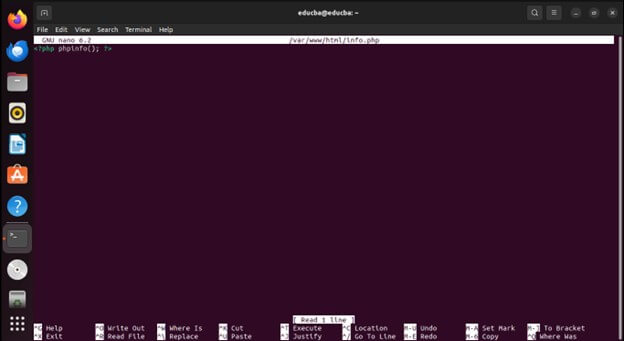
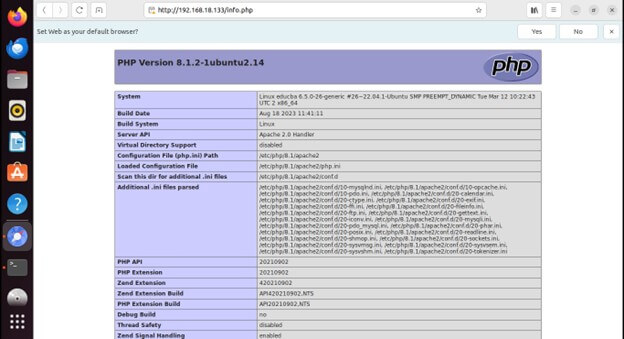
- To verify that PHP works correctly, create a PHP info file in the web server’s document root. You can do this by running:
sudo nano /var/www/html/info.php
- Access the PHP info file in a web browser by navigating to http://your_server_ip/info.php
- With Apache, MySQL/MariaDB, and PHP installed and configured, you’ve successfully set up the LAMP stack on your Ubuntu.
Step 2: Creating a Database for WordPress
Accessing MySQL command line interface
- Open a terminal on your Ubuntu server and log into the MySQL command line interface (CLI) as the root user:
sudo mysql -u root -p
Creating a New MySQL Database for WordPress:
Once logged in to the MySQL CLI, you can create a new database for WordPress using the following command:
CREATE DATABASE wordpress;
Creating a MySQL User and Granting Privileges to the Database
- Following database creation, you must create a MySQL user and grant it privileges to access and manage the database
CREATE USER ‘user’@’localhost’ IDENTIFIED BY ‘password’;
- Next, grant all privileges on the educba database to the educbauser:
GRANT ALL ON WordPress.* TO ‘user’@’localhost’ IDENTIFIED BY ‘password’;
- Finally, apply the changes and exit the MySQL CLI
FLUSH PRIVILEGES;
EXIT;
With the MySQL database created and the user granted the necessary privileges, you can install WordPress.
Step 3: Downloading and Installing WordPress
After setting up the LAMP stack and creating a MySQL database for WordPress, you should download and install It on your Ubuntu.
- Navigate to the Apache web root directory
cd /var/www/html
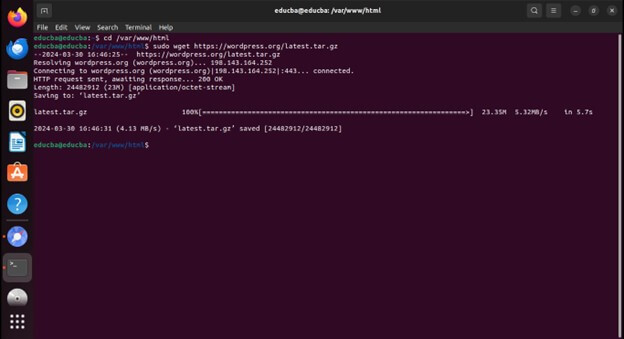
- Download the latest version of WordPress by using wget command
sudo wget https://wordpress.org/latest.tar.gz
Extracting WordPress Files to the Appropriate Directory:
- Once download is complete, extract the WordPress files from the downloaded archive:
sudo tar -xzvf latest.tar.gz
- This command extracts the contents of the latest.tar.gz
Setting Up Necessary Permissions
To ensure that WordPress can write to specific directories and files, you must adjust the file permissions.
- Set the ownership of the WordPress files and directories to the Apache web server
sudo chown -R www-data:www-data /var/www/html/wordpress
sudo chmod -R 755 /var/www/html/wordpress
- These commands recursively change the ownership (chown) of the wordpress directory to the www-data user and group. They also set the permissions (chmod) to 755, allowing the web server to read, write, and execute files within the WordPress directory.
Step 4: Completing the Installation via Web Browser
After installing WordPress on your Ubuntu server, you can complete the installation process by accessing the WordPress setup wizard via a web browser.
Accessing WordPress setup via web browser
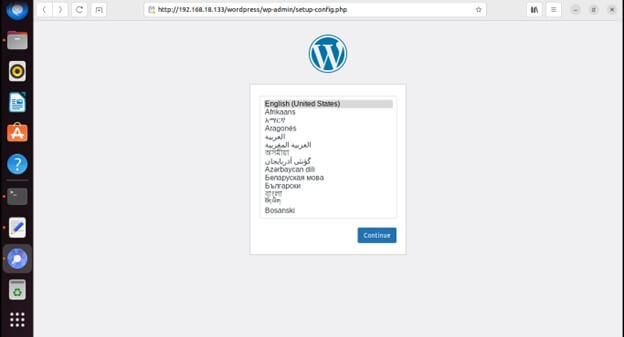
Open any web browser on your local computer and enter your Ubuntu server’s IP address or domain name in the address bar.
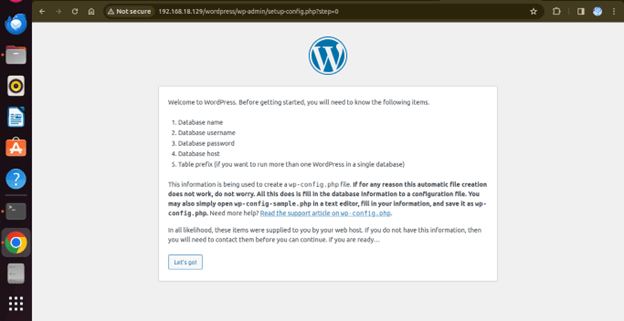
- Select your preferred language and click continue.
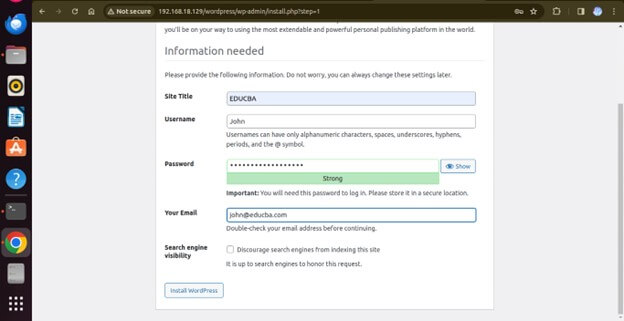
- Providing necessary information (site title, admin username, password, etc.)
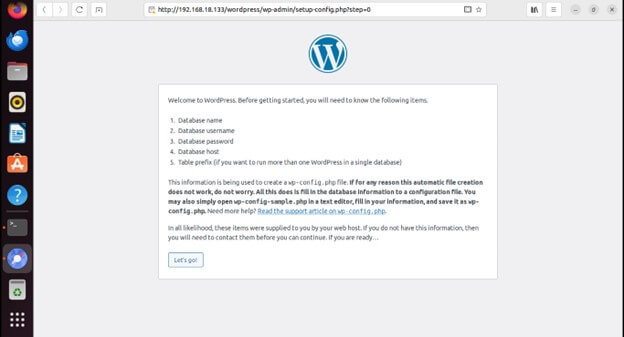
- Click let’s go
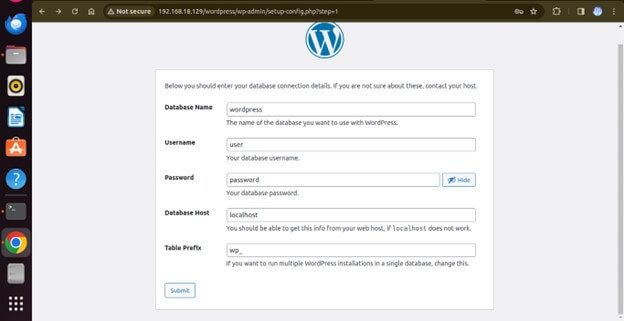
- Add necessary information (from the server we created in MySQL)
- Enter user details and press Install WordPress.
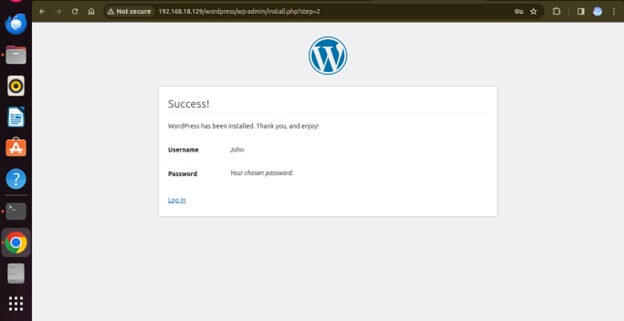
- It will return a Success! Page
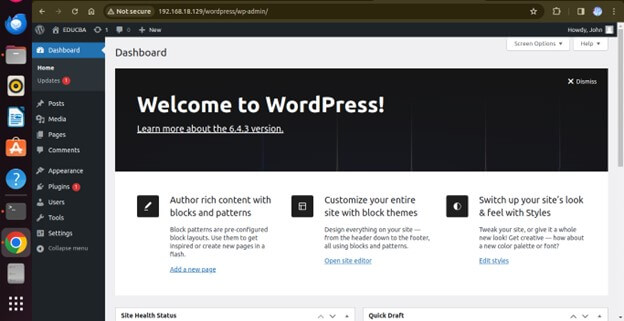
Now use the credentials you just generated to log in on the WordPress server.
Below is how the WordPress dashboard will look like
Step 5: Post-Installation Steps
Once you are logged in to the WordPress admin dashboard, you can customize various settings to adapt your website according to your preferences. Some key customization options include:
- General Settings: Update the site title, tagline, and site URL.
- Permalinks: Choose the URL structure for your posts and pages.
- Reading Settings: Configure settings related to front page displays and syndication feeds.
- Discussion Settings: Manage settings for comments and notifications.
- Media Settings: Specify the dimensions for uploaded media files.
Explore each section under the “Settings” menu to adjust the settings according to your requirements.
Installing essential plugins and themes
Plugins and themes extend the functionality and appearance of your WordPress website. Install essential plugins and themes to enhance your site’s features and design. Some recommended plugins include:
- Security Plugins: Install plugins such as Wordfence Security, Sucuri Security, or iThemes Security to protect your website from threats and vulnerabilities.
- SEO Plugins: Install an SEO plugin, such as Yoast SEO or Rank Math, to increase the visibility of and optimize your website for search engines.
- Performance Plugins: Install caching plugins such as W3 Total Cache or WP Super Cache to improve website performance and speed.
- Backup Plugins: Set up a backup solution using UpdraftPlus or BackWPup to back up your WordPress site regularly.
Conclusion
Installing WordPress on Ubuntu is a straightforward process that enables you to set up a powerful and versatile website or blog on your Ubuntu server. WordPress empowers you to easily create, customize, and manage your website. Whether you are a beginner or an experienced web developer, WordPress on Ubuntu offers a flexible and scalable platform for building dynamic and engaging websites adapt to your needs.
FAQ’S
Q1. Why use Ubuntu for hosting WordPress?
Answer: Ubuntu is a widespread Linux distribution known for its stability, security, and ease of use. It’s well-supported, regularly updated, and offers a vast repository of software packages, making it an excellent choice for hosting WordPress.
Q2. Is it possible to move a current WordPress website to Ubuntu?
Answer: Yes, you can migrate an existing WordPress site to Ubuntu by transferring the files and database to your Ubuntu server. Various plugins and tools are available to facilitate the migration process, or you can perform it manually by following migration guides provided by WordPress and Ubuntu communities.
Q3. How can I update WordPress after installation?
Answer: WordPress itself and plugins can be updated directly from the WordPress admin dashboard. It’s crucial to keep WordPress updated for security reasons and to benefit from the latest features and bug fixes.
Q4. Is it possible to install multiple WordPress sites on the same Ubuntu server?
Answer: Yes, you can host multiple WordPress sites on the same Ubuntu server by setting up separate virtual hosts (Apache) or server blocks (Nginx) for each site. Each WordPress installation will have its directory, database, and configuration.
Recommended Articles
We hope that this EDUCBA information on “Install WordPress on Ubuntu” was beneficial to you. You can view EDUCBA’s recommended articles for more information,
