Updated June 16, 2023

Introduction to Java array.push
In Java, push is a method that adds elements in the stack, array, LinkedList, etc. In Java, you can add an element to the stack using the push(E el) method from the java.util.Stack class. In the case of LinkedList, Java.util.LinkedList. It functions similarly to the addFirst() method in LinkedList. Java.util.ArrayDeque.push(E el) method in ArrayDeque pushes the element into the top of the Deque.
Syntax and Parameters
Let us see the syntax of the push method in a stack, LinkedList, and Deque.
1. Stack
Syntax:
STACK.push(E el)- Parameters: Item el of the element type that has to be pushed to the stack.
- Return Value: The argument passed will be returned.
2. LinkedListObject
Syntax:
LinkedListObject.push(Object el)- Parameters: Item el of an object type that has to be pushed to the stack.
- Return Type: No value will be returned.
3. ArrayDeque
Syntax:
Array_Deque.push(E el)- Parameters: Item el of ArrayDeque type that has to be pushed to the stack.
- Return Value: No value will be returned.
How does the push method work in Java?
The push method works similarly in Stack, LinkedList, and Deque. To achieve the desired result, you can follow these steps:
1. Create a stack, LinkedList, or Deque based on the requirement.
Stack<String>s = new Stack<String>();
LinkedList<Integer>li = new LinkedList<>();
Deque<Integer>dq = new ArrayDeque<Integer>(8);
2. add elements to it using the push method.
s.push("A")
li.push(45)
dq.push(9)
Examples to Implement Java array.push
Below are examples of implementing Java array.push:
1. Java program to push elements of string type in a stack.
Code:
import java.util.*;
public class PushMethodExample
{
public static void main(String args[])
{
// create a stack
Stack<String> s = new Stack<String>();
s.push("Happy");
s.push("Sad");
s.push("Confused");
s.push("Tensed");
s.push("Mixed Emotions");
// Print elements in stack
System.out.println("Stack Elements: " + s);
// Push new elements
s.push("Emotions");
s.push("Exists");
// Stack after adding new elements
System.out.println("Stack after adding new elements " + s);
}
}
Output:
Explanation: First, create a stack s and add elements using the push() method. After that, you can print the stack and add the elements again to verify if they are successfully inserted. When you execute the code, you will be able to display the stack both before and after adding the new elements.
2. Java program to push elements of integer type in LinkedList.
Code:
import java.util.*;
public class PushMethodExample
{
public static void main(String args[])
{
// create a LinkedList
LinkedList<Integer> li = new LinkedList<>();
li.push(45);
li.push(90);
li.push(67);
li.push(33);
li.push(56);
// Print elements in LinkedList
System.out.println("LinkedList Elements: " + li);
// Push new elements
li.push(456);
li.push(678);
// LinkedList after adding new elements
System.out.println("LinkedList after adding new elements " + li);
}
}
Output:
Explanation: Create a LinkedList li and add elements of integer type using the push() method. Then, display the LinkedList and add the items again so that it can be determined whether or not elements are inserted. On executing the code, LinkedList, before adding new elements and after adding new elements, can be displayed.
3. Java program to add integer elements to stack.
Code:
import java.util.*;
public class PushMethodExample
{
public static void main(String args[])
{
// create a stack
Stack<Integer> s = new Stack<Integer>();
s.push(45);
s.push(90);
s.push(67);
s.push(33);
s.push(56);
// Print elements in stack
System.out.println("stack Elements: " + s);
// Push new elements
s.push(456);
s.push(678);
// stack after adding new elements
System.out.println("stack after adding new elements " + s);
} }
Output:
Explanation: First, we create a stack to accept integer elements. Then, we use the push() method to add elements to the stack. We print the current elements in the stack. Next, we add two new elements to the stack. To verify the successful addition of these elements, we print the elements in the stack again. When executing the code, you can observe that the stack does indeed contain the two additional elements that were added.
4. Java program to add string elements to LinkedList.
Code:
import java.util.*;
public class PushMethodExample
{
public static void main(String args[])
{
// create a LinkedList
LinkedList<String> li = new LinkedList<>();
li.push("Happy");
li.push("Sad");
li.push("Confused");
li.push("Tensed");
li.push("Mixed Emotions");
// Print elements in LinkedList
System.out.println("LinkedList Elements: " + li );
// Push new elements
li.push("Emotions");
li.push("Exists");
// LinkedList after adding new elements
System.out.println("LinkedList after adding new elements " + li );
} }
Output:
Explanation: Create a LinkedList li and add elements of string type using the push() method. On executing the code, LinkedList, before adding new elements and after adding new elements, can be displayed.
5. Java program to add integer elements to Deque.
Code:
import java.util.ArrayDeque;
import java.util.Deque;
public class PushMethodExample {
public static void main(String[] args) {
// Create ArrayDeque
Deque<Integer> dq = new ArrayDeque<Integer>(8);
// Add elements to the deque using add() method
dq.add(23);
dq.add(56);
dq.add(78);
dq.add(13);
// Print elements in deque
System.out.println("Elements in deque are : ");
for (Integer n : dq)
{
System.out.println("No : " + n);
}
// Add new elements using the method push()
dq.push(456);
dq.push(3432);
// Print elements in Deque after inserting new elements
System.out.println("Deque after inserting new elements:");
for (Integer n : dq)
{
System.out.println("No : " + n);
}
}
}
Output:
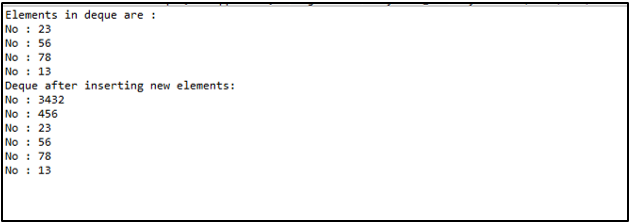
Explanation: Create a deque for adding the elements. For that, use the method push() and add the elements of integer type. Then, print the Deque and identify the current elements present in it.
Recommended Articles
This is a guide to Java array.push. Here we discuss an introduction to Java array.push, syntax, parameters, and how it works with programming examples. You can also go through our other related articles to learn more –


