Updated April 10, 2023

Introduction to JavaFX EventHandler
The following article provides an outline for JavaFX EventHandler. In JavaFX, Event Handling is a process which controls an event as well as decides what has to be triggered, when an event occurs. This will be done writing a code called as an event handler that executes when an event occurs. For single node, it can be more than one event handlers. Moreover, one handler can be used for more than 1 event type as well as node.
How does JavaFX EventHandler Work?
Event filter has to be registered for adding it to a node. This is done using the addEventFilter() method of the class Node.
Code:
EventHandler<MouseEvent> hnd = new EventHandler<MouseEvent>() {
public void handle(MouseEvent ev) { . . .             }
}
First, a handler has to be created.
Then, event filter is added using the syntax as shown below.
Syntax:
crc.addEventFilter(MouseEvent.MOUSE_CLICKED , eventHandler ) ;Similarly, event handler can be removed by using the following syntax.
Syntax:
crc. removeEventFilter (MouseEvent.MOUSE_CLICKED , eventHandler ) ;Examples of JavaFX EventHandler
Given below are the examples of JavaFX EventHandler:
Example #1
JavaFX program that animates a circle on clicking a button which is done using an event handler.
Code:
import javafx.animation.TranslateTransition;
import javafx.application.Application;
import javafx.event.EventHandler;
import javafx.scene.Group;
import javafx.scene.Scene;
import javafx.scene.control.Button;
import javafx.scene.input.MouseEvent;
import javafx.scene.paint.Color;
import javafx.scene.shape.Circle;
import javafx.stage.Stage;
import javafx.util.Duration;
//main class
public class EventHandlerSample extends Application
{
@Override
public void start(Stage st) throws Exception
{
//Create Circle
Circle crc = new Circle(200,200,60);
//fill the circle with yellow color and set stroke
crc.setFill(Color.YELLOW);
crc.setStroke(Color.RED);
//create a button and set the X and Y coordinates
Button butn1 = new Button("Start");
butn1.setTranslateX(225);
butn1.setTranslateY(300);
//create a button and set the X and Y coordinates
Button butn2 = new Button("Click for pausing");
butn2.setTranslateX(200);
butn2.setTranslateY(230);
//Instantiate the class for creating the animation
TranslateTransition tr = new TranslateTransition();
//set auto reverse
tr.setAutoReverse(true);
//set byx
tr.setByX(250);
//set the cycle count
tr.setCycleCount(110);
//set the duration
tr.setDuration(Duration.millis(600));
//set the node
tr.setNode(crc);
//Create the EventHandler
EventHandler<MouseEvent> hnd = new EventHandler<MouseEvent>() {
@Override
//handle method
public void handle(MouseEvent ev) {
//if the source is button 1, start animation
if(ev.getSource()==butn1)
{
tr.play();
}
//if the source is button 2, pause animation
if(ev.getSource()==butn2)
{
tr.pause();
}
ev.consume();
}
};
//Add the event handler for the button 1 and button 2
butn1.setOnMouseClicked(hnd);
butn2.setOnMouseClicked(hnd);
//Create the Group as well as scene
Group gp = new Group();
//add the children
gp.getChildren().addAll(crc , butn1 , butn2 ) ;
Scene sc = new Scene(gp , 520 , 400 ,Color.BLACK);
//set the scene
st.setScene(sc);
//set the title
st.setTitle("EventHandler Sample Program");
//display the results
st.show();
}
//main method
public static void main(String[] args)
{
//application starts here
launch(args);
}
}
Output:
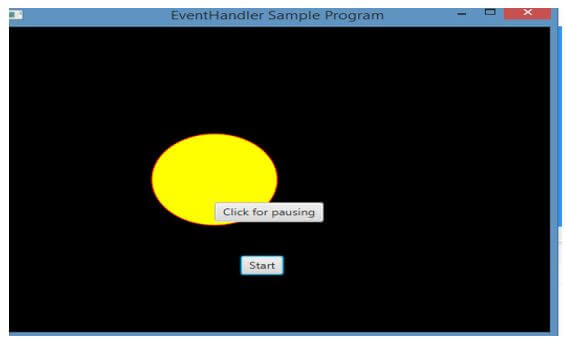
First, import all the necessary packages. Then, create a circle, fill the circle with yellow color and set stroke for the circle. After this, create a button butn1 for starting the animation and set the X and Y coordinates for the button. Similarly, create a button butn2 for pausing the animation and set the X and Y coordinates for the button. Then, instantiate the class TranslateTransition for creating the animation and set the attributes for the class. Also, set the auto reverse, byX, cycle count, duration and node. Once all these are done, create the EventHandler with a handle method. If the button butn1 is clicked, animation starts and if the button butn2 is clicked, animation pauses. Create the Group as well as scene and add the children. Set the scene, title and display the results.
On executing the code, it can be seen that a yellow circle gets displayed with two buttons as shown in the above figure.
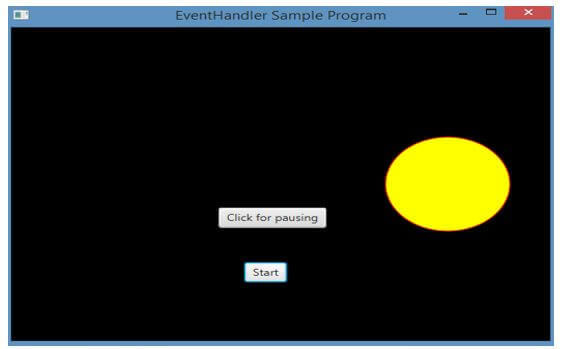
If start button is clicked, the circle starts moving and below is the screenshot at that time.
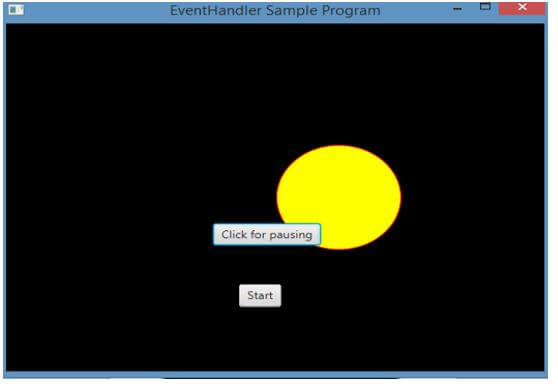
If the second button is clicked, it pauses.
Example #2
JavaFX program to rotate rectangle using event handler.
Code:
import javafx.animation.RotateTransition;
import javafx.application.Application;
import javafx.event.EventHandler;
import javafx.scene.Group;
import javafx.scene.PerspectiveCamera;
import javafx.scene.Scene;
import javafx.scene.control.TextField;
import javafx.scene.input.KeyEvent;
import javafx.scene.paint.Color;
import javafx.scene.paint.PhongMaterial;
import javafx.scene.shape.Box;
import javafx.scene.text.Font;
import javafx.scene.text.FontWeight;
import javafx.scene.text.Text;
import javafx.scene.transform.Rotate;
import javafx.stage.Stage;
import javafx.util.Duration;
//main class
public class EventHandlerSample extends Application {
@Override
public void start(Stage st) {
//Draw a Box
Box b = new Box();
//set the width, height, depth
b.setWidth(160.0);
b.setHeight(160.0);
b.setDepth(110.0);
//x position
b.setTranslateX(360);
//y position
b.setTranslateY(160);
//z position
b.setTranslateZ(60);
//Set the text
Text txt = new Text("Click once to start and then click to pause");
//Set the text font, color and position
txt.setFont(Font.font(null, FontWeight.BOLD, 20));
txt.setFill(Color.RED);
//x value
txt.setX(30);
//y value
txt.setY(60);
//Set the box material
PhongMaterial mt = new PhongMaterial();
//set the diffuse color
mt.setDiffuseColor(Color.RED);
//Set the material OF diffuse color to box
b.setMaterial(mt);
//Set the box rotation animation to the box
RotateTransition rt = new RotateTransition();
//Set the transition duration
rt.setDuration(Duration.millis(2000));
//Set the transition node
rt.setNode(b);
//Set the rotation axis
rt.setAxis(Rotate.Y_AXIS);
//Set the rotation angle
rt.setByAngle(360);
//Set the transition cycle count
rt.setCycleCount(50);
//Set the value of auto reverse as false
rt.setAutoReverse(false);
//Create a text field
TextField txtt = new TextField();
//Setting the text field position
txtt.setLayoutX(60);
txtt.setLayoutY(110);
//event handler
EventHandler<KeyEvent> evnt = new EventHandler<KeyEvent>() {
@Override
//handle method
public void handle(KeyEvent event) {
//start animation
rt.play();
}
};
//Add event handler ev to the text feld txt
txtt.addEventHandler(KeyEvent.KEY_TYPED, evnt);
//mouse clicked event handler
EventHandler<javafx.scene.input.MouseEvent> evntt =
new EventHandler<javafx.scene.input.MouseEvent>() {
//handle method
@Override
public void handle(javafx.scene.input.MouseEvent e) {
//stop the animation
rt.stop();
}
};
// Event handler adding to the box
b.addEventHandler(javafx.scene.input.MouseEvent.MOUSE_CLICKED, evntt);
//Create a Group
Group gp = new Group(b, txtt, txt);
//Create a scene
Scene sc = new Scene(gp, 650, 350 );
//Set the cm
PerspectiveCamera cm = new PerspectiveCamera(false);
//set the x, y, z value for camera cm
cm.setTranslateX(0);
cm.setTranslateY(0);
cm.setTranslateZ(0);
sc.setCamera(cm);
//Set the title for the Stage and add scene
st.setTitle("Event Handlers Sample program");
st.setScene(sc);
//Display the result
st.show();
}
public static void main(String args[])
{
//launch the application
launch(args);
}
}
Output:
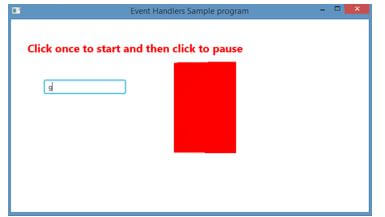
In this program, rectangle starts rotating when a letter is typed and stops when another letter is typed.
Recommended Articles
This is a guide to JavaFX EventHandler. Here we discuss the introduction, how does JavaFX EventHandler work? and examples. You may also have a look at the following articles to learn more –


