Updated April 10, 2023

Introduction to JavaFX Gradle
The following article provides an outline for JavaFX Gradle. In Java, JavaFX helps in creating desktop applications as well as games. Gradle is considered as one of the top build systems present on the Java platform. Nowadays, plethora of projects is migrated to gradle from maven and ant etc. Using this plugin boosts the build-script and moreover, gradle-plugin wraps every call as well as introduces workarounds along with fixes for JDK-bugs.
How does JavaFX Gradle Plugin Work?
In order to work with gradle, we have to setup the same. For that, some steps has to be performed.
Step 1:
Download JDK8 and install it for the platform you use. Always remember to download the JDK based on your platform. Then, verify the same by using the command java – version and running it.
Before moving to next step, you have to know what JDK is.
Step 2:
After installing JDK, download Eclipse IDE and install the same.
For that, extract the downloaded zip and double click on the exe (executable file) for verifying whether the downloaded eclipse is up and running.
Step 3:
Normally, Eclipse has in-built gradle support (that is, buildship gradle plugin). But, the default version can be old sometimes. For that, the gradle buildship has to be updated.
For that, perform the steps below.
- Open Eclipse.
- Click on the menu Help.
- Choose Eclipse Marketplace.
- Find the buildship with the help of field find on the top.
- Click go.
- Click on the button installed/install for updating the buildship. On clicking it, the page will take the user to the tab installed.
- Click on the button update. On clicking this, the update starts and buildship gets updated.
- Once these steps are done, restart eclipse.
If you want to check whether the buildship is installed or not, perform the below steps.
- Open Eclipse.
- Click on the menu Help.
- Choose Eclipse Marketplace.
- Click on the button installed/install for viewing the installed buildship.
Normally, you will be able to see the buildship in that section. If it is not visible, close the eclipse and start again.
Step 4:
Next, a JavaFX project has to be created with the help of gradle.
Now, we will see how to do that. For that, following steps has to be performed.
- Open Eclipse.
- Click on the menu File.
- Choose.
- Select Other.
- Select the GradleProject from the Gradle option.
- Give a name for the project you have created.
- Click Next.
- Then click Finish.
As this is the first gradle project you have created, it will download libraries for the project.
Step 5:
Once all these steps are done, create a simple Java class and save it within the project folder src/main/java.
Step 6:
[optional]Sometimes, you may see an error as shown below.
For solving that, you can perform the below steps.
- Right click on the gradle project you have created.
- Select properties.
- Click on Java Build path.
- Click libraries.
- Expand the JRE system library by clicking the arrow.
- Select Access rules by double clicking it.
- Click on Add.
- Change the resolution as Accessible.
- Set the pattern as javafx/**.
- Apply and close the window.
Example of JavaFX Gradle
Let us see a sample program which is created on the gradle project.
JavaFX program that works on a gradle project.
Code:
//JavaFX program that works on a gradle project and displays a button with text
//import all the necessary packages
import javafx.application.Application ;
import javafx.scene.Scene ;
import javafx.scene.control.Button ;
import javafx.scene.layout.StackPane ;
import javafx.stage.Stage ;
// main class
public class JavaFXDemoSample extends Application
{
//main method
public static void main(String[] args)
{
//application starts here
launch(args);
}
// entry point of the program
@Override
// st is the window at top level which is created by the platform
public void start(Stage st) throws Exception
{
//declare a msg
String msg = "Hey !!! It is working !!!" ;
//create a button
Button btn1 = new Button();
//set a text for the button
btn1.setText(msg);
// For UI controls, create a layout container
StackPane sp = new StackPane();
//add children
sp.getChildren().add(btn1);
// a container at top level for viewing all content
Scene sc = new Scene( sp , 350 , 300 );
//set title for the stage
st.setTitle(msg);
//set the scene
st.setScene(sc);
//display the result
st.show();   } }
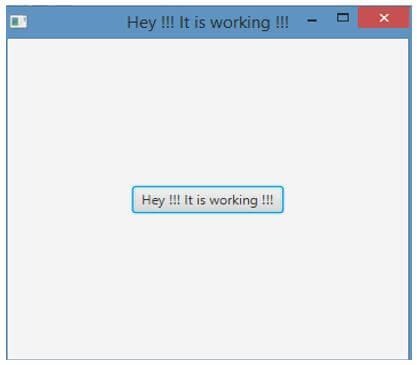
Output:
First, import all the necessary packages and declare a msg “Hey !!! It is working !!!”. Then, create a button btn1 and set the msg as the text for the button. For UI controls, create a layout container and add children to the same. Once all these are done, set title for the stage and set the scene. On executing the code, it can be seen that a button is displayed with a text as shown above.
Conclusion
In Java platform, Gradle is considered as one of the top build systems and many of the projects are migrating to gradle from maven and ant etc. In this article, detailed aspects such as working, and examples of JavaFX gradle is explained in detail.
Recommended Articles
This is a guide to JavaFX Gradle. Here we discuss the introduction, how does JavaFX gradle plugin work? and example respectively. You may also have a look at the following articles to learn more –


