Updated April 4, 2023

Introduction to JavaFX group
In JavaFX, a group is a container component that does not apply any special layout for the children. Here, every child component or node will be kept at the position 0,0. Normally, this group component is mainly used to put transformations or effects to a control set together-that is, as a group. Suppose a layout to the children that are available within the group; then it can be nested within the layout component and add them to the group. It is denoted by the javafx.scene.Group class.
Syntax
Below is the syntax of the Group component in JavaFX
Group group = new Group();How does group work in JavaFX?
The main task in group creation is the addition of components to the group. It is done by getting the children’s list and adding them to it. For example, children can be added to the group, as shown below.
Button b1 = new Button("Button 1");
Button b2 = new Button("Button 2");
Group gp = new Group();
gp.getChildren().add(b1);
gp.getChildren().add(b2);
Here, two buttons are created first. Then, after creating a group, children of those are retrieved, and they are all added to the group using the add() method.
Constructors
Following are the two constructors of the class.
- Group(): A new group can be constructed.
- Group(Collection c): A new group can be constructed with the mentioned nodes.
- Group(Node… c): A new group can be constructed with the mentioned nodes.
Commonly Used Methods
Different commonly used methods are mentioned below:
- getChildren(): The children of the particular group will be retrieved.
- minHeight(double w): The minimum height of the node will be returned for using the calculations of the layout.
- minWidth(double h): The minimum width of the node will be returned for using the calculations of the layout.
- isAutoSizeChildren(): autoSizeChildren property’s value will be retrieved.
- prefHeight(double w): The group will define a preferred height as simply for being the layout bound height.
- prefWidth(double h): The group will define preferred width as simply for being the layout bound height.
- setAutoSizeChildren(): autoSizeChildren property’s value will be set.
Examples
Different examples are mentioned below:
Example #1
JavaFX program to create two buttons with the help of a group.
Code:
import javafx.application.Application; import javafx.scene.Group; import javafx.scene.Scene; import javafx.scene.control.Button; import javafx.stage.Stage; //main class public class GroupProgram extends Application { //stasrt stage @Override public void start(Stage st) throws Exception { //set title st.setTitle("Sample"); //create button one Button bt = new Button("This is Button one"); //create button two Button btn = new Button("Button two"); //create group Group gp = new Group(); //add children gp.getChildren().add(bt); gp.getChildren().add(btn); //create scene Scene sc = new Scene(gp, 200, 100); //set the scene st.setScene(sc); //display st.show(); } //main method public static void main(String[] args) { Application.launch(args); } }Output:In this program, two buttons are created and then added to the group using the method add(). On executing the code, two buttons are displayed.
Example #2
JavaFX program to create a circle using the group. Code:
import javafx.application.Application;
import javafx.scene.Group;
import javafx.scene.Scene;
import javafx.scene.control.Button;
import javafx.stage.Stage;
import javafx.scene.control.*;
import javafx.scene.layout.*;
import javafx.event.ActionEvent;
import javafx.event.EventHandler;
import javafx.scene.canvas.*;
import javafx.scene.web.*;
import javafx.scene.shape.*;
//main class
public class GroupProgram extends Application  {
//start stage
@Override
public void start(Stage st) throws Exception {
//set title
st.setTitle("Sample");
//create a circle
Circle c = new Circle(150, 150, 40);
//create group
Group gp = new Group();
//add children
gp.getChildren().add(c);
//create scene
Scene sc = new Scene(gp, 600, 400);
//set the scene
st.setScene(sc);
//display
st.show();
}
//main method
public static void main(String[] args) {
Application.launch(args);
}
}
Output:
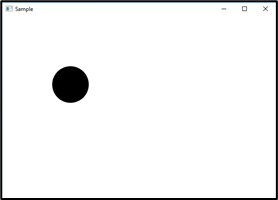
In this program also, necessary classes are imported first. Then, a circle is created, which is then added to the group using the method add(). On executing the code, the circle gets displayed.
Example #3
JavaFX program to create a circle using a group with authorizing set as true.
Code:
import javafx.application.Application;
import javafx.scene.Group;
import javafx.scene.Scene;
import javafx.scene.control.Button;
import javafx.stage.Stage;
import javafx.scene.control.*;
import javafx.scene.layout.*;
import javafx.event.ActionEvent;
import javafx.event.EventHandler;
import javafx.scene.canvas.*;
import javafx.scene.web.*;
import javafx.scene.shape.*;
//main class
public class GroupProgram extends Application  {
//start stage
@Override
public void start(Stage st) throws Exception {
//set title
st.setTitle("Sample");
//create a circle circle
Circle c = new Circle(50, 50, 40);
//create group
Group gp = new Group();
//add children
gp.getChildren().add(c);
// set auto resize
gp.setAutoSizeChildren(true);
//create scene
Scene sc = new Scene(gp, 600, 400);
//set the scene
st.setScene(sc);
//display
st.show();
}
//main method
public static void main(String[] args) {
Application.launch(args);
}
}
Output:
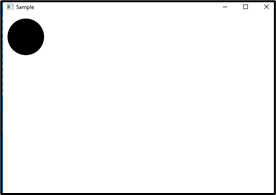
Similar to the above program, a circle is created first, then added to the group using the add method (). The difference is that an auto-resizing option is set as true. On executing the code, the circle gets displayed with resizing.
Example #4
JavaFX program to create a rectangle using the group.
Code:
import javafx.application.Application;
import javafx.scene.Group;
import javafx.scene.Scene;
import javafx.scene.control.Button;
import javafx.stage.Stage;
import javafx.scene.effect.MotionBlur;
import javafx.scene.paint.Color;
import javafx.scene.shape.Rectangle;
import javafx.scene.text.Font;
import javafx.scene.text.FontWeight;
import javafx.scene.text.Text;
//main class
public class GroupProgram extends Application  {
//start stage
@Override
public void start(Stage st) throws Exception {
//set title
st.setTitle("Sample");
//create rectangle
Rectangle r = new Rectangle();
//set x value of rectangle
r.setX(20);
//set y value of rectangle
r.setY(40);
//set width of rectangle
r.setWidth(170);
//set height of rectangle
r.setHeight(90);
//fill the color as green
r.setFill(Color.GREEN);
//create a text
Text t = new Text();
//set the text
t.setText("Working . . ");
//set the color
t.setFill(Color.BLACK);
//set the font
t.setFont(Font.font("null", FontWeight.BOLD, 28));
//set the x value
t.setX(35);
//set the y value
t.setY(75);
//create group
Group gp = new Group();
//create a button
Button b = new Button("Sample Button");
//set the cache as true
gp.setCache(true);
// MotionBlur effect
MotionBlur mb = new MotionBlur();
// group effect setting
gp.setEffect(mb);
// Translation of x axis is as 50
gp.setTranslateX(50);
//add the children to group
gp.getChildren().addAll(r, b, t);
//create scene
Scene sc = new Scene(gp, 600, 400);
//set the scene
st.setScene(sc);
st.show();
}
//main method
public static void main(String[] args) {
Application.launch(args);
}
}
Output:
In this program, a rectangle is created with the text inside it as blurred.
Recommended Articles
This is a guide to the JavaFX group. Here we discuss the detailed aspects such as syntax, working, examples, constructors, and the JavaFX group methods. You may also have a look at the following articles to learn more –
 In this program, two buttons are created and then added to the group using the method add(). On executing the code, two buttons are displayed.


