Updated July 7, 2023

Introduction to JavaFX HBox
JavaFX HBox is a component that lays out child nodes in a horizontal manner. For this HBox, if any insets are present, the content of HBox will be displayed within that insets. HBox class is extended by the Pane class and can be instantiated from the class JavaFX.scene.layout.HBox. Unlike VBox, adding more children won’t insert it below the previous child node, but on the right side of the previous one.
Constructors of JavaFX HBox
Four constructors can be used to implement HBox in Java.
- HBox(): An HBox layout will be created with 0 spacing.
- HBox(Double s): An HBox layout will be created with the spacing s specified as the argument.
- HBox(Double spacing, Node children): An HBox layout will be created with the spacing and children nodes specified in the argument.
- HBox(Node? children): An HBox layout will be created with the spacing 0 and children nodes specified since the spacing is not set, here it is taking the default value is 0.
Properties of JavaFX HBox
JavaFX HBox has three properties as shown below.
- alignment: Property that is used for the alignment of the children that is within the height and width of HBox.
- fillHeight: Resizable children nodes will be resized to the HBox height or kept in the preferred height on setting this property as true.
- spacing: The amount of horizontal space between the child nodes in HBox will be set.
Top 15 Methods of JavaFX HBox
Following are the commonly used methods in JavaFX HBox.
- getSpacing(): Spacing property’s value will be returned.
- getHgrow(Nodechild): Hgrow property’s value will be returned.
- setFillHeight(boolean value): FillHeight property’s value will be set.
- clearConstraints(Nodechild): HBox constraints will be removed from the child node.
- isFillHeight(): FillHeight property’s value will be returned.
- setAlignment(Posvalue): Alignment property’s value will be set.
- setSpacing(double value): Spacing property’s value will be set.
- getMargin(Nodechild): Margin property’s value will be returned.
- spacingProperty(): Horizontal space between the child nodes in HBox will be set.
- setMargin(Nodechild, Insets value): Margin for the child will be set in the HBox.
- computeMinWidth(double height): The minimum width of the region will be computed using this method.
- computeMinHeight(double width): The minimum height of the region will be computed using this method.
- getAlignment(): Alignment property’s value will be returned.
- computePrefWidth(double height): Preferred width for the region that is needed for the given height will be computed.
- computePrefHeight(double width): Preferred height for the region that is needed for the given width will be computed.
Examples of JavaFX HBox
Now, let us see some examples of HBox with some of the methods explained in the above section.
Example #1
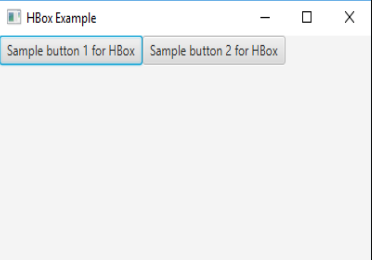
Firstly, 2 buttons b1 and b2 are created with the text ‘Sample button 1 for HBox’ and ‘Sample button 2 for HBox’. Then, create an HBox and a scene. After setting the scene, the results will be displayed.
Code:
//Java program to create a HBox
import javafx.application.Application;
import javafx.scene.Scene;
import javafx.scene.control.Button;
import javafx.scene.layout.HBox;
import javafx.stage.Stage;
//class that extends Application base class
public class JavaFXHBoxExample extends Application {
//application starts at this point
@Override
public void start(Stage s) throws Exception {
s.setTitle("HBox Example");
//create button 1
Button b1 = new Button("Sample button 1 for HBox");
Button b2 = new Button("Sample button 2 for HBox");
//create HBox
HBox hb = new HBox();
//create scene
Scene sc = new Scene(hb,400,200);
//add them
hb.getChildren().addAll(b1,b2);
//set the scene
s.setScene(sc);
//display the result
s.show();
}
//main method
public static void main(String[] args) {
launch(args);
}
}
Output:
Example #2
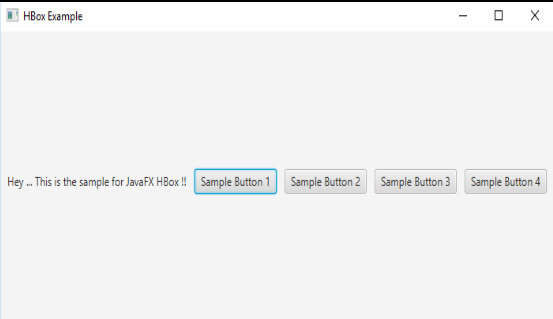
Firstly, create an HBox and a label. Then, add the created label to HBox. Create buttons using a for loop so that button creation syntax needs not written again. Create a scene and set it. After setting the scene, buttons will be displayed in the center.
Code:
//Java program to demonstrate JavaFX HBox with center alignment
import javafx.application.Application;
import javafx.scene.Scene;
import javafx.scene.control.*;
import javafx.scene.layout.*;
import javafx.stage.Stage;
import javafx.event.ActionEvent;
import javafx.event.EventHandler;
import javafx.scene.Group;
import javafx.geometry.Pos;
//class that extends Application class
public class JavaFXHBoxExample extends Application {
//  application starts at this point
public void start(Stage s)
{
try {
// set title
s.setTitle("HBox Example");
// create HBox
HBox hb = new HBox(10);
// create  label
Label lb = new Label("Hey ... This is the sample for JavaFX HBox !!");
// add the created label to HBox
hb.getChildren().add(lb);
// set alignment of the HBox
hb.setAlignment(Pos.CENTER);
// add buttons to HBox
for (int i = 0; i < 4; i++)
{
hb.getChildren().add(new Button("Sample Button " + (int)(i + 1)));
}
// create a scene
Scene sc = new Scene(hb, 700, 300);
// set the scene
s.setScene(sc);
s.show();
}
//catch the exception
catch (Exception e) {
System.out.println(e.getMessage());
}
}
// Main Method
public static void main(String args[])
{
// launch the application
launch(args);
}
}
Output:
Example #3
Firstly, HBox is created with padding and insets set. Then, create a label with a customized font. After that, Create 4 buttons and a scene. At last, set the scene and display the results.
Code:
//Java program to create HBox with padding and insets
import javafx.application.Application;
import javafx.geometry.Insets;
import javafx.scene.Scene;
import javafx.scene.control.Button;
import javafx.scene.control.Label;
import javafx.scene.layout.HBox;
import javafx.scene.text.Font;
import javafx.scene.text.FontWeight;
import javafx.stage.Stage;
public class JavaFXHBoxExample extends Application {
//main method
public static void main(String[] args) {
Application.launch(args);
}
//application starts at this point
@Override
public void start(Stage s) {
//set title
s.setTitle("HBox Sample");
// Create HBox
HBox hb = new HBox();
//set padding
hb.setPadding(new Insets(10, 50, 50, 50));
//set spacing
hb.setSpacing(10);
//create label
Label lbl = new Label("This is the HBox");
//set font properties
lbl.setFont(Font.font("Amble CN", FontWeight.BOLD, 24));
hb.getChildren().add(lbl);
// create Buttons
Button b1 = new Button();
b1.setText(" I am Button1");
hb.getChildren().add(b1);
Button b2 = new Button();
b2.setText("I am Button2");
hb.getChildren().add(b2);
Button b3 = new Button();
b3.setText("I am Button3");
hb.getChildren().add(b3);
Button b4 = new Button();
b4.setText("I am Button4");
hb.getChildren().add(b4);
// Add HBox to the scene that is created
Scene sc = new Scene(hb);
s.setScene(sc);
s.show();
}
}
Output:
Conclusion
JavaFX HBox is a component that helps the child nodes to layout in a horizontal manner. Also, the new child will be added right to the previous child.
Recommended Articles
This is a guide to JavaFX HBox. Here we discuss the Constructors, Methods, Properties of JavaFX HBox along with Code Implementation. you can also go through our suggested articles to learn more –


