Updated March 17, 2023
Introduction to JavaFX Label
JavaFX Label is a part of the package JavaFX.scene.control and class JavaFX label. It is mainly used to represent the label control and also, it is non-editable. Even though it helps in displaying the graphical image or a small text on the screen, it can’t be focused. It is also useful for presenting text that is necessary to fit in an exact space. Below is the syntax for creating a label.
Syntax:
Syntax to Initialize JavaFX label is:
Label lbl = new Label();Here, the constructor can be of parameterized and non-parameterized, which depends on the requirement. It will be discussed in the below section.
Syntax Used
The following are some of the commonly used syntaxes that help in changing the font, color, wrapping up of text, etc.
1. To Change the Font
//set font as Times New Roman
l2.setFont(Font.font("Times New Roman", 34));
Here, l2 is the label.
2. To Change the Color
//set color for the font as Red
l2.setTextFill(Color.web("Red"));
Here, l2 is the label.
3. Wrapping up of Text
l3.setMaxWidth(100);
l3.setWrapText(true);
Here, l3 is the label.
Constructor of JavaFX Label
JavaFX Label has 3 constructors they are:
1. Label()
This constructor helps in creating an empty label.
Code:
Label lbl = new Label();2. Label(String txt)
A label with the specified text will get created.
Code:
Label lbl = new Label("Name of the user");3. Label(String txt, Node ng)
This constructor helps in creating a label with the specified text and graphic.
Code:
Label lbl = new Label("Name of the user", new Imageview(graph));Methods
There are certain methods that are commonly used in JavaFX. They are:
- createDefaultSkin(): For the specified control, a new instance will be created for the default skin.
- getLabelFor(): labelFor property’s value will be returned.
- labelForProperty(): For another node or control, a label can behave like a label.
- setLabelFor(Node n): labelFor property’s value will be set.
Example to Implement in JavaFX Label
Now, let us see some of the programming examples for JavaFX Labels.
Example #1
Program to Create a Label
Code:
// Java program that demonstrates creation of label
import javafx.application.Application;
import javafx.scene.Scene;
import javafx.scene.layout.*;
import javafx.scene.control.Label;
import javafx.stage.Stage;
//Example class that extends Application class
public class JavaFXLabelExamples extends Application{
// launch the application
public void start(Stage s)
{
// set stage title
s.setTitle("label is created");
//  label creation
Label lb = new Label("This is the sample label !!!!");
// Stack pane creation
StackPane sp = new StackPane();
sp.getChildren().add(lb);
// scene creation
Scene scn = new Scene(sp, 200, 200);
// set scene
s.setScene(scn);
s.show();
}
public static void main(String args[])
{
// launch the application
launch(args);
}
}
Output:
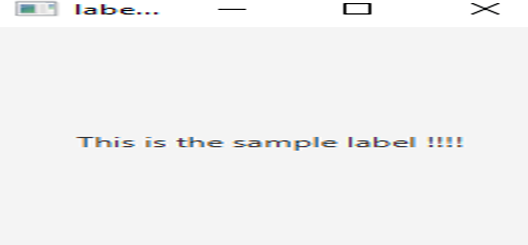
The explanation for the above program:
- A stage is created and a title is set.
- The label is created with the help of a default constructor.
- Stack pane is also created.
- Show() method helps in displaying the results.
Example #2
Program to create a label and set a color.
Code:
// Java program that demonstrates creation of label
//Java program to set a color for the created label
import javafx.application.Application;
import javafx.scene.Group;
import javafx.scene.Scene;
import javafx.scene.control.Label;
import javafx.scene.layout.HBox;
import javafx.scene.paint.Color;
import javafx.stage.Stage;
//Example class that extends Application class
public class JavaFXLabelExamples extends Application{
public static void main(String[] args) {
// launch the application
launch(args);
}
//application starts here
public void start(Stage stage) {
//a new scene is created
Scene scn = new Scene(new Group());
//set the title, width and height of stage
stage.setTitle("Example of Label");
stage.setWidth(300);
stage.setHeight(200);
//horizontal direction box
HBox hb = new HBox();
//create label with parameterised constructor
Label lbl = new Label("This is the sample label");
//set the color for the text
lbl.setTextFill(Color.web("Red"));
hb.setSpacing(10);
hb.getChildren().add((lbl));
((Group) scn.getRoot()).getChildren().add(hb);
//set scene
stage.setScene(scn);
//display result
stage.show();
}
}
Output:
The explanation for the above program:
- A stage is created and a title is set
- The label is created with the help of a parameterized constructor. That is, label with the specified name will be created.
- Text with the specified color gets created.
- Show() method helps in displaying the results
Example #3
Program to set color, font, wrap and add effects.
Code:
import java.io.*;
import javafx.application.Application;
import javafx.event.EventHandler;
import javafx.geometry.Insets;
import javafx.scene.Scene;
import javafx.scene.control.Label;
import javafx.scene.image.Image;
import javafx.scene.image.ImageView;
import javafx.scene.input.MouseEvent;
import javafx.scene.layout.FlowPane;
import javafx.scene.paint.Color;
import javafx.scene.text.Font;
import javafx.stage.Stage;
public class JavaFXLabelExamples extends Application {
@Override
public void start(Stage primaryStage) throws Exception {
// Image Source
//Make sure you have a source image in the specified path
FileInputStream input = new FileInputStream("D:\\EduCBA\\nov\\download.png");
//image creation
Image i = new Image(input);
//image view creation
ImageView iv = new ImageView(i);
//label 1
Label l1 = new Label("Sample Label for Text & image");
// Set image
l1.setGraphic(iv);
//  Label 2
Label l2 = new Label("sample Label for Font & Color");
//set font as Times New Roman
l2.setFont(Font.font("Times New Roman", 34));
//set color for the font
l2.setTextFill(Color.web("Red"));
// Label 3
Label l3 = new Label("Sample label for wrapping of the text");
l3.setMaxWidth(100);
l3.setWrapText(true);
// Label 4
Label l4 = new Label("Label with 45 degree rotation");
// Rotate in a degree of 45
l4.setRotate(45);
l4.setTranslateY(30);
FlowPane root = new FlowPane();
//set the padding
root.setPadding(new Insets(10));
//set horizontal gap
root.setHgap(10);
//set vertical gap
root.setVgap(10);
//add it to the stage
root.getChildren().addAll(l1, l2, l3, l4);
//scene creation
Scene scene = new Scene(root, 400, 250);
//set title
primaryStage.setTitle("Sample Labels for demo purpose");
//set the scene
primaryStage.setScene(scene);
//display the results
primaryStage.show();
}
public static void main(String[] args) {
//launch the application
launch(args);
}
}
Output:
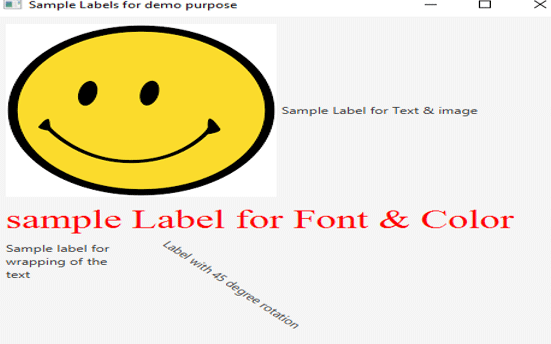
The explanation for the above program:
- An image is taken from the source specified. If an image is not present in the source, an error can occur.
- Four labels are present.
- The first label creates a text and an image.
- The second label creates a text with specified font and color
- The third label creates a text that wraps
- The fourth label creates a text with a 45-degree rotation.
- All these labels are created with the help of parameterized constructors. That is, label with the specified name will be created.
- Show() method helps in displaying the results
Conclusion
It helps in displaying graphical images, texts on the screen. These texts can be made changes based on the user’s requirement. This document covers the syntax, sample programs, parameterized and non-parameterized constructors of JavaFX labels in detail.
Recommended Articles
This is a guide to JavaFX Label. Here we discuss the method, examples, and function in JavaFX Label with proper codes and output. You can also go through our other related articles to learn more –


