Updated July 6, 2023
Introduction to JavaFX Layouts
In JavaFX, layouts are used to define the way in which the components are to be seen the stage, in other words, we can say that layouts organize the components on the screen using JavaFX.scene.layout package and JavaFX.scene.layout.per class. JavaFX provides various built-in Layouts that are VBox, HBox, BorderPane, FlowPane, GridPane, Pane, and StackPane.
Top 5 JavaFX Layouts
As already discussed, layouts can be of different types such as VBox, HBox, BorderPane, FlowPane, StackPane, AnchorPane, TilePane, GridPane, etc. In this section, we will discuss five of them.
1. VBox
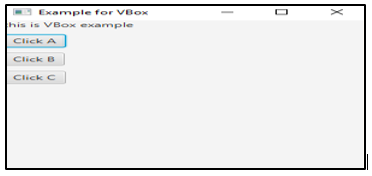
VBox helps in organizing the node in a vertical column. In this, the content area’s default height can display the children in its preferred height and default width is the greatest of the children’s width. Even though the locations cannot be set for the children since it is automatically computed, it can be controlled to an extent by customization of VBox properties.
Code:
// Java Program to create a VBox
import javafx.application.Application;
import javafx.scene.Scene;
import javafx.scene.control.*;
import javafx.scene.layout.*;
import javafx.stage.Stage;
public class JFXLayouts extends Application {
// start method helps in launching the application
public void start(Stage stage)
{
// Title set
stage.setTitle("Example for VBox");
// VBox creation
VBox vb = new VBox(10);
// Label creation
Label lb = new Label("this is VBox example");
// Add the created label to vbox
vb.getChildren().add(lb);
// add the buttons to VBox
vb.getChildren().add(new Button("Click A"));
vb.getChildren().add(new Button("Click B"));
vb.getChildren().add(new Button("Click C"));
// Scene creation
Scene scene = new Scene(vb, 300, 300);
// Scene setting
stage.setScene(scene);
stage.show();
}
// Main Method
public static void main(String args[])
{
//method to launch the JavaFX application
launch(args);
}
}
Output:
Here, 3 buttons A, B, and C are arranged in a horizontal manner.
2. HBox
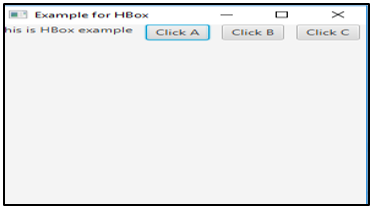
HBox works in the opposite concept of VBox. That is, nodes will be organized horizontally. Following is a program that helps in understanding HBox.
Code:
// Java Program to create an HBox
import javafx.application.Application;
import javafx.scene.Scene;
import javafx.scene.control.*;
import javafx.scene.layout.*;
import javafx.stage.Stage;
public class JFXLayouts extends Application {
// start method helps in launching the application
public void start(Stage stage)
{
// Title set
stage.setTitle("Example for HBox");
// HBox creation
HBox hb = new HBox(10);
// Label creation
Label lb = new Label("this is HBox example");
// Add the created label to Hbox
hb.getChildren().add(lb);
// add the buttons to Hbox
hb.getChildren().add(new Button("Click A"));
hb.getChildren().add(new Button("Click B"));
hb.getChildren().add(new Button("Click C"));// Scene creation
Scene scene = new Scene(hb, 300, 300);
// Scene setting
stage.setScene(scene);
stage.show();
}
// Main Method
public static void main(String args[])
{
//method to launch the JavaFX application
launch(args);
}
}
Output:
In this case, 3 buttons A, B, and C are arranged in a horizontal manner.
3. BorderPane
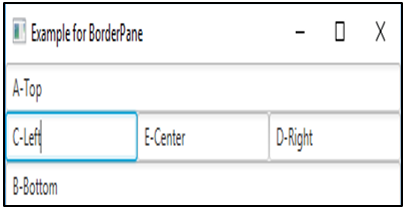
In this, layout structure has five regions such as TOP, BOTTOM, CENTRE, LEFT, and RIGHT.
Code:
// Java Program to create an BorderPane
import javafx.application.Application;
import javafx.scene.Scene;
import javafx.scene.control.*;
import javafx.scene.layout.*;
import javafx.stage.Stage;
public class JFXLayouts extends Application {
// start method helps in launching the application
public void start(Stage stage)
{
BorderPane bp = new BorderPane();
bp.setTop(new TextField("A-Top"));
bp.setBottom(new TextField("B-Bottom"));
bp.setLeft(new TextField("C-Left"));
bp.setRight(new TextField("D-Right"));
bp.setCenter(new TextField("E-Center"));// Scene creation
Scene scene = new Scene(bp);// Title set
stage.setTitle("Example for BorderPane");
// Scene setting
stage.setScene(scene);
stage.show();
}
// Main Method
public static void main(String args[])
{
//method to launch the JavaFX application
launch(args);
}
}
Output:
Here, 5 text fields are resent in the five directions of the pane.
4. FlowPane
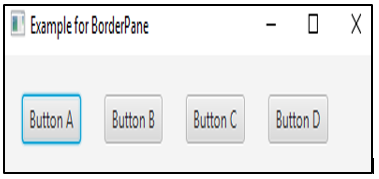
FlowPane permits the user to layout the nodes in a consecutive manner and wraps the nodes at the boundary. Here, the nodes can be in the vertical direction (columns) or horizontal direction (rows).
Code:
// Java Program to create a flowpane
import javafx.application.Application;
import javafx.collections.ObservableList;
import javafx.geometry.Insets;
import javafx.scene.Scene;
import javafx.scene.control.Button;
import javafx.scene.layout.FlowPane;
import javafx.scene.shape.Sphere;
import javafx.stage.Stage;
public class JFXLayouts extends Application {
// start method helps in launching the application
public void start(Stage stage)
{
//create buttons
Button b1 = new Button("Button A");
Button b2 = new Button("Button B");
Button b3 = new Button("Button C");
Button b4 = new Button("Button D");
//Flow Pane creation
FlowPane fp = new FlowPane();
//Set horizontal gap
fp.setHgap(25);
//Set margin
fp.setMargin(b1, new Insets(20, 0, 20, 20));
ObservableList list = fp.getChildren();
//Add nodes to the flow pane
list.addAll(b1, b2, b3, b4);
// Scene creation
Scene scene = new Scene(fp);
// Title set
stage.setTitle("Example for BorderPane");
// Scene setting
stage.setScene(scene);
stage.show();
}
// Main Method
public static void main(String args[])
{
//method to launch the JavaFX application
launch(args);
}
}
Output:
5. StackPane
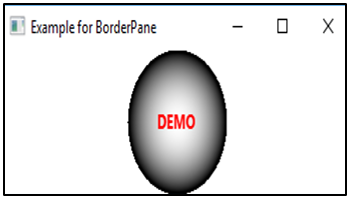
In this layout, all nodes are placed within a single stack. That is, nodes are arranged just like in a stack, on top of another.
Code:
// Java Program to create a flowpane
import javafx.application.Application;
import javafx.scene.shape.Sphere;
import javafx.collections.ObservableList;
import javafx.scene.text.Font;
import javafx.geometry.Insets;
import javafx.scene.text.FontWeight;
import javafx.scene.Scene;
import javafx.scene.layout.StackPane;
import javafx.scene.shape.Circle;
import javafx.scene.text.Text;
import javafx.stage.Stage;
import javafx.scene.paint.Color;
public class JFXLayouts extends Application {
@Override
public void start(Stage stage) {
//draw a sphere
Sphere sph = new Sphere(50);
//text creation
Text t = new Text("DEMO");
//Set font of the text
t.setFont(Font.font(null, FontWeight.BOLD, 13));
//Set color of the text
t.setFill(Color.RED);
//set position of the text
t.setX(20);
t.setY(50);
//Create a Stackpane
StackPane sp = new StackPane();
ObservableList list = sp.getChildren();
//Add nodes to the pane
list.addAll( sph, t);
// Scene creation
Scene scene = new Scene(sp);
// Title set
stage.setTitle("Example for BorderPane");
// Scene setting
stage.setScene(scene);
stage.show();
}
// Main Method
public static void main(String args[])
{
//method to launch the JavaFX application
launch(args);
}
}
Output:
Conclusion
JavaFX Layouts helps to create the interface design in a consistent Look and Feel. Layouts can be of different types and they can be chosen based on the user’s requirements. In this document, five of the layouts are discussed in detail.
Recommended Articles
This is a guide to JavaFX Layouts. Here we discuss the top 5 layouts of JavaFX such as VBox, HBox, BorderPane, FlowPane, and StackPane along with examples and code implementation. You may also look at the following articles to learn more –
