Updated June 23, 2023
Introduction to JavaFX ListView
JavaFX ListView is a class used to choose one or more choices from the list. ListViewclass is available within scene.control.ListView package. ListView allows us to add as many elements as we want. The user may additionally add elements to ListView either horizontally or vertically. ListView can be allowed to add images to the list values. ListView is used to select single or multiple values at a time.
Real-Time Example: While installing any application into the Windows PC, many features are there to select. But we didn’t choose all the features because we are choosing the feature because we are allowing additional software to install in the background. So, we choose the required features from the list. In this case, we can use the ListView Multi-select option.
Advantages: Flexible to choose single or multiple options from the list; also, Flexible to add images to the list.
How does ListView work in JavaFX?
Accessing JavaFX features user-defined class must extend the Application class.
Step 1: In JavaFX, creating is the first step. ListView can instantiate by using the new keyword.
Syntax:
ListFView listViewRef=new ListView();Step 2: Adding elements or items to thelistViewRef is the second step. Items can be added in 2 ways:
1. By using add() Method
Syntax:
listViewRef.getItems().add(“item-name”);- getItems(): Used for showing the list item to the user.
2. By using ObservableList Class
Syntax:
ObservableList<Type> names = FXCollections.observableArrayList(list of items);- ObservavleList<Type>: Holds the list of the items with Type.
- FXCollections.observableArrayList(): Takes the all possible Typed list of items.
Step 3: The third step is to create a horizontal or vertical box to add the items.
Syntax:
HBox hBox=new HBox(); //Gives horizontal box
VBox vBox=new VBox();//Gives vertical box
Step 4: Creating a scene means screen to display output is the fourth step.
Syntax:
Scene screen = new Scene(hBox or vBox, length, width);Step 5: Adding a Scene reference screen to the Stage object reference is the fifth step. We are adding an output screen to Stage. We will get this stage object reference from the start predefined JavaFX method.
Syntax:
stage.setScene(screen);Step 6: Finally, display the output screen by showing stage reference with the show() method.
Syntax:
stage.show();Examples of JavaFX ListView
Following are the different examples of JavaFX Listview.
Example #1 – Adding Items Horizontally to the ListView
Code:
import javafx.application.Application;
import javafx.scene.Scene;
import javafx.scene.control.ListView;
import javafx.scene.layout.HBox;
import javafx.stage.Stage;
public class AddingItemsListView extends Application {
@Override
public void start(Stage displayScreen) throws Exception {
/* create list object */
ListView<String> listViewReference = new ListView<String>();
/* adding items to the list view */
listViewReference.getItems().add("First Item");
listViewReference.getItems().add("Second Item");
listViewReference.getItems().add("Third Item");
listViewReference.getItems().add("Fourth Item");
listViewReference.getItems().add("Fifth Item");
/*making list view horizontal*/
listViewReference.setOrientation(Orientation.HORIZONTAL);
/* creating horizontal box to add item objects */
HBox hbox = new HBox(listViewReference);
/* creating scene */
Scene scene = new Scene(hbox, 400, 200);
/* adding scene to stage */
displayScreen.setScene(scene);
/* display scene for showing output */
displayScreen.show();
}
public static void main(String[] args) {
/*launch method calls internally start() method*/
Application.launch(args);
}
}
Output:
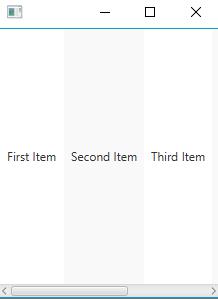
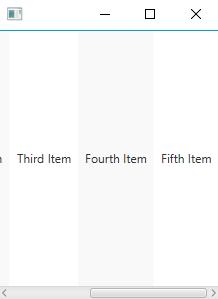
Explanation: As you can see from the output, items are added horizontally. You can scroll the scroll bar to see more items like in the output.
Example #2 – Adding Items Vertically to the ListView
Code:
import javafx.application.Application;
import javafx.scene.Scene;
import javafx.scene.control.ListView;
import javafx.scene.layout.VBox;
import javafx.stage.Stage;
public class AddingItemsListView extends Application {
@Override
public void start(Stage displayScreen) throws Exception {
/* create list object */
ListView<String> listViewReference = new ListView<String>();
/* adding items to the list view */
listViewReference.getItems().add("First Item");
listViewReference.getItems().add("Second Item");
listViewReference.getItems().add("Third Item");
listViewReference.getItems().add("Fourth Item");
listViewReference.getItems().add("Fifth Item");
/* creating vertical box to add item objects */
VBox vBox = new VBox(listViewReference);
/* creating scene */
Scene scene = new Scene(vBox, 220, 270);
/* adding scene to stage */
displayScreen.setScene(scene);
/* display scene for showing output */
displayScreen.show();
}
public static void main(String[] args) {
/*launch method calls internally start() method*/
Application.launch(args);
}
}
Output:
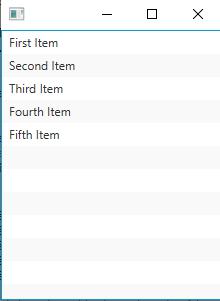
Explanation: As you can see from the output, items are added vertically. By default alignment of the list, the view is vertical.
Example #3 – Select Multiple Items from the ListView
Code:
import javafx.application.Application;
import javafx.scene.Scene;
import javafx.scene.control.ListView;
import javafx.scene.control.SelectionMode;
import javafx.scene.layout.VBox;
import javafx.stage.Stage;
public class SelectingMultipleItemsListView extends Application {
@Override
public void start(Stage displayScreen) throws Exception {
/* create list object */
ListView<String> listViewReference = new ListView<String>();
/* adding items to the list view */
listViewReference.getItems().add("First Item");
listViewReference.getItems().add("Second Item");
listViewReference.getItems().add("Third Item");
listViewReference.getItems().add("Fourth Item");
listViewReference.getItems().add("Fifth Item");
/*Make listview to select multiple values*/
listViewReference.getSelectionModel().setSelectionMode(SelectionMode.MULTIPLE);
/* creating vertical box to add item objects */
VBox vBox = new VBox(listViewReference);
/* creating scene */
Scene scene = new Scene(vBox, 220, 270);
/* adding scene to stage */
displayScreen.setScene(scene);
/* display scene for showing output */
displayScreen.show();
}
public static void main(String[] args) {
/*launch method calls internally start() method*/
Application.launch(args);
}
}
Output:
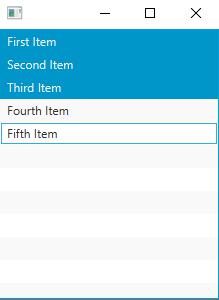
Explanation: Select multiple items and press Ctrl+(click on which item you want to select).
Example #4 – Adding Items to the ListView
Code:
import javafx.application.Application;
import javafx.collections.FXCollections;
import javafx.collections.ObservableList;
import javafx.scene.Scene;
import javafx.scene.control.ListCell;
import javafx.scene.control.ListView;
import javafx.scene.image.Image;
import javafx.scene.image.ImageView;
import javafx.scene.layout.VBox;
import javafx.stage.Stage;
public class AddingImagesToItemsListView extends Application {
/*loading images with their paths*/
private final Image cabinetImage  = new Image("Cab.png");
private final Image docIconImage  = new Image("documenticon.png");
private final Image homeCabImage  = new Image("HomCab.png");
private final Image searchIconImage = new Image("searchicon.png");
/*image array to load all images at a time*/
private Image[] imagesArray = {cabinetImage, docIconImage, homeCabImage, searchIconImage};
@Override
public void start(Stage displayScreen) throws Exception {
/* create list object */
ListView<String> listViewReference = new ListView<String>();
/* adding items to the list view */
ObservableList<String> elements = FXCollections.observableArrayList("Fist Image", "Second Image", "Third Image",
"Fourth Image");
listViewReference.setItems(elements);
/*setting each image to corresponding array index*/
listViewReference.setCellFactory(param -> new ListCell<String>() {
/*view the image class to display the image*/
private ImageView displayImage = new ImageView();
@Override
public void updateItem(String name, boolean empty) {
super.updateItem(name, empty);
if (empty) {
setText(null);
setGraphic(null);
} else {
if (name.equals("Fist Image"))
displayImage.setImage(imagesArray[0]); /*setting array image to First Image*/
else if (name.equals("Second Image"))
displayImage.setImage(imagesArray[1]);/*setting array image to Second Image*/
else if (name.equals("Third Image"))
displayImage.setImage(imagesArray[2]);/*setting array image to Third Image*/
else if (name.equals("Fourth Image"))
displayImage.setImage(imagesArray[3]);/*setting array image to Fourth Image*/
setText(name);
setGraphic(displayImage);
}
}
});
/* creating vertical box to add item objects */
VBox vBox = new VBox(listViewReference);
/* creating scene */
Scene scene = new Scene(vBox, 220, 270);
/* adding scene to stage */
displayScreen.setScene(scene);
/* display scene for showing output */
displayScreen.show();
}
public static void main(String[] args) {
/* launch method calls internally start() method */
Application.launch(args);
}
}
Output:
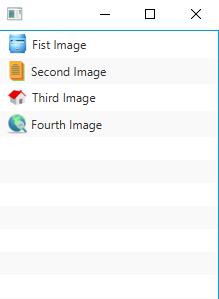
Explanation:
- First, paste all the images to the eclipse src folder, then give their names in the Image class.
- Now you can see the output in the above image.
Recommended Articles
This is a guide to JavaFX ListView. Here we discuss the Introduction and how does ListView works in JavaFX, along with different examples and code implementation. You may also look at the following articles to learn more –
