Updated July 10, 2023
Introduction to JavaFX Menu
In the JavaFX menu, the menu is used as a popup that consists of many menu items that are shown when the user clicks it. After that, the menu items go into a hidden state. In order to create this, instantiate the class javafx.scene.control.Menu. Syntax, constructors and several other aspects of JavaFX Menu will be discussed in the following sections.
Syntax:
In JavaFX, the menu can be created as below.
Menu mn = new Menu();Always make sure that the class javafx.scene.chart.Menu is imported into the program before executing the code.
Constructors of JavaFX Menu
There are four constructors for the JavaFX menu. They are:
- Menu(): An empty menu will be created.
- Menu(String s): A menu will be created with string s as its label.
- Menu(String s, Node nd): A menu will be created with string s as its label and nd as the graphics node.
- Menu(String s, Node nd, Item … .. i): A menu will be created with string s as its label, and as the graphic node and add the given items to the list.
Methods of JavaFX Menu
There are some JavaFX menu methods that are discussed below:
- getItems(): Items to be displayed within this menu.
- getOnHidden(): onHidden property’s value will be returned.
- getOnShowing(): onShowing property’s value will be returned.
- getOnHiding(): onHiding property’s value will be returned.
- getOnShown(): onShown property’s value will be returned.
- setOnHidden(EventHandler<Event> v): onHidden property’s value v will be set.
- setOnHiding(EventHandler<Event> v): onHiding property’s value v will be set.
- setOnShowing(EventHandler<Event> v): onShowing property’s value v will be set.
- setOnShown(EventHandler<Event> v): onShown property’s value v will be set.
- hide(): If contextMenu or its submenus are showing, this method will be called to hide it.
- isShowing(): Showing the property’s value will be returned.
- onHiddenProperty(): Once the contextMenu is hidden, this method will be called.
- onShowingProperty(); Before the contextMenu is shown, this method will be called even if it has no items to show.
- onHidingProperty(): Before the contextMenu is hidden, this method will be called.
- onShownProperty(): Once the contextMenu is shown, this method will be called.
- addEventHandler(EventType<E> et, EventHandler<E> e): An event handler e will be registered to the menu item.
- removeEventHandler(EventType<E> et, EventHandler<E> e): An event handler e that is registered will be unregistered from the menu item.
- buildEventDispatchChain(EventDispatchChaint): An event dispatch chain t will be constructed for the target.
- showingProperty(): In order to check whether the contextMenu is visible, this method will be called.
How to Create Menu in JavaFX?
It can be created using the following steps.
Step 1: Create a Class that Extends from Application Class.
Import the package javafx.application.Application to extend the Application class and create a class that extends it.
public class JavaFXChartsExample extends Application {
}
Step 2: Create the Menu.
As already discussed, create a menu using the syntax.
Menu m = new Menu();Step 3: Create Menu items.
Create Menu ItemsMenu items that have to be added to the menu that needs to be created.
MenuItem mi1 = new MenuItem("Happy");Step 4: Create a Menu Bar.
MenuBar mb = new MenuBar();Step 5: Add Menu Bar.
Add the menu bar created.
mb.getMenus().add(mn);Step 6: Configure Group and Scene.
A group and scene has to be configured after performing the above steps.
VBox vb = new VBox(mb);
Scene sc = new Scene(vb, 400, 200);
s.setScene(sc);
s.show();
Examples to Implement JavaFX Menu
Let us see some different examples to implement the JavaFX Menu.
Example #1
In this example, we’ll see a java program with menu items to construct a menu.
Code:
//java program to create a menu with menu items
import javafx.application.Application;
import javafx.scene.Scene;
import javafx.event.EventHandler;
import javafx.scene.control.*;
import javafx.stage.Stage;
import javafx.scene.control.Alert.AlertType;
import java.time.LocalDate;
import javafx.scene.control.Button;
import javafx.scene.layout.*;
import javafx.event.ActionEvent;
//sample class that extends application class
public class JavaFXMenuExample extends Application {
// application starts at this point
public void start(Stage s)
{
// Title for the stage
s.setTitle("Sample menu bar");
// menu creation
Menu mn = new Menu("Select your favourite online shopping site");
// menu items creation
MenuItem mi1 = new MenuItem("Flipkart");
MenuItem mi2 = new MenuItem("Myntra");
MenuItem mi3 = new MenuItem("Amazon");
MenuItem mi4 = new MenuItem("Club factory");
// Adding menu items
mn.getItems().add(mi1);
mn.getItems().add(mi2);
mn.getItems().add(mi3);
mn.getItems().add(mi4);
// menubar creation
MenuBar mb = new MenuBar();
// Adding Menubar
mb.getMenus().add(mn);
// VBox creation
VBox v = new VBox(mb);
// scene creation
Scene scn = new Scene(v, 500, 300);
// set the scene
s.setScene(scn);
//display the result
s.show();
}
public static void main(String args[])
{
// launch the application
launch(args);
}
}
Output:
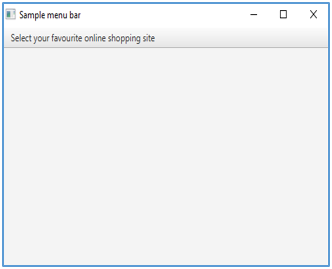
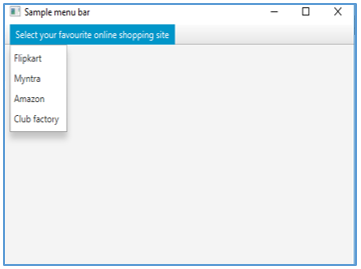
A menu will be displayed as shown above. When it is clicked, a list of items gets displayed.
Example #2
This is a java program to create a menu with menu items and its sub-items.
Code:
//java program to create menu with menu items and its sub items
import javafx.application.Application;
import javafx.application.Platform;
import javafx.scene.Scene;
import javafx.scene.control.CheckMenuItem;
import javafx.scene.control.Menu;
import javafx.scene.control.MenuBar;
import javafx.scene.layout.BorderPane;
import javafx.scene.paint.Color;
import javafx.stage.Stage;
import javafx.scene.control.MenuItem;
import javafx.scene.control.RadioMenuItem;
import javafx.scene.control.SeparatorMenuItem;
import javafx.scene.control.ToggleGroup;
public class JavaFXMenuExample extends Application {
@Override
public void start(Stage s) {
//create border pane
BorderPane r = new BorderPane();
Scene scene = new Scene(r, 300, 250, Color.RED);
//create menubar
MenuBar mb = new MenuBar();
mb.prefWidthProperty().bind(s.widthProperty());
r.setTop(mb);
// first menu with sub items
Menu m = new Menu("Select your Age group");
MenuItem mi1 = new MenuItem("18-24");
MenuItem mi2 = new MenuItem("25-35");
MenuItem mi3 = new MenuItem("36-50");
m.getItems().addAll(mi1,mi2,mi3);
// second menu with sub items
Menu m1 = new Menu("Favorite online site");
ToggleGroup t1 = new ToggleGroup();
RadioMenuItem r1 = new RadioMenuItem("Flipkart");
r1.setToggleGroup(t1);
RadioMenuItem r2 = new RadioMenuItem("Myntra");
r2.setToggleGroup(t1);
r2.setSelected(true);
m1.getItems().addAll(r1,r2);
Menu m2 = new Menu("Queries");
m2.getItems().addAll( new CheckMenuItem("Related to product"),
new CheckMenuItem("Related to delivery"));
m1.getItems().add(m2);
mb.getMenus().addAll(m, m1);
s.setScene(scene);
s.show();
}
public static void main(String[] args) {
launch(args);
}
}
Output:
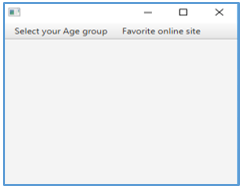
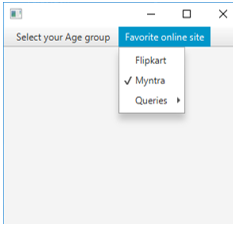
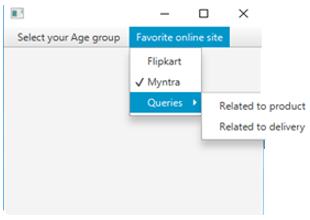
Two menus with different sub-items will be displayed on executing the code. When the second menu is clicked, sub-items such as Flipkart, Myntra and Queries will be showed.
It can be seen that a tick is present near Myntra as the method setSelected is set as True.
When the Queries menu is clicked, two sub-items such as ‘Related to product’ and ‘Related to delivery’ get displayed.
Conclusion
In JavaFX, the menu is used as a popup that gets displayed when a user clicks it. Menu consists of menu items and its sub-items. In this document, important points on the JavaFX menu are discussed.
Recommended Articles
This is a guide to JavaFX Menu. Here we discuss steps to create menu, constructors, methods along with examples and code implementation.You may also look at the following articles to learn more-
