Updated April 4, 2023
Introduction to JavaFX Pane
The JavaFX Pane is defined as one of the classes used to derive the subclasses from the base classes. It contains some UI related things like forms, layouts, panels, etc., for every subclass. It can be added and modified to the things in the UI panel. The pane class inherits their parent classes which are related to their parts like width the height that can be used to the form layouts, data-bindings, table rows, and columns. It’s been configured manually by using these in the colors, positions, sizes, and other default UI related elements.
Syntax
The javafx pane is UI based on java technology that can use for form layouts, Horizontal and Vertical boxes, etc. For each UI elements have their own instance and properties to execute the application. Likewise, the JavaFX pane has n number of types, and it is used for creating the application more sophisticated.
import javafx.*;
class class name{
method()
{
Creatingpaneclass reference= Creatingpaneclass() // the pane class will be of any type like stackpane, hbox, vbox etc.
reference.default methods();
---some java logics---
}
pubic static void main(String args[])
{
method(); // call the method which is already running on the pane class operations
----some logics---
}
}
The above code is the basic syntax for creating the java fx pane class, and it is used in the different scenarios of the applications.
How JavaFX Pane function works?
The javafx pane is one of the java-based ui widget class. It has n number of sub-type classes, and it is widely used in the application front end. The pane class also satisfied and performed the animation effects, images, etc. At the beginning of the java versions, they used the applets; swing is the ui based classes and packages to create the front end codes. The combined swing is one of the types for the javafx pane; there is around n number of type of java fx panes.1.StackPane, 2.GridPane, 3.BorderPane, 4.FlowPane, 5.TilePane and 6.Anchor Plane. These are some types of the pane which is used for creating the UI with more sophisticated.
The stack pane is one of the panes it is mainly used for allowing the nodes for many areas like the top, bottom, left, right, and center page of the application. It’s like a stack concept in the data structure; the first node of the pane is placed on the bottom, and the next node is placed on the top of the pane. The GridPane is like the table concept; the nodes are fully grided that is it can be arranged in the collection of rows and columns. The Grid Pane looks more comfortable, and the alignment of this pane is good compared to the other types of the pane. The horizontal and vertical gap of the data has also been calculated, and it is represented in the form layouts.
The Border pane looks like the border concept; it covers all the areas of the application like top to bottom, left to right, and mid-centre positions are covered for each position; the default method is to be called with the help of the classes. The flow pane is one of the added advantages of the java fx pane because the multiple nodes are combined into a single form, so the data flow should be easier for the user inputs in the application.
Some line spacing and text alignments are calculated when we use this class. The Tile Pane allows all the nodes are arranged in the sequential order of the forms its been uniformly arranged the data values in the form. The Anchor pane is the type which has been calculated the distance from the form layout panes; likewise, the JavaFX pane has many types like HBox, VBox, etc. these types are covered under the UI panel for java, both standalone and web-based applications.
Examples of JavaFX Pane
Different examples of the JavaFX pane are mentioned below:
Example #1
Code:
package com.first;
import javafx.application.Application;
import javafx.collections.ObservableList;
import javafx.geometry.Insets;
import javafx.scene.Scene;
import javafx.scene.layout.StackPane;
import javafx.scene.paint.Color;
import javafx.scene.shape.Circle;
import javafx.scene.shape.Rectangle;
import javafx.scene.shape.Sphere;
import javafx.scene.text.Font;
import javafx.scene.text.FontWeight;
import javafx.scene.text.Text;
import javafx.stage.Stage;
public class Example extends Application {
public void start(Stage st) {
Rectangle cr = new Rectangle();
cr.setX(2.3);
cr.setY(3.4);
cr.setWidth(4.5);
cr.setHeight(5.6);
Sphere sp = new Sphere(51);
Text tx = new Text("Welcome To My Domain");
tx.setFont(Font.font(null, FontWeight.BOLD, 17));
tx.setFill(Color.GREEN);
tx.setX(33);
tx.setY(62);
StackPane stp = new StackPane();
stp.setMargin(cr, new Insets(33, 43, 53, 63));
ObservableList ob = stp.getChildren();
ob.addAll(cr, sp, tx);
Scene sc = new Scene(stp);
st.setTitle("Have a Nice Day");
st.setScene(sc);
st.show();
}
public static void main(String args[]){
System.out.println("Thanks user for clicking this boxes");
launch(args);
}
}
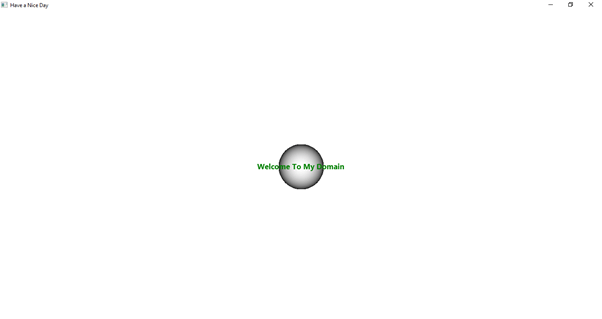
Output:
Example #2
Code:
package com.first;
import javafx.application.Application;
import javafx.geometry.Insets;
import javafx.geometry.Orientation;
import javafx.scene.Scene;
import javafx.scene.control.Button;
import javafx.scene.layout.FlowPane;
import javafx.scene.shape.Rectangle;
import javafx.stage.Stage;
public class Example extends Application {
public void start(Stage st) {
Exts(st);
}
public void Exts(Stage st) {
Rectangle rt = new Rectangle();
rt.setX(5.4);
rt.setY(7.5);
rt.setWidth(8.6);
rt.setHeight(9.7);
FlowPane fp = new FlowPane(Orientation.VERTICAL, 7,9);
fp.setPadding(new Insets(7));
fp.setMargin(rt, new Insets(9));
for (int j=0; j<=50; j++) {
fp.getChildren().add(new Button(String.valueOf(j)));
}
Scene sc = new Scene(fp, 203, 370);
st.setTitle("Welcome To My Domain");
st.setScene(sc);
st.show();
}
public static void main(String[] args) {
System.out.println("Have a Nice Day");
launch(args);
}
}
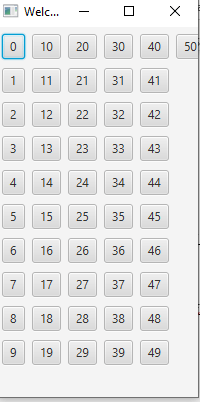
Output:
Example #3
Code:
package com.first;
import javafx.application.Application;
import javafx.scene.Scene;
import javafx.scene.control.Label;
import javafx.scene.layout.*;
import javafx.stage.Stage;
import javafx.scene.shape.Rectangle;
public class Example extends Application {
public void start(Stage st) throws Exception {
Rectangle rt1 = new Rectangle();
rt1.setX(5.4);
rt1.setY(7.5);
rt1.setWidth(8.6);
rt1.setHeight(9.7);
BorderPane br = new BorderPane();
br.setTop(new Label("Welcome To My Domain"));
br.setLeft(new Label("Have a Nice Day"));
br.setRight(new Label("Thanks for choosing the application"));
br.setCenter(new Label("Please reach out our customer care number"));
br.setBottom(new Label("Good Day Users"));
Scene sc = new Scene(br,543,743);
st.setScene(sc);
st.setX(6.5);
st.setY(8.6);
st.setWidth(9.7);
st.setHeight(10.8);
st.show();
}
public static void main(String[] args) {
System.out.println("Have a nice Weekend");
launch(args);
}
}
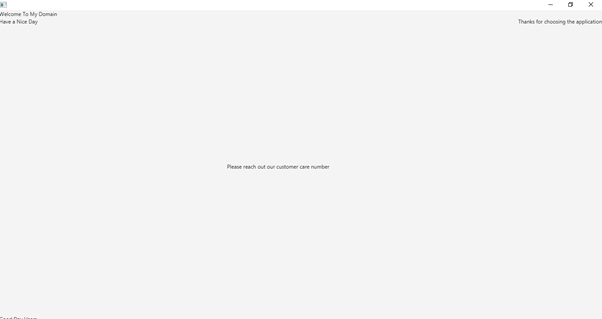
Output:
Conclusion
In the Concluded part, the JavaFX is a great feature for creating the UI Elements in the standalone application. It can be coordinate with the back end methods if we create the instance of the classes. The Start method is the initial and default method when we use the JavaFX import classes in the application.
Recommended Articles
This is a guide to JavaFX Pane. Here we discuss How the JavaFX Pane function works and Examples along with the code and output. You may also have a look at the following articles to learn more –


