Updated March 31, 2023
Introduction to JavaFX Scene
JavaFX Scene is class. Scene object can be said it as the root of JavaFX scene graph. This class contains all the visual GUI components within it. This class is available in scene.Scene package. If we want to make use of it by importing this package. If JavaFX Stage window visible when we set scene object to stage object. We can attach only one scene object to one stage at a time. If we try to attach an already attached scene to another stage then it is first detached from the previous stage (1st attached stage). Same way we can attach only one stage object to one scene at a time.
Advantage:
- Used to add any JavaFX element.
Frequently Used Constructors:
- Scene(Parent root): Creates a Scene object by new keyword with JavaFX element as argument.
- Scene(Parent root, double width, double height): Creates a Scene object by new keyword with JavaFX element, width and height as arguments.
- Scene(Parent root, double width, double height, Paint fill): Creates a Scene object by new keyword with JavaFX element, width, height and color as arguments.
Frequently used Methods:
- show(): The show() method will show the output.
- setScene(scene): This method set the Scene object.
- setTitle(): The setTitle() the set the title of the application.
How does Scene Work in JavaFX?
- Accessing JavaFX features user defined class must extends Application
- In JavaFX creating any JavaFX element is first step. ImageView, AnchorePane, ScrollPane, MenuBar etc. This can instantiate by using new.
ImageView imageView=new ImageView();
ScrollPane scrollPane=new ScrollPane();
AnchorPane anchorPaneRef=new AnchorPane ();
.
.
Etc.- Create VBox or any other display(like TilePane or HBox as per requirement) class to add the items is second step.
VBox vBox=new VBox (scrollPane or ImageView , anchorPaneRef etc.); //Gives vertical box- Third step is creating scene for apply show method on to it.
Scene screen = new Scene(vBox, length, width);Adding Scene reference screen to the Stage object reference is fourth step. Adding output screen to Stage. We will get this stage object reference from start predefined JavaFX method.
stage.setScene(screen);- Fifth step is showing output to the end user by applying show() method on the scene object.
stage.show();Examples
Following are the example are given below:
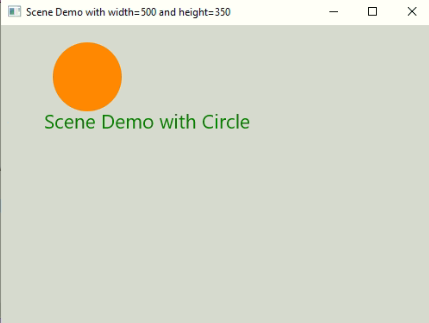
Example #1 – Scene with Circle
Code:
package com.scene;
import javafx.application.Application;
import javafx.stage.Stage;
import javafx.scene.Scene;
import javafx.scene.Group;
import javafx.scene.paint.Color;
import javafx.scene.shape.Circle;
import javafx.scene.text.Text;
import javafx.scene.text.Font;
public class SceneDemo extends Application {
@Override public void start(Stage outputStage) {
//settings title to the scene application
outputStage.setTitle("Scene Demo with width=500 and height=350");
//creating a group object for adding any element
Group groupObject = new Group();
//creating scene object for adding group object
Scene sceneObject = new Scene(groupObject,500,350);
//setting scene color
sceneObject.setFill(Color.LIGHTGRAY);
//creating circle object for display on window
Circle sceneCircle = new Circle(100, 60, 40, Color.DARKORANGE);
//creating a text displayed on the window
Text sceneText = new Text(50, 120, "Scene Demo with Circle");
sceneText.setFill(Color.GREEN);
//creating font object for set the font
Font sceneFont = new Font(23);
sceneText.setFont(sceneFont);
// adding all the created elements one by one
groupObject.getChildren().add(sceneText);
groupObject.getChildren().add(sceneCircle);
outputStage.setScene(sceneObject);
outputStage.show();
}
public static void main(String[] args) {
//JVM calls start method automatically
Application.launch(args);
}
}
Output:
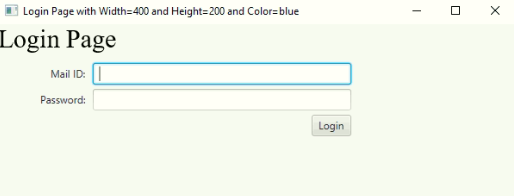
Example #2 – Scene Login Page
Code:
package com.scene;
import javafx.application.Application;
import javafx.geometry.HPos;
import javafx.geometry.Insets;
import javafx.scene.Scene;
import javafx.scene.control.Button;
import javafx.scene.control.Label;
import javafx.scene.control.PasswordField;
import javafx.scene.control.TextField;
import javafx.scene.layout.BorderPane;
import javafx.scene.layout.ColumnConstraints;
import javafx.scene.layout.FlowPane;
import javafx.scene.layout.GridPane;
import javafx.scene.layout.Priority;
import javafx.scene.paint.Color;
import javafx.scene.text.Font;
import javafx.scene.text.Text;
import javafx.stage.Stage;
public class SceneLogin extends Application {
@Override
public void start(Stage outputStage) {
// setting the title
outputStage.setTitle("Login Page with Width=400 and Height=200 and Color=blue");
// creating border pane for adding login elements
BorderPane borderPaneRef = new BorderPane();
Scene loginScene = new Scene(borderPaneRef, 600, 200, Color.BLUE);
// creating grid pane to set the elements at specific location
GridPane gridpaneRef = new GridPane();
gridpaneRef.setPadding(new Insets(5));
gridpaneRef.setHgap(5);
gridpaneRef.setVgap(5);
// creating column constraints
ColumnConstraints firstColumnConstraint = new ColumnConstraints(100);
ColumnConstraints secondColumnConstraint = new ColumnConstraints(50, 150, 300);
secondColumnConstraint.setHgrow(Priority.ALWAYS);
gridpaneRef.getColumnConstraints().addAll(firstColumnConstraint, secondColumnConstraint);
// creating mail id label
Label mailIDLabel = new Label("Mail ID: ");
// creating password label
Label passwordLabel = new Label("Password: ");
// creating text fields for mail and password
TextField mailIDField = new TextField();
PasswordField passwordField = new PasswordField();
// creating button for Login
Button saveButton = new Button("Login");
// setting the grids of label and fields in Horizontal positions like
// left and right
GridPane.setHalignment(mailIDLabel, HPos.RIGHT);
GridPane.setHalignment(passwordLabel, HPos.RIGHT);
GridPane.setHalignment(mailIDField, HPos.LEFT);
GridPane.setHalignment(passwordField, HPos.LEFT);
GridPane.setHalignment(saveButton, HPos.RIGHT);
// adding labels and fields
gridpaneRef.add(mailIDLabel, 0, 0);
gridpaneRef.add(mailIDField, 1, 0);
gridpaneRef.add(passwordLabel, 0, 1);
gridpaneRef.add(passwordField, 1, 1);
gridpaneRef.add(saveButton, 1, 2);
// creating flow pane
FlowPane topBanner = new FlowPane();
topBanner.setPrefHeight(40);
// creating font
Font serif = Font.font("Times New Roman", 30);
// creating text
Text contactText = new Text("Login Page");
contactText.setFill(Color.BLACK);
contactText.setFont(serif);
// adding elements
topBanner.getChildren().addAll(contactText);
borderPaneRef.setTop(topBanner);
borderPaneRef.setCenter(gridpaneRef);
outputStage.setScene(loginScene);
// displaying output
outputStage.show();
}
public static void main(String[] args) {
//JVM calls start method automatically
launch(args);
}
}
Output:
Example #3 – Scene Cursor
Code:
package com.scene;
import javafx.application.Application;
import javafx.scene.Cursor;
import javafx.scene.Scene;
import javafx.scene.control.Label;
import javafx.scene.layout.TilePane;
import javafx.stage.Stage;
public class ScenLine extends Application {
// launch the application
@Override
public void start(Stage outputStage) {
// setting the title
outputStage.setTitle("Scen Cursor Demor");
// creating tile pane object
TilePane tilepane = new TilePane();
// creating label object
Label label = new Label(
"\n\n\n\n\t\t\t Wait Cursor Demo. When we hover the cursor on to the text then waiting icon displayed");
// adding label to tile pane
tilepane.getChildren().add(label);
// creating scene with width and height
Scene scene = new Scene(tilepane, 600, 150);
// different cursor styles
// you can uncomment each style and see the difference
scene.setCursor(Cursor.WAIT);
// scene.setCursor(Cursor.CROSSHAIR);
// scene.setCursor(Cursor.DISAPPEAR);
// scene.setCursor(Cursor.MOVE);
// scene.setCursor(Cursor.CLOSED_HAND);
// setting the scene
outputStage.setScene(scene);
// displaying the output
outputStage.show();
}
public static void main(String args[]) {
// JVM calls start method directly
launch(args);
}
}
Output:
Recommended Articles
This is a guide to JavaFX Scene. Here we also discuss the Introduction and how does scene work in javafx along with different examples and its code implementation. You may also have a look at the following articles to learn more –


