Updated March 18, 2023
Introduction to JavaFX StackPane
Java StackPane is a container that lays out its children stacked up to others. The content area is filled by resizing the children and if the children nodes are not able to resize, Pos.CENTER will be used which is the default alignment property. Normally child nodes are not able to resize when the maximum size prevented it. Java Stack Pane can be instantiated from the class javafx.scene.layout.StackPane. When the padding is set, child nodes will be layed out within the insets only. Syntax, constructors and several other aspects of JavaFX StackPane will be discussed in the following sections.
Syntax:
In JavaFX, StackPane can be created as shown below.
StackPane sp = new StackPane();Always make sure that the class javafx.scene.layout.StackPane is imported in the program before executing the code.
Constructors and Properties of JavaFX StackPane
Below we have discussed the constructors and properties :
Constructors
There are two constructors as mentioned below:
- StackPane(): A StackPane layout will be created with a default alignment. In JavaFX StackPane, CENTER is considered as a default alignment.
- StackPane(Node…. nd): A StackPane layout will be created with a default alignment.
Properties
Java StackPane has a property alignment that is used for the alignment of the children that is within the height and width of StackPane.
Methods of StackPane
Java StackPane has several methods that perform different functionalities. Some of the commonly used methods are explained below:
- clearConstraints(Nodechild): StackPane constraints will be removed from the child node.
- computeMinWidth(double height): The minimum width of the region will be computed using this method.
- computeMinHeight(double width): The minimum height of the region will be computed using this method.
- getAlignment(): Alignment property’s value will be returned.
- setAlignment(Posvalue): Alignment property’s value will be set.
- setAlignment(Node child, Posvalue): Alignment property’s value will be set for the child that is present in the stackpane.
- getMargin(Nodechild): Margin constraints value will be returned.
- computePrefWidth(double height): Preferred width for the region that is needed for the given height will be computed.
- computePrefHeight(double width): Preferred height for the region that is needed for the given width will be computed.
Program to Implement JavaFX StackPane
Now, let us see different JavaFX programs to implement JavaFX StackPane.
Program #1
//java program to demonstrate stack pane
import javafx.application.Application;
import javafx.scene.Scene;
import javafx.scene.control.Button;
import javafx.scene.layout.StackPane;
import javafx.stage.Stage;
public class JavaFXStackPaneExample extends Application {
//application starts at this point
@Override
public void start(Stage s) throws Exception {
//create button 1
Button b1 = new Button("   This button is on the bottom    ");
//create button 2
Button b2 = new Button("This button is on the top");
//create stackpane
StackPane r = new StackPane();
//create scene
Scene sc = new Scene(r,200,200);
r.getChildren().addAll(b1,b2);
//set the scene
s.setScene(sc);
//display the result
s.show();
}
public static void main(String[] args) {
launch(args);
}
}
Output:
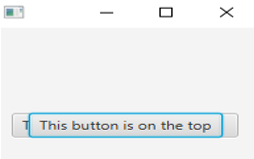
A StackPane is created with two buttons. As you can see, one button is on the top of the other button which satisfies the condition of StackPane.
Program #2
//java program to demonstrate stack pane with the help of shapes
import javafx.application.Application;
import javafx.collections.ObservableList;
import javafx.geometry.Insets;
//package for different shapes
import javafx.scene.Scene;
import javafx.scene.layout.StackPane;
import javafx.scene.paint.Color;
import javafx.scene.shape.Circle;
import javafx.scene.shape.Sphere;
//packages for the text font, size etc
import javafx.scene.text.Font;
import javafx.scene.text.FontWeight;
import javafx.scene.text.Text;
import javafx.stage.Stage;
//sample classs that extends Application class
public class JavaFXStackPaneExample extends Application {
//application starts at this point
@Override
public void start(Stage s) {
//Create a text
Text txt = new Text("This is an example of Stackpane");
//Set the font of the above created text
txt.setFont(Font.font(null, FontWeight.BOLD, 20));
//Set the color of the text
txt.setFill(Color.GREEN);
//set the position of the text
txt.setX(20);
txt.setY(50);
//Draw  a circle
Circle c = new Circle(400, 200, 100);
//fill color
c.setFill(Color.RED);
//stroke color
c.setStroke(Color.BLACK);
//Draw Sphere
Sphere sp = new Sphere(30);
//Create a Stackpane
StackPane spn = new StackPane();
//Set the margin for the above circle
spn.setMargin(c, new Insets(50, 50, 50, 50));
ObservableList li = spn.getChildren();
//Add the created child nodes to the pane
li.addAll(c, sp, txt);
//Create a scene
Scene sc = new Scene(spn);
//Set title
s.setTitle("Stack Pane Sample");
//Add scene to the stage
s.setScene(sc);
//Display the results
s.show();
}
public static void main(String args[]){
launch(args);
}
}
Output:
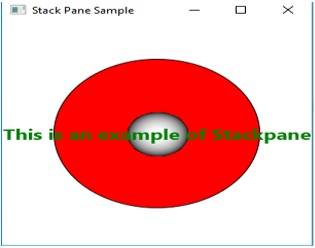
A StackPane is created with 1 circle, 1 sphere, and a text. All these are lying on top of others where the text is on the topmost.
Program #3
import javafx.application.Application;
import javafx.collections.ObservableList;
import javafx.scene.control.Button;
import javafx.scene.control.CheckBox;
import javafx.scene.control.Label;
import javafx.scene.layout.StackPane;
import javafx.scene.layout.VBox;
import javafx.stage.Stage;
import javafx.event.ActionEvent;
import javafx.event.EventHandler;
import javafx.geometry.Insets;
import javafx.geometry.Pos;
import javafx.scene.Node;
import javafx.scene.Scene;
public class JavaFXStackPaneExample extends Application {
private StackPane sp;
//application starts at this point
@Override
public void start(Stage s) throws Exception {
VBox r = new VBox();
// create StackPane
sp = new StackPane();
// Add Label
Label lb = new Label("Hi . . I am a label ..!!");
//set visibility as false
lb.setVisible(false);
sp.getChildren().add(lb);
// Add Button
Button b = new Button("Hi .. I'm a Button.. ");
//set visibility as false
b.setVisible(false);
sp.getChildren().add(b);
// Add CheckBox and set its opacity and visibility
CheckBox cb = new CheckBox("Hi... I'm a CheckBox");
//set opacity
cb.setOpacity(1);
//set visibility as true
cb.setVisible(true);
sp.getChildren().add(cb);
sp.setPrefSize(400, 150);
r.getChildren().add(sp);
Button cbtn = new Button("Click me");
r.getChildren().add(cbtn);
r.setAlignment(Pos.CENTER);
Scene sc = new Scene(r, 600, 250);
s.setTitle("StackPane Sample");
s.setScene(sc);
//action to be performed on clicking the button
cbtn.setOnAction(new EventHandler<ActionEvent>() {
@Override
public void handle(ActionEvent ev) {
//declaration of function
functopchange();
}
});
s.show();
}
//definition of function
private void functopchange() {
ObservableList<Node> nd = this.sp.getChildren();
if (nd.size() > 1) {
//top node
Node tN = nd.get(nd.size()-1);
//new top node
Node ntN = nd.get(nd.size()-2);
tN.setVisible(false);
tN.toBack();
ntN.setVisible(true);
}
}
public static void main(String[] args) {
launch(args);
}
}
Output :
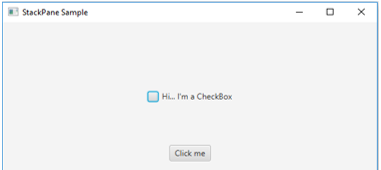
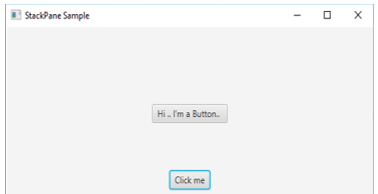
On executing the code, a dialog box with a checkbox and button appears.
On clicking the Click me button, a checkbox will be replaced by a button.
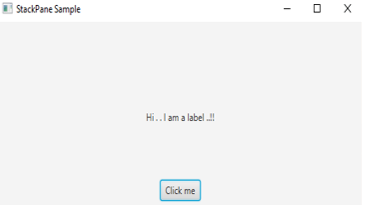
If you click the button once again, a label will be displayed.
Recommended Articles
This is a guide to JavaFx StackPane. Here we discuss the constructors and properties, methods of JavaFx StackPane with different programs. You can also go through our other suggested articles to learn more –
