Updated April 14, 2023

Introduction to JavaScript mousemove
MouseMove is a simple event that is executed when a pointer is moving over or around an element. Mousemove is a javascript event that inside a web page. The mousemove event can also be understood as a part of an event handler, whereupon some action or movement by a mouse pointer, an intended script is executed.
The mousemove works as an event, that whenever a pointer move is made, the mousemove will be invoked and execute the intended code. The mousemove is part of the MouseEvent interface and includes many other events like mouseout, click, mouseup, mousedown, etc. Now let us understand the syntax we need to implement the mousemove event.
Syntax of JavaScript mousemove
Understanding the standard syntax is important in order to implement the mousemove event. For mousemove, we have two separate syntaxes for HTML and JavaScript, respectively. We will start with HTML syntax:
The standard syntax for mousemove in HTML is as follows:
<element onmousemove = "samScript">As you can see, the syntax for mousemove in html works within the angle brackets just like any other element in HTML. Here we have an element, which can be anything as per needs. Followed by the keyword onmousemove and finally a script to run. And for Javascript, the syntax is as follows:
object.onmousemove = function(){samScript};Just like our HTML syntax starts with an element, our Javascript syntax starts with an element. Then the element is followed by our mousemove keyword and then we pass a function. At last, we have our script that will be executed. Let us now move to understand how the mousemove event actually works within JavaScript.
How mousemove Event Works in Javascript?
The mousemove in Javascript works like an event. Unlike other events., the mousemove is based on the movements by the mouse pointer. It is part of the Mouse Event interface and includes many such events. So basically, every time a pointer move is made around or above the defined division, a message or a script is executed. There can be multiple events or functions to be executed based on the requirement. A very simple implementation of mousemove could be a simple message that is to be printed when we roll over the button like submit or clear.
Now that we have understood, what mousemove is, how it works, and the standard syntax for the same, let us move to proper implementation. With our examples we will use the mousemove event within a web page, using HTML and JavaScript. The code for the first example is as follows.
Example #1
Code:
<!DOCTYPE html>
<html>
<head>
<style>
div {
width: 110px;
height: 110px;
border: 1px solid black;
}
</style>
</head>
<body>
<center>
<br>
<p> Sample Example for mousemove in JavaScript. </p>
<div onmousemove = "samFunct(event)" onmouseout = "clearCoo()"></div>
<p id="demo"></p>
<script>
function samFunct(el) {
var x = el.clientX;
var y = el.clientY;
var coo = "Coordinates are: (" + x + "," + y + ")";
document.getElementById("demo").innerHTML = coo;
}
function clearCoo() {
document.getElementById("demo").innerHTML = "Keep mouse pointer within";
}
</script>
</center>
</body>
</html>
Code Explanation: Started just like a web page with all required HTML tags, then we have a division that defines all necessary aspects like width, height, and border. Then our head tag ends and the body begins, where we have a simple statement that will be printed. Then we have our division, with the mousemove event, which calls for the function defined later in the code. In addition, we have a mouseout event that calls for another function. Then we begin with the script, where we define our first function, where we declare few variables as required and we have document get element by id function which calls for the demo and print the “coo” variable which holds the coordinates. Finally, we have our last function, named clearCoo, which will be invoked every time we move the pointer out of the box of coordinates.
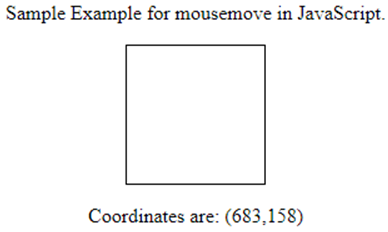
The expected output will be a box that holds coordinates and when we move in the pointer, the coordinates will be printed on the web page, and when we move out the pointer, the Keep mouse pointer within the message will be printed. Refer below-attached screenshot for proper output:
As explained, the output as shown in a web browser is like this. A simple statement, then a square division of which holds the coordinates and when we move in the mouse pointer, the statement below will print the coordinates wherever the mouse pointer moves. And when we move out the pointer, the message will change to ”Keep mouse pointer within”.
Example #2
In this example, we have implemented both, the mousemove and the mouseout events. Our next example is where we implement the onmouseenter function of the mousemove event.
Code:
<!DOCTYPE html>
<html>
<head>
<style>
div {
width: 100px;
height: 100px;
border: 1px solid black;
margin: 10px;
float: left;
padding: 30px;
text-align: center;
background-color: lightgray;
}
p {
background-color: white;
}
</style>
</head>
<body>
<h3> This is our example where we demonstrate mousemoveevent.</h3>
<p> Every time your pointer enters the element of div, the count will increase.</p>
<div onmouseenter = "myFunct()">
<p>No. of mouse moves: <br><span id = "ex1">Move the mouse over me!</span></p>
</div>
<script>
var x = 0;
function myFunct() {
document.getElementById("ex1").innerHTML = x+=1;
}
</script>
</body>
</html>
Code Explanation: Started with HTML tags, then we have our style tag with div elements within. Within div elements, we have important aspects like width, height, border, margin, etc. are all defined. Followed by defining the background color as white.
Then starts our body, where we have two simple sentences defined within headline and paragraph tags. Then we have another division that holds the main function, with required text messages. This main function holds the span id which will be called later in the program. Then we have our script, where we start with declaring a simple variable named x. Then we have our function, within which is our document, and get element by ID, where we invoke the span created earlier. This line holds the value that is to be printed, which is x+=1, meaning every time we roll in the mouse pointer inside the span, the value increases, at last, we have a total count of a number of times we rolled in the pointer.
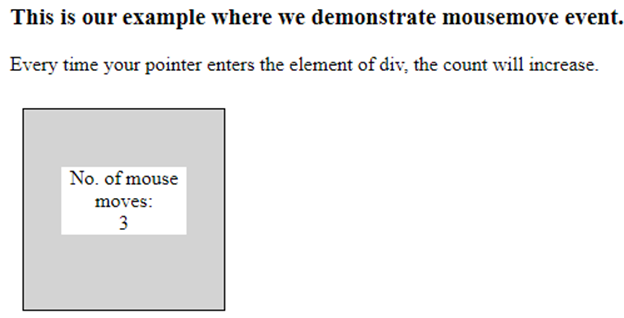
For a proper understanding of the output, refer the screenshot attached below:
Conclusion
Mousemove is part of the Mouse Event interface of javascript and is responsible for actions post movement of the pointer. The working is that when a mouse pointer is rolled over an element like button or division, a message or a script will be executed. We understood the working with examples and also implemented mouseout.
Recommended Articles
This is a guide to JavaScript mousemove. Here we also discuss the introduction and how mousemove event work in javascript? along with different examples and its code implementation. you may also have a look at the following articles to learn more –


