Updated February 21, 2023
Introduction to JMeter Recording
JMeter recording helps to test and execute the activity besides the test target. Therefore, it is one of the most preferred tools in the software testing platform. JMeter comprises a test script recorder to capture, record, and save such scenarios. The working of JMeter testing is similar to the proxy using the HTTP test script recorder. The special component proxy is placed between the remote server and the user. Once the JMeter acts like a proxy, the user can start to record the browser interactions. It is the most advanced feature in the software testing tool to eliminate difficulties in-browser interactions. This article briefly discusses the working of JMeter recording and its configuration.
What is JMeter recording?
JMeter recording is like a help tester to capture, record, and execute the activity besides the test target. It is automated testing and used in multiple scenarios. The proxy server is connected to JMeter to monitor and record the user actions when browsing the web application in the standard browser. The JMeter 2.10 recording has been updated to manage the embedded resources and certification creations. JMeter uses the keytool utility to enable these features available in JDK and JRE.
How to use JMeter recording?
Follow the basic instructions to configure the JMeter recording.
Navigate to JMeter_Home and execute the JMeter, which is saved as a .bat file on windows. In Linux or Unix, execute the JMeter.sh file.
Choose templates from the menu bar. From the list, select the recording template.
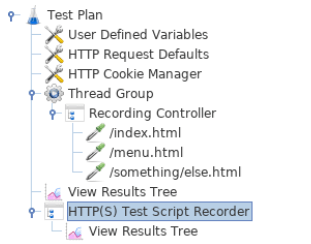
Now the system generates the entire test plan.
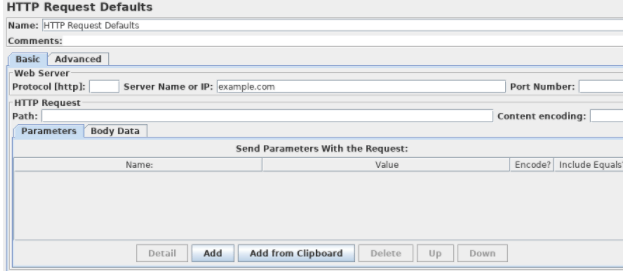
The default element is chosen from the HTTP request. In addition, the server name or IP is given.
Fill in the path and website name, or ignore the blanks.
Return to the HTTP test script recorder and select the start option on the top pane.
Now, execute the JMeter proxy server, which is allotted to intercept the request from the browser. A file is generated automatically and saved in the Jmeter_Home folder.
Ensure to install the certificate in the browser.
Then configuration is made to the browser to use the proxy in JMeter.
Now the firefox is initiated, but don’t close the window of JMeter.
In the toolbar, choose preference from the edit option. Next, choose the advanced and network tab.
Select the settings from the top, and choose the manual proxy configuration in the new pop-up. Enable the port field and address. Then give the IP address or local host of the system. Enter the port name and give 8888. Use the proxy server for every protocol and select the OK button. After these steps, it automatically navigates to the browser.
To record the navigation made by the user, follow the below steps
Give the browser name and press enter. Select a few links from the site page and then close this window. Now populate the JMeter window.
Expand the thread group, which has several samplers. The test plan should be saved. Enter all the mandatory fields in several threads, loop counts, and ramp-up period.
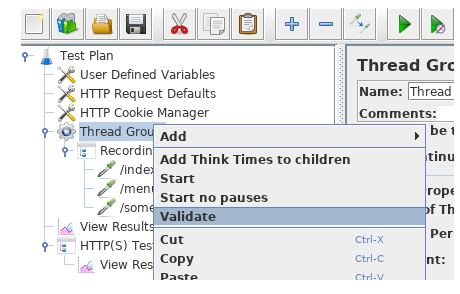
Validate the script before executing it. Save the test plan with an appropriate name. The Thread group validate option is there, and right-click to validate the results. View result tree option is there to check if all the elements are configured correctly.
JMeter recording setup
The user had to enter the input in a few scripts and correlate operational data between the requests. The mandatory input fields are search words, passwords, and login IDs. To variabilize the functions, the user can configure the CSV data set config to fetch the input data from the CSV file. For example, the JMeter functions like time; the counter should be pre-defined. To correlate the functions, the user can receive data from the request using post-processors in JSON and regular expression extractor and feed it into another request. To view and correlate the easy way, it is advised to use the search function from the view result tree.
Start the test by executing the test plan, which can be executed in two ways. One is GUI, and the other is the command line. But it is not recommended to take a heavy load test in GUI.
At debug phase, the user can work with GUI, and for load test, he can prefer CLI mode.
Before starting the test, import a summary report element. When the test is executed, the statistics are changed until the test is completed. So at the end of the test, the summary test report should have a green circle or triangle sign. When the test is completed, the green circle turns grey.
HTTP proxy server in examples
JMeter has a unique superpower to record the traffic in a single bound, which enables the tester to avoid continuous and tedious activities of recording the traffic manually and automating tasks. The proxy server enables the JMeter to monitor and record the user’s activities when using the standard web application. It creates the objects from the test sample and saves them directly beside the user browser actions. So the samples can be communicated in real-time.
Choose the free port which can be used for proxy, and this port should not be used for another server. The WAMP server can be installed for the testing application, and the default port can be changed to 8090 or 8080. Give manual proxy configuration and provide 127.0.0.1 for an HTTP proxy, which works on the localhost. Ensure to set the same port in the proxy server’s settings and add the recording controller to collect the HTTP request. The recording controller is fixed to indicate the collection of proxy server samples. At the test run, it doesn’t show any effect, but it uses an HTTP proxy server when recording and records all the samples by default under the recording controller.
Conclusion
Hence it is the brief configuration of JMeter recording and its unique feature proxy server to monitor all the actions performed by the user. It can be applied in all situations and all applications according to the user’s preference.
Recommended Articles
This is a guide to JMeter Recording. Here we discuss the working of JMeter recording, and its configuration is briefly discussed. You may also look at the following articles to learn more –


