Updated March 31, 2023
Introduction to jQuery Autocomplete
Autocomplete is basically a mechanism that provides the users with a pre-populated list of values or suggestions as they type which enables them to easily find and select a particular item from the list. This jQuery feature helps the users by preventing them to type an entire word or set of words to find options from the select box. The user can then select from the list of options available which will be displayed in the input field. To help select from the list of available options, jQuery UI provides an autocomplete An autocomplete widget is a control that basically filters the options to display only those matching with what the user is typing in control.
The autocomplete() method is used to create a list of suggestions and can be used in two forms.
- $(selector, context).autocomplete (options)
- $(selector, context).autocomplete (“action”, params)
Syntax
Below is the syntax for jQuery Autocomplete:
Syntax #1
The autocomplete(options) method specifies that an HTML <input> element must be managed as an input field which will be displayed above a list of suggestions.
$(selector,context).autocomplete(options)Where,
options: Parameter refers to an object which specifies the behavior of the list of suggestions as to the user types.
Syntax #2
The autocomplete(“action”, params) method is used when we need to perform an action on the list of suggestions. Such actions can be shown or hide for example.
$(selector,context).autocomplete("action", params)Where
action: specifies a string.
Implementation of jQuery autocomplete Method
Let us take a look at a few examples to understand how the autocomplete method can be implemented in web pages.
Example #1
The following example illustrates how the autocomplete mechanism works without passing any parameter to the autocomplete() method.
Code:
<!DOCTYPE html>
<html>
<head>
<title>jQuery Autocomplete functionality</title>
<link
rel="stylesheet"
href="https://code.jquery.com/ui/1.11.4/themes/smoothness/jquery-ui.css"
/>
<script src="https://code.jquery.com/jquery-1.12.4.min.js"></script>
<script src="https://code.jquery.com/ui/1.11.4/jquery-ui.js"></script>
<script>
$(function() {
var languages = [
"C",
"C++",
"Java",
"JavaScript",
"jQuery",
"PHP",
"Python",
"Ruby",
"C#",
"React"
];
$("#langs").autocomplete({
source: languages
});
});
</script>
</head>
<style>
#divstyle {
text-align: center;
background-color: cadetblue;
width: 400px;
height: 150px;
margin-left: 100px;
}
#pid {
color: brown;
font-weight: bold;
font-family: Georgia, "Times New Roman", Times, serif;
}
</style>
<body>
<div id="divstyle">
<div class="ui-widget">
<p id="pid">Available Languages:</p>
<label for="tags">Languages</label>
<input id="langs" />
</div>
</div>
</body>
</html>
Output:
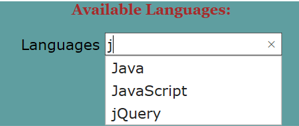
- Below screenshot is of the output which gets displayed on the page once the above code is executed. As we start typing words, for example, here, the word containing “j”, we see a list of suggestions for the words with “j” getting displayed below the input box.
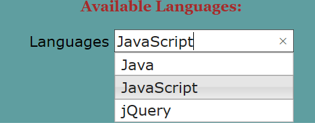
- We can use the up and down arrow key to navigate the list and make the selection as shown below in the screenshot.
Example #2
In the following example, we are trying to demonstrate the usage of a label in the autocomplete widget of jQuery.
Code:
<!DOCTYPE html>
<html>
<head>
<title>jQuery Autocomplete functionality</title>
<link
href="https://code.jquery.com/ui/1.10.4/themes/ui-lightness/jquery-ui.css"
rel="stylesheet"
/>
<script src="https://code.jquery.com/jquery-1.12.4.min.js"></script>
<script src="https://code.jquery.com/ui/1.10.4/jquery-ui.js"></script>
<script>
$(function() {
$("#autocmp").autocomplete({
source: [
{ label: "Mathematics", value: "MATHS" },
{ label: "Chemistry", value: "CHEM" },
{ label: "Physics", value: "PHY" },
{ label: "English", value: "ENG" },
{ label: "Environmental Science", value: "EVS" }
]
});
});
</script>
<style>
#divstyle {
text-align: center;
background-color: cadetblue;
width: 400px;
height: 150px;
margin-left: 100px;
}
#pid {
color: brown;
font-weight: bold;
font-family: Georgia, "Times New Roman", Times, serif
}
</style>
</head>
<body>
<div id="divstyle">
<div class="ui-widget">
<p id="pid">Type E OR S</p>
<input id="autocmp" />
</div>
</div>
</body>
</html>
Output:
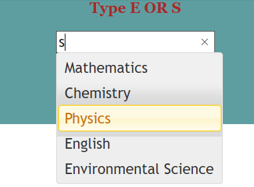
- Below screenshot is of the output which gets displayed on the page once the above code is executed.
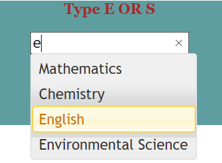
- As we start typing the word in the input box, we start getting a list of suggestions as shown below in the screenshot.
- Here we are using labels in autocomplete()
- If we start with typing “E” or “e” or “S” or “s”, we get a list of available options containing these letters.
- We can then make the selection as per our choice.
- We can use up and down arrow keys for navigation.
Example #3
In the following example, we are trying to demonstrate the usage of two options, that are, minLength and delay in jQuery autocomplete() method.
Code:
<!DOCTYPE html>
<html>
<head>
<title>jQuery Autocomplete functionality</title>
<link
href="https://code.jquery.com/ui/1.10.4/themes/ui-lightness/jquery-ui.css"
rel="stylesheet"
/>
<script src="https://code.jquery.com/jquery-1.12.4.min.js"></script>
<script src="https://code.jquery.com/ui/1.10.4/jquery-ui.js"></script>
<script>
$(function() {
var avaialableSubjects = [
"Mathematics",
"Chemistry",
"Physics",
"English",
"Environmental Science"
];
$("#subjs").autocomplete({
source: avaialableSubjects,
minLength: 2,
delay: 500
});
});
</script>
<style>
#divstyle {
text-align: center;
background-color: cadetblue;
width: 400px;
height: 200px;
margin-left: 100px;
}
#pid {
color: brown;
font-weight: bold;
font-family: Georgia, "Times New Roman", Times, serif;
}
</style>
</head>
<body>
<div id="divstyle">
<div class="ui-widget">
<p id="pid">Type two letters</p>
<hr />
<p>Available Subjects:</p>
<br />
<label for="subjs">Subjects: </label>
<input id="subjs" />
</div>
</div>
</body>
</html>Output
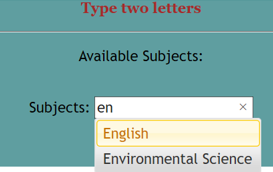
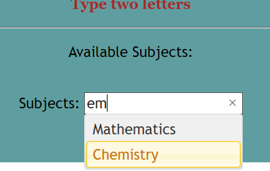
- Below screenshot is of the output which gets displayed on the page once the above code is executed.
- As we start typing the word in the input box, we start getting a list of suggestions as shown below in the screenshot.
- Here we are using labels in autocomplete()
- Here, minLength specifies the number of characters that must be entered before getting the matching values, the default value is 1.
- delay specifies the time delay in milliseconds for which we need to wait before trying to obtain the matching values, the default value is 300.
Conclusion
In this article, we discussed the autocomplete widget functionality and its usage in the development of modern websites. This jQueryUI feature provides the users with the facility of obtaining a list of suggestions while typing in an input box and making a selection from the list which will be displayed in the input field. This feature helps users by not making them to type an entire word for making a selection. It can be utilized in searching and filtering purposes as well.
Recommended Articles
This is a guide to jQuery Autocomplete. Here we discuss the introduction, two syntaxes, and how autocomplete method can be implemented. You can also go through our other related articles to learn more –
