Updated April 1, 2023

Introduction to jQuery mouseleave()
User can attach a triggered event handler when the mouse leaves an element or activate the handler on an element. The mouse left is a JavaScript event that is unique to Internet Explorer. The jQuery simulates this event because of the common nature of the event so that it can be used irrespective of the browser. When the mouse pointer leaves the element, this event will be sent to an entity. The event can be received by any HTML element. jQuery has introduced custom events called MouseEnter and MouseLeave which are built on top of the existing mouse over and mouse out events.
Syntax
The below syntax is for attaching a function to the mouse leave event:
Syntax #1
$(selector).mouseleave(function)In the above syntax, the function allows an optional single parameter function. This is used to define the function to execute when calling the mouse leave event. In a simple manner, it connects the mouse leave event to the function. This process returns the chosen element with changes that have been made using the method mouseleave().
One more syntax can be used when the mouse leaves event triggers for the selected elements:
Syntax #2
$(selector).mouseleave()How jQuery mouseleave() work?
The mouse leaves can be worked with the help of a mouseleave() event when the user leaves the mouse pointer from the text or an element. To accomplish this, the mouseleave() event attaches the event handler function to an element on the page.
The mouse leave event will be triggered whenever the mouse cursor leaves from the selected element and after the occurrence of the event, it implements a mouse leave event that has been attached to an event handler function to run.
Examples to Implement jQuery mouse leave event
Below are the examples mentioned:
Example #1
Code:
<!DOCTYPE html>
<html>
<head>
<title>jquery Mouse Leave Demo</title>
<script src=
"https://ajax.googleapis.com/ajax/libs/jquery/3.3.1/jquery.min.js">
</script>
<!-- The code is used to show the working of mouse leave method -->
<script>
m = 0;
n = 0;
$(document).ready(function(){
$("div.heading").mouseout(function(){
$(".heading span").text(m += 1);
});
$("div.enter").mouseleave(function(){
$(".enter span").text(n += 1);
});
});
</script>
</head>
<body>
<p>The event will be triggered when user leave the selected element. </p>
<div class="heading" style="background-color:grey;padding:10px;width:200px;float:left">
<h3 style="background-color:white;">The mouse leave event triggered: <span></span></h3>
</div>
</body>
</html>
Output:
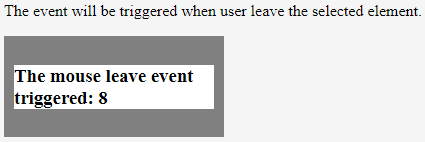
Explanation: In the above output, when you leave the mouse pointer from the line of text, the mouse leave event will be triggered and it will increment the numbers when leaving the mouse from the selected element.
Example #2
Code:
<!DOCTYPE html>
<html>
<head>
<title> jQuery Mouse Leave Demo </title>
<script src= "https://ajax.googleapis.com/ajax/libs/jquery/3.3.1/jquery.min.js"> </script>
<!-- jQuery code to show the working of this method -->
<script>
$(document).ready(function() {
$(".demo").mouseleave(function() {
$(".demo").css("background-color", "red");
});
});
</script>
<style>
body {
width: 280px;
padding: 50px;
height: 20px;
border: 1px solid grey;
font-weight: bold;
font-size: 15px;
}
</style>
</head>
<body>
<!--  Please move the cursor over this text and you will see the effect -->
<span class="demo"> Welcome to EDUCBA... !!! </span>
</body>
</html>
Output: When you run the above code, it will show the below output.
Output: When you leave the mouse pointer from the element, it will display the background color in red as shown in the below image.
Example #3
Code:
<!DOCTYPE html>
<html>
<head>
<title> jQuery Mouse Leave Demo </title>
<script src="https://ajax.googleapis.com/ajax/libs/jquery/3.4.1/jquery.min.js"></script>
<script>
$(document).ready(function(){
$(".demo").mouseenter(function(){
$(".demo").css("color", "#F2892A");
});
$(".demo").mouseleave(function(){
$(".demo").css("color", "#1985C0");
});
});
</script>
</head>
<body>
<p> You can move the mouse pointer from the paragraph to see mouse leave event effect and it will change the text color to blue.</p>
<span class="demo"> EDUCBA... </span>
</body>
</html>
Output:
Example #4
Code:
<!DOCTYPE html>
<html>
<head>
<title> jQuery Mouse Leave Demo </title>
<script src="https://ajax.googleapis.com/ajax/libs/jquery/3.4.1/jquery.min.js"></script>
<script>
$(document).ready(function(){
var mouseentercnt = 0;
var mouseleavecnt = 0;
const mouseDemo = document.getElementById('mouseDemo');
const myList = document.getElementById('myList');
mouseDemo.addEventListener('mouseenter', e => {
mouseDemo.style.border = '2px solid green';
mouseentercnt++;
addListItem(' Mouse event entered here: ' + mouseentercnt + '.');
});
mouseDemo.addEventListener('mouseleave', e => {
mouseDemo.style.border = '1px solid blue';
mouseleavecnt++;
addListItem(' Mouse leave event triggered: ' + mouseleavecnt + '.');
});
function addListItem(text) {
var txtnode = document.createTextNode(text);
var listitems = document.createElement("li");
listitems.appendChild(txtnode);
myList.appendChild(listitems);
}
});
</script>
<style>
#mouseDemo {
box-sizing: border-box;
width:10rem;
}
</style>
</head>
<body>
<div id='mouseDemo'>
<ul id="myList">
<li> You can leave mouse pointer from this text to see the mouse events ...!</li>
</ul>
</div>
</body>
</html>
Output:
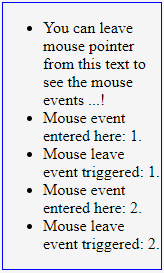
Explanation: As shown in the above image, when you enter the mouse cursor on the text or element, the mouse enter event will be triggered and when you leave the mouse pointer from the text, the mouse leave event will be triggered. Each time when use repeats this process, the mouse event counter will be kept on increasing as shown in the output.
Example #5
Code:
<!DOCTYPE html>
<html>
<head>
<title> jQuery Mouse Leave Demo </title>
<script src="https://ajax.googleapis.com/ajax/libs/jquery/1.11.2/jquery.min.js"></script>
<script>
$(document).ready(function(){
$("#h2").mouseleave(function(){
$( "div" ).text( " Leaving the mouse from the text..." ).show().fadeOut( 2500 );
});
});
</script>
</head>
<body>
<h2 id="h2"> Welcome to EDUCBA... </h2>
<div> </div>
</body>
</html>
Output:
Explanation: As shown in the above output, when you leave the mouse from the text element, the mouse event will be triggered and it will fade out the event as shown in the image.
Benefits of Using jQuery mouseleave()
- Mouse leave events are used for triggering events when a user leaves the mouse from the given HTML element.
- The mouse event can also be used with the mouse enter event.
- The mouse leave event does not react to event bubbling (in this bubbling, the lowest level element will be handled first and out element will be handled afterward).
Conclusion
So far, we have seen how mouse leave events will work in jQuery. The mouse leave event occurs when the user moves the cursor pointer from the element outside. In other words, when the chosen elements are detached by the mouse cursor pointer at the time the mouse leave event occurred. Unlike mousevent() event, the mouse leave event which can only be triggered when the mouse pointer leaves the selected element, whereas mouse out event triggers when the mouse cursor leaves any child elements and the selected element.
Recommended Articles
This is a guide to jQuery mouseleave(). Here we discuss how mouseleave() work in jQuery with examples for better understanding. You can also go through our other related articles to learn more –


