Updated April 6, 2023

Introduction to jQuery offsetWidth
In jQuery, offsetWidth is defined as a property for displaying the width of the viewable for selected element to display the width in pixel format, which not only includes width property but also includes other properties like border, padding, scrolling, etc. but we should note that the margin property is not included. In general, the offsetWidth in jQuery can be defined as built-in property for determining the width of any HTML element, which includes other properties other than margin property and the unit in which the width of the element is displayed is in pixels and it does not include margin width, and if the element does not have any associated layout box, then the return value will be zero.
Syntax:
HTML_element.offsetWidthIn this article, the syntax is as shown in the above in which this jQuery property is applied on any matched or selected HTML element to find the width of that element, and it also has options of getting details of other properties like padding, border, scrolling but not the margin property. In most cases, this property is used along with offsetHeight property, and this property is said to be viewable property because this provides the width of the element which is viewable to it and not the elements that are not viewable, and hence this property is said to be read-only property.
In jQuery, this property returns only the width of any viewable element in numbers format with the unit as pixels and includes padding, border, and scrolling such as scrollbar.
How to Set the offsetWidth in jQuery?
- In jQuery, the working of the offsetWidth property is very simple. This property is mostly used along with offsetHeight for setting the height and width of any matched or selected HTML elements.
- The offsetWidth is one of the built-in property provided by jQuery, which is used for displaying the width of the element where only the viewable element’s width is displayed when this offsetWidth property is applied to any element, and this is done by selecting the element first for which we need to display the width and is followed by dot operator with offsetWidth property.
- Therefore, when we apply this property, it will return the width of the element viewed by this property and give the number in pixels for displaying the width.
Examples of jQuery offsetWidth
Given below are the examples of jQuery offsetWidth:
Example #1
Code:
<!DOCTYPE html>
<html>
<head>
<title> Demonstration of offsetWidth property in jQuery </title>
<style>
#divid {
height: 250px;
width: 400px;
padding: 10px;
margin: 15px
border: 5px solid yellow;
background-color: orange;
}
</style>
</head>
<body>
<p>Click the button to get the height and width of div elment, including padding and border using offsetHeight and offsetWidth.</p>
<button onclick="func()"> click me ! </button>
<div id="divid">
<b>Information about this div:</b><br>
Height: 250px<br>
Width: 400px<br>
padding: 10px<br>
margin: 15px<br>
border: 5px<br>
<p id="off"></p>
</div>
<script>
function func() {
var elmnt = document.getElementById("divid");
var txt = "Height including padding and border: " + elmnt.offsetHeight + "px<br>";
txt += "Width including padding and border: " + elmnt.offsetWidth + "px";
document.getElementById("off").innerHTML = txt;
}
</script>
</body>
</html>
Output:
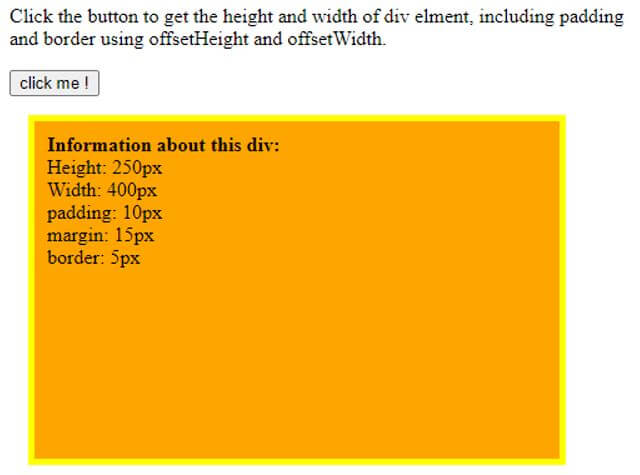
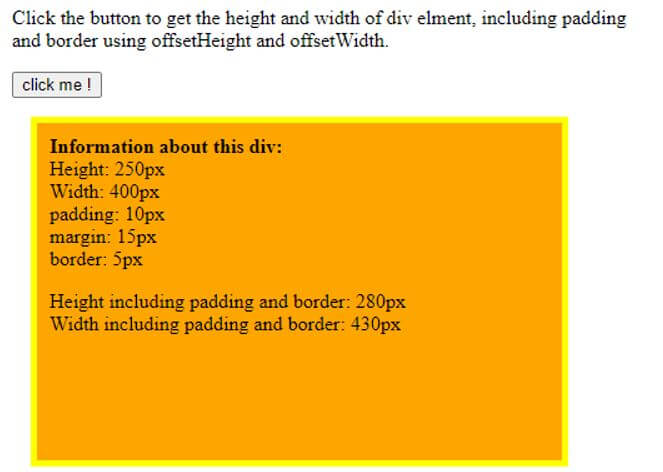
In the above code, we can see we are using this offsetWidth on the “div” element. Firstly, we have created a div element with its different properties such as its normal height, width, padding, border, color, etc. and this “div” element is given an id named “divid”, for which we have defined the properties within the style tag in the head tag.
Then we have also used a button tag for which we are applying the onclick() function, which we are declaring the defined function to this and here the function name is func() within the script tag where we are applying this function to the element by using getElementId() function for declaring the element to which we are applying this property with the variable declared as “elmnt” in which the element which is declared is stored and then we are declaring another variable known as “txt” in which we will be storing the offsetHeight and offsetWidth values in it using “elmnt.offsetHeight” and “elmnt.offsetWidth” and then this “txt” value is stored back to the property value where it will display the Height and width after clicking the button as shown in second screenshot else it just shows only the details of the element defined in the program which is seen in the first screenshot.
Example #2
Another example where we also are using scrollbar along with offsetWidth or offsetHeight.
Code:
<!DOCTYPE html>
<html>
<head>
<style>
#DIV1 {
height: 150px;
width: 300px;
padding: 10px;
margin: 15px;
border: 5px solid yellow;
overflow: auto;
}
#DIV2 {
height: 150px;
width: 300px;
padding: 10px;
margin: 15px;
border: 5px solid blue;
background-color: lightblue;
}
#info {
height: 800px;
width: 2000px;
}
</style>
</head>
<body>
<p> In this example, the child element info inside the div1 is bigger than div's height and width
where the child height and width is 800x2500 while its parent height and width is 250x400, so we have added a scrollbar. </p>
<p> Click the button to get offsetWidth of div. </p>
<button onclick="func()"> click me ! </button>
<p> Notice how the scrollbar in the div1 "steals" some of div's right and bottom padding, but offsetWidth is not affected by this. </p>
<div id="DIV1">
<div id="info"></div>
</div>
<div id="DIV2">
<div id="info2"></div>
</div>
<script>
function func() {
var elmnt = document.getElementById("DIV1");
var txt = "";
txt += "<b>Information about div1:</b><br>";
txt += "Width including padding, border and scrollbar: " + elmnt.offsetWidth + "px";
document.getElementById("info").innerHTML = txt;
var elmnt2 = document.getElementById("DIV2");
var txt2 = "";
txt2 += "<b>Information about div2:</b><br>";
txt2 += "Width including padding and border: " + elmnt2.offsetWidth + "px";
document.getElementById("info2").innerHTML = txt2;
}
</script>
</body>
</html>
Output:
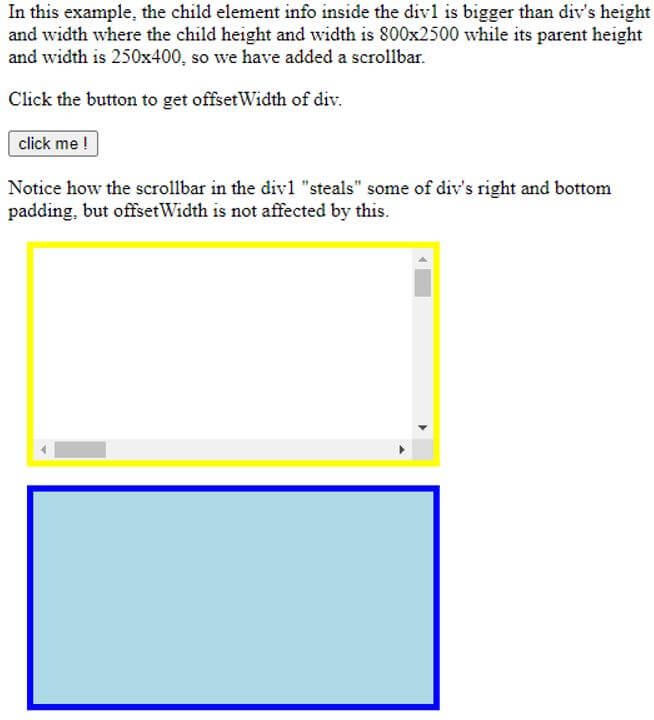
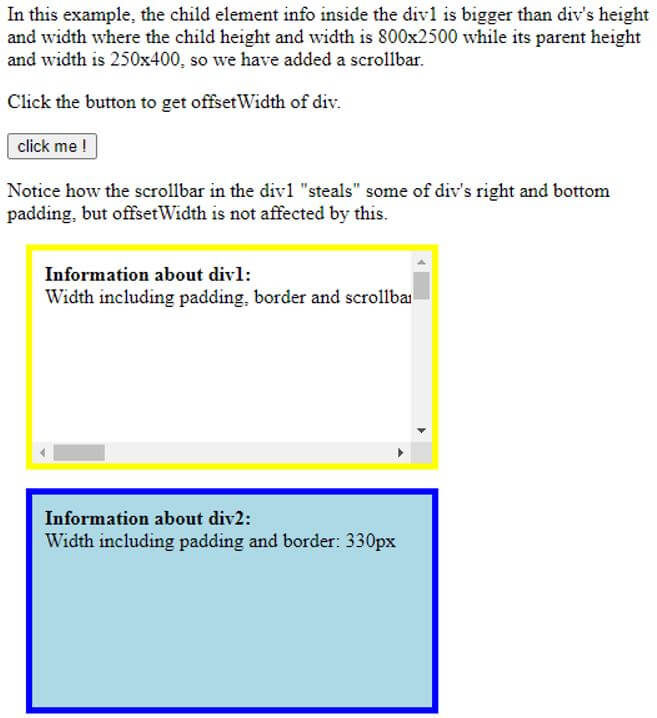
In the above code, we can see the example is similar to the above example. Still, here we have made the first “div” element in such a way where the text which we are displaying is bigger than the “div” element view; therefore, we get to see the scrollbar effect when we are trying to display the width of the “div” element, and the output can be seen in the first screenshot. After clicking the button, we can see the text will be displayed. Similarly, in the div2 element, we are just displaying the second div’s width; it displays only the width, including padding and border, and not the scrollbar, which can be seen in the second screenshot.
Conclusion
In this article, we conclude that the offsetWidth property in jQuery is the built-in property for displaying the viewable width for any matched element and is mostly used along with offsetHeight. In jQuery, there are other properties like clientHeight and clientWidth, which is similar to offsetHeight and offsetWidth.
Recommended Articles
This is a guide to jQuery offsetWidth. Here we discuss the introduction, how to set the offsetWidth in jQuery? and examples, respectively. You may also have a look at the following articles to learn more –


