Updated April 10, 2023

Introduction to jQuery read-only
In jquery read-only is one of the attributes which is used for to block the edit access on the HTML or any other web forms. It shows only the value but we can’t able to edit that. It’s one of the security-level features for securing user data. If the user data is in read-only mode then the required text area will not be the editable one until the user gets the required access from the admin user. The application data may be of any type like text, special characters, passwords, emails, images, numbers, etc.
Syntax:
jQuery has a different set of built-in methods for implementing the UI design with more sophisticated. For that when we creating the application with user data it needs to provide the authentication for accessing the data for every user. Among that read-only is one of the features for accessing the user data on the screen.
$('html element id').attr('readonly', boolean);
----some jQuery codes depends upon the requirement----
------html codes depends upon the requirement----
The above codes are the basic syntax for utilizing the read-only attribute on the Html with jQuery UI. We have used other Html elements and jQuery methods to call and execute the id based upon the project requirement.
How read-only function works in jQuery?
The read-only attribute which helps the user data will not be editable and the method the attribute which helps to fill the form field. The jQuery method like attr() helps to set and return the attributes with values of the selected elements. If this specific method is used to return the attribute value before that it must return the previous and first most selected HTML elements. By using the set read-only(state) we can set the values in the UI form directly with a various set of conditions that may prefer to the same usage like readOnly for setting and opacity to select the selectors otherwise we can set the values like “disabled” in the specific attributes also it performed the same way like previously the attribute operated on the script. Mainly we used attr() method for using the readOnly attributes its to be pass as the parameter it may have more than once on the specific attribute. For Each set of values, the readOnly mode is applicable to the specific users in a web-based application we may also give the user rights to avoid these readOnly features. Basically, Admin privileges will have all types of access for accessing the data, fields, and other attributes they also set the rights for other users.
Examples
Let us discuss examples of jQuery read-only
Example #1
<html>
<head>
<title>Welcome to My Domain it’s a First Example</title>
<script src = "https://ajax.googleapis.com/ajax/libs/jquery/3.2.1/jquery.min.js"></script>
<script>
$(document).ready(function() {
$('input[type="text"], textarea').each(function(){
$(this).attr('readOnly','readOnly');
});
});
$(function()
{
$('#eg').attr('Your Input', 'Your Input');
});
</script>
</head>
<body>
<form>
<input type="text" value="readonly text field" /><br>
<textarea>Your Input Thank you for using the feature and also it can't be editable whatever you providing the inputs to this text area</textarea>
</form>
<div>
<input id="eg" name="eg" type="text" class="text_box" value="Sample" />
<p>Here we used readOnly mode for this specific text box but we can't use in the UI but the readOnly mode is enabled we can't able to edit the text box value so we are unable to add and remove the values</p>
</div>
</body>
</html>
Output:
In the above example, we used readOnly mode in basic types on the Html with jQuery option. We can add the text inputs to the textboxes and it can’t be editable on the UI page because the textareas are enabled in the readOnly mode on the script.
Example #2
<!DOCTYPE HTML>
<html>
<head>
<title>
Welcome To My Domain its a Second Example for the readOnly attribute usages
</title>
<script src =
"https://ajax.googleapis.com/ajax/libs/jquery/3.4.0/jquery.min.js">
</script>
</head>
<body style = "text-align:center;">
<p style = "font-size: 17px; font-weight: bold;">
Have a Nice Day users
</p>
<form> Your First Input: <input type="text" name="first" />
<br>
<button id="submit">
Please click this button for to submit your inputs to the backend
</button>
</form>
<p id = "eg" style =
"color: violet; font-size: 33px; font-weight: bold;">
</p>
<script>
$(document).ready(function(){
$("#submit").click(function(){
$('input').attr('readonly', true);
document.getElementById("eg").innerHTML
= "Your inputs are not editable because readOnly mode is enabled for this function";
window.alert("Thank you users Your readonly attribute values are added successfully")
});
});
</script>
</body>
</html>
Output:
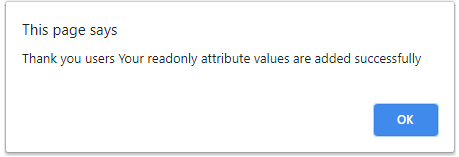
In the second example we can add the readonly attribute values to the text box and store them on the backend. Using the alert() method we can confirm whether the user inputs are added successfully on the backend.
Example #3
<!DOCTYPE html>
<html>
<head>
</script>
<meta charset=utf-8 />
<title>Welcome to My Domain it’s a Third Example for readOnly attribute</title>
<script src =
"https://ajax.googleapis.com/ajax/libs/jquery/3.4.0/jquery.min.js"
>
(function ($) {
"use strict";
$(document.body).delegate('[type="checkbox"][readonly="readonly"]', 'click', function(e) {
e.preventDefault();
});
$('#first').submit(function(e) {
$('.third').first().html($(this).serialize());
return true;
});
}(window.jQuery));
</script>
</head>
<body>
<form action="about:blank" id="first">
<h3>Have a Nice Day users your first check box</h3>
<input type="checkbox" value="eg1" name="eg1" />
<input type="checkbox" checked="checked" value="eg2" name="eg2" />
<h3>Second Check box</h3>
<input type="checkbox" value="eg3" name="eg3" disabled="disabled" />
<input type="checkbox" checked="checked" value="eg4" name="eg4" disabled="disabled" />
<h3>"Third Check box"</h3>
<input type="checkbox" readonly="readonly" value="eg5" name="eg5" />
<input type="checkbox" checked="checked" readonly="readonly" value="read-only 3.2" name="read-only 3.2" />
<h3>"Fourth check box"</h3>
<p>
<label>
<input type="checkbox" checked="checked" readonly="readonly" value="eg6" name="eg6" />
<p> Thank You users</p>
</label></p>
<div>
<input type="checkbox" checked="checked" readonly="readonly"
id="second" value="eg7" name="eg7" />
<p>
<label for="second">Please try again more check boxes <code>Thank You</code>
</label>
</p>
</div>
<input type="submit" name="Click Me" value="Click Me" />
</form>
<pre class="third">
</pre>
</body>
</html>
Output:
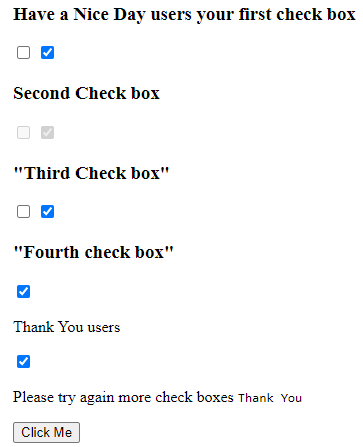
In the final example, we used the checkbox option in html UI elements. We used jQuery readOnly mode is enabled for the second checkbox option so it can’t be editable when we want to change the check box inputs. Further, we can able to edit the other check box option like first, third and fourth even we have used some default jQuery methods like preventDefault() and serialize() methods to convert the user inputs to the objects.
Conclusion
In jQuery readOnly mode is used for both online and offline applications. By using this feature the user inputs on the text areas are disabled and we can’t be able to edit the values even after entering the wrong values. It’s applicable for all the Html tag elements depending upon the requirement the readOnly feature is applicable to the script.
Recommended Articles
This is a guide to jQuery read-only. Here we discuss the Introduction, syntax, How the read-only function works in jQuery? and examples. You may also have a look at the following articles to learn more –


