Updated April 11, 2023

Introduction to jQuery Select Option
The jQuery Select Option is to control the multiple attributes and content for the user input information. It is a special attribute used mostly in the dropdown list. It helps to user for reference of the input information or content. It controls and modifies the multiple-choice information as per user requirements. It is mostly used in the form tag of websites or web applications.
Syntax of jQuery Select Option
The basic select tag and option tag syntax is below:
<select id = "IdName">
<option value = "values"> content </option>
<option value = "values"> content </option>
</select>- The select tag and option tag used inside of the body in html page.
- The option tag is always placed inside of the select tag.
The jQuery select option syntax in the script tag is below:
$("selector option: selected");The jQuery select option is used to display selected content in the option tag.
The jQuery select option with
text syntax is below:
var variableValue = $("selector option: selected").text();- The “option: selected” attribute is used to select specific content in the option tag.
- The selector is the id name (#IdName) of the select tag.
The basic syntax used in the web page is below.
<head>
<script >
$(document).ready(function() {
$("#optionselect").change(function(){
Var value =  $(“# optionselect option: selected”);
alert(value.text());
});
});
</script>
</head>
<body>
<select id = "optionselect">
<option value = "1"> content </option>
<option value = "2"> content </option>
</select>
</body>
Explanation:
- Placed in the script tag with variable.
- The selector id selects the particular option and displays it on the alert window.
How does the jQuery Select Option works?
Given below shows the working:
Step 1
- There is two methods to add jQuery in the web page.
- The first method is jQuery file downloads from the respective website which is jQuery.com.
- The file is placed inside of head section of the html file.
<script src = "path/jquery-3.5.1.min.js">
</script>- The second method is jQuery CDN file include in the head section of the html file.
<head>
<script src = "https://ajax.googleapis.com/ajax/libs/jquery/3.5.1/jquery.min.js">
</script>
</head>
Step 2
- The select tag and option tag is placed in the body section of the web page.
- The select tag is used to create multiple option list on the web page.
- The option tag is used to create multiple list elements and their value on the web page.
- The value attribute is placed in the option tag for maintaining a unique element in the list.
<select id = "optionselect">
<option value = "" selected disable> choose the value </option>
<option value = "1"> Tutorial </option>
<option value = "2"> Study material </option>
<option value = "3"> Subject Notes </option>
<option value = "4"> Subject Guidline </option>
</select>
Step 3
- Its syntax is used on the web page.
- The option: selected attribute place with the selector in the script tag.
- The text() method is used along with syntax to display selecting value.
$(document) .ready(function() {
$("#optionselect").change(function(){
var values=$("#optionselect option:selected");
alert(values.text());
});
});- The below sample is a combination of all steps:
<!DOCTYPE html>
<html>
<head>
<script src = “https://ajax.googleapis.com/ajax/libs/jquery/3.5.1/jquery.min.js”>
</script>
</head>
<body>
<select id = "optionselect">
<option value = "" selected disable> choose the value </option>
<option value = "1"> Tutorial </option>
<option value = "2"> Study material </option>
<option value = "3"> Subject Notes </option>
<option value = "4"> Subject Guidline </option>
</select>
<script>
$(document) .ready(function() {
$("#optionselect").change(function(){
var values=$("#optionselect option:selected");
alert(values.text());
});
});
</script>
</body>
</html>
Examples
Given below are the examples mentioned:
Example #1
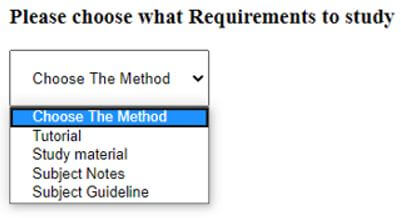
With alert message example and output is below.
Code:
<!DOCTYPE html>
<html>
<head>
<script src= "https://ajax.googleapis.com/ajax/libs/jquery/3.5.1/jquery.min.js"> </script>
<script>
$(document).ready(function(){
$("#optionselect").change(function(){
var values = $("#optionselect option:selected");
alert(values.text());
});
});
</script>
<style>
#optionselect{
height: 50px;
padding: 15px;
}
</style>
</head>
<body>
<h3> Please choose what Requirements to study </h3>
<select id = "optionselect">
<option value = " " selected disable> Choose The Method </option>
<option value = "1"> Tutorial </option>
<option value = "2"> Study material </option>
<option value = "3"> Subject Notes </option>
<option value = "4"> Subject Guideline </option>
</select>
</body>
</html>
Output:
Before:
After:
Explanation:
- When option is selected then alert window popup with selected option content.
Example #2
Using the text method example and output is below.
Code:
<!DOCTYPE html>
<html>
<head>
<script src = "https://ajax.googleapis.com/ajax/libs/jquery/3.5.1/jquery.min.js">
</script>
<script>
$(document).ready(function(){
$("#optionselect").change(function(){
var values=$("#optionselect option:selected").text();
$("#selectedcontent").val(values);
});
});
</script>
<style>
#optionselect{
height: 40px;
}
#selectedcontent{
height: 35px;
}
</style>
</head>
<body>
<h3> Please choose what Requirements to study </h3>
<select id = "optionselect">
<option value = "" selected disable> Choose The Method  </option>
<option value = "1"> Tutorial </option>
<option value = "2"> Study material </option>
<option value = "3"> Subject Notes </option>
<option value = "4"> Subject Guideline </option>
</select>
<input type="text" readonly = "readonly" id = "selectedcontent" />
</body>
</html>
Output:
Before:
After:
Explanation:
- With text method syntax is used in the script tag.
- When the option is selected then selected content is displayed in another text box.
Conclusion
It is used in the user input information to reduce content size and space. It helps to choose and control multiple content options at a time. It is user_friendly and easy to the understanding event in the web application.
Recommended Articles
This is a guide to jQuery Select Option. Here we discuss the introduction to jQuery Select Option, how does it works along with respective examples. You may also have a look at the following articles to learn more –


