Updated April 18, 2023

Introduction to jQuery slice
The jQuery slice is one of the methods that can be used to set the DOM elements and it also constructs the new jQuery object. It contains the subset of each html element the method has the arguments like start and end arguments. The argument contains the index value for specified regions by using the start index value the position of the elements is to be placed and identified by the user if the end value index is used to specifies the position of the elements is to be completed it reduced the set of matched elements to the subset of the number ranges using the indices.
Syntax:
JQuery has a number of inbuilt methods to implement and present the UI layer in the web application. Like that slice() is one of the default methods for selecting the subset of the html elements that will be based on the index value. For each index the value will be varied depends upon the user inputs.
<html>
<head>
<script type = "text/javascript" src="https://ajax.googleapis.com/ajax/libs/jquery/2.1.3/jquery.min.js”>
$(document).ready(function(){
$("").slice(start value, end value).addClass("");
});
</script>
<body>
---some UI tag elements usages depends upon the requirement---
</body></html>
The above codes are the basic syntax for utilizing the slice(start, end) method on the jQuery in the html web page. The parameter starting and ending index value is used to pass the method arguments on the html page.
How does the slice method work in jQuery?
The jQuery slice() method is used to set the substring values and construct the new object. It supports the subset of the elements that will be specified with start and ending value arguments. The argument value contains and supports the integer number to store and retrieve the index values. Generally, the subset of elements will include the element value at starting index which also excludes the index value for the ending stage at the html element. Starting argument of the slice() method is a necessary parameter for specifies the starting index of the elements is to be selected. Moreover, the index value is starting at the 0 based index value. The purpose of the method is useful for us to want to get the subset of elements from the matched set values. By using the negative number, it indicates the offset value from the end with the matched set elements. Ending index value is the optional parameter that going to be selected at the specified elements it will be the stopped position. The specified range of the selected elements continues until the end of the matched set values if we omitted the index value of the ending position.
Examples of jQuery slice
Here are the following examples mention below
Example #1
Code:
<!doctype html>
<html>
<head>
<title>Welcome To My Domain</title>
<style>
.first{
background: yellow;
}
.second{
background: green;
}
.third{
background: red;
}
.four{
background: blue;
}
.five{
background: pink;
}
div{
display: block;
border: 4px yellow;
color: violet;
padding: 7px;
margin: 31px;
width:303px;
}
</style>
<script src="https://code.jquery.com/jquery-2.1.1.js"></script>
</head>
<body>
<h2>Have a Nice Day Users</h2>
<div>The User first Example1 results</div>
<div>The User second Example2 results</div>
<div>The User third Example3 results</div>
<div>The User fourth Example4 results</div>
<div>The User fifth Example5 results</div>
<script>
$( "div" ).slice( 1,5).addClass("second");
$( "div" ).slice( -2,-6 ).addClass("first");
$( "div" ).slice( 2,4 ).addClass("third");
$( "div" ).slice( -1,-3 ).addClass("four");
$( "div" ).slice( -5,-7 ).addClass("five");
</script>
</body>
</html>
Output:
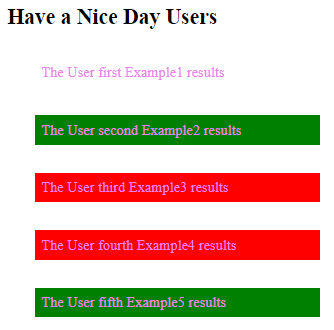
In the above example, we used the slice() method in basic strings. We used some starting and ending index like .slice(1,5) etc.. once we slice it will mark it as red color.
Example #2
Code:
<!DOCTYPE html>
<html>
<head>
<script src="http://ajax.googleapis.com/ajax/libs/jquery/1.11.1/jquery.min.js"></script>
<script>
$(document).ready(function() {
$("#example1").click(function() {
$("li").css("background-color", "red");
$("li").slice(3).css("background-color", "violet");
});
$("#example2").click(function() {
$("li").css("background-color", "red");
$("li").slice(1, 4).css("background-color", "violet");
});
$("#example3").click(function() {
$("li").css("background-color", "red");
$("li").slice(-4).css("background-color", "violet");
});
$("#example4").click(function() {
$("li").css("background-color", "red");
$("li").slice(-2, -1).css("background-color", "violet");
});
$("#example5").click(function() {
$("li").css("background-color", "red");
$("li").slice(1, 4).css("background-color", "violet");
});
$('#Authenticated').click(function() {
if ($('#ok').is(':disabled')) {
$('#ok').removeAttr('disabled');
}
else {
$('#ok').attr('disabled', 'disabled');
}
});
});
</script>
<style>
ul {
font-family: Arial;
font-size: 17px;
font-family: Arial;
font-style: normal;
font-size-adjust: none;
width: 175px;
}
ul li {
background-color: blue;
margin: 7px;
padding: 9px;
list-style-type: none;
}
</style>
</head>
<body>
<h1>Welcome To My Domain its a Nice day users</h1>
<a href="#popupMenu" data-rel="popup" data-transition="slideup" class="ui-btn ui-corner-all ui-shadow ui-btn-inline ui-icon-gear ui-btn-icon-left ui-btn-a">Menus</a>
<div>
<div data-role="popup" id="popupMenu" data-theme="b">
<ul data-role="listview" data-inset="true" style="min-width:170px">
<li>first element (index 0)</li>
<li>second element (index 1)</li>
<li>third element(index 2)</li>
<li>fourth element (index 3)</li>
<li>fiveth element (index 4)</li>
</ul>
</div>
<div style="clear:both;">
<button id="example1">.slice(3)</button>
<button id="example2">.slice(1,4)</button>
<button id="example3">.slice(-4)</button>
<button id="example4">.slice(-2,-1)</button>
<button id="example5">.slice(1,4)</button>
</div>
<input id="Authenticated" name="Authenticated" type="checkbox" value="y"/>Authenticated<br>
<input id="ok" disabled="disabled" name="ok" type="submit" value="ok" />
</body>
</html>
Output:
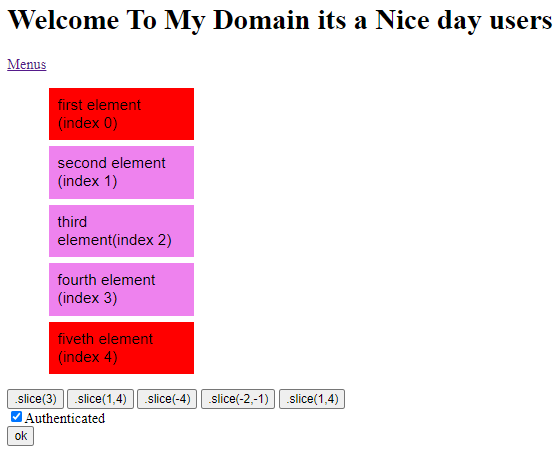
In the second example, we used the slice() method with some html authentication. Like button and some enable and disable option is used in the front end.
Example #3
Code:
<!DOCTYPE html>
<html lang="en">
<head>
<head>
<link rel="stylesheet"
href=
"https://maxcdn.bootstrapcdn.com/bootstrap/4.0.0/css/bootstrap.min.css"
integrity=
"sha384-Gn5384xqQ1aoWXA+058RXPxPg6fy4IWvTNh0E263XmFcJlSAwiGgFAW/dAiS6JXm"
crossorigin="Welcome" />
<title>Have a Nice Day Users</title>
<style>
body {
height: 320px;
width: 107%;
background: rgba(0, 1, 0, 0.5);
}
#popup {
width: 603px;
height: 302px;
background-repeat: no-repeat;
background-position: center;
top: 63%;
left: 63%;
box-shadow: 3px 1px 4px 2px blue;
}
#emailId {
text-align: left;
left: 73%;
top: 73%;
}
.submitId {
top: 103px;
left: 194px;
}
.eg { color:blue; }
</style>
</head>
<body>
<h1 class=
"text-center text-white mt-5 font-weight-bold">
Welcome To My Domain
</h1>
<br />
<br />
<div class="first"
style="display: none;">
<div id="first">
<input type="mobile"
class=
"number-center w-50 form-control mt-5"
id="mobile"
placeholder=
"Enter your mobile number" />
<button class=
"submitId btn btn-primary font-weight-bold mt-5">
Ok
</button>
<button class=
"submitId btn btn-primary text-center font-weight-bold mt-5">
Cancel
</button>
</div>
</div>
<script src=
"https://code.jquery.com/jquery-3.2.1.slim.min.js"
integrity=
"sha384-KJ3o2DKtIkvYIK3UENzmM7KCkRr/rE9/Qpg6aAZGJwFDMVNA/GpGFF93hXpG5KkN"
crossorigin="welcome"></script>
<script src=
"https://cdnjs.cloudflare.com/ajax/libs/popper.js/1.12.9/umd/popper.min.js"
integrity=
"sha384-ApNbgh9B+Y1QKtv3Rn7W3mgPxhU9K/ScQsAP7hUibX39j7fakFPskvXusvfa0b4Q"
crossorigin="welcome"></script>
<script src=
"https://maxcdn.bootstrapcdn.com/bootstrap/4.0.0/js/bootstrap.min.js"
integrity=
"sha384-JZR6Spejh4U02d8jOt6vLEHfe/JQGiRRSQQxSfFWpi1MquVdAyjUar5+76PVCmYl"
crossorigin="welcome"></script>
<script>
$(document).ready(function () {
setTimeout(function () {
$(".first").css("display", "block");
}, 230);
});
$(".submitId").click(function () {
$(".first").css("display", "none");
});
$(document).ready(function() {
$("li").slice(3, 5).addClass("eg");
});
</script>
<div>
<ul>
<li class = "above">Thanks for choosing the application</li>
<li class = "top">Welcome Users</li>
<li class = "middle">Try again</li>
<li class = "bottom">Have a Nice day</li>
<li class = "below">Please try again</li>
</ul>
</div>
</body>
</html>
Output:
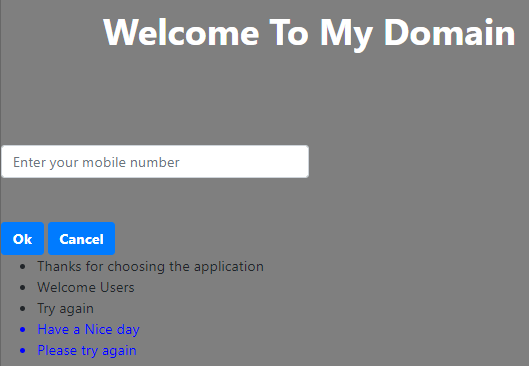
In the final example, we used some html elements like entering the mobile number in the text box after entering the mobile number is submitted to the back end. With the help of the slice() method, we can highlight the strings with blue color options.
Conclusion
The jQuery library has many features and UI widgets. Like that slice() is one of the built-in methods for slicing or highlight the substrings elements. Whenever we use the method in the html elements it creates a separate instance for utilizing the input value in the UI DOM Elements.
Recommended Articles
This is a guide to jQuery slice. Here we discuss How the slice method works in jQuery and Examples along with the codes and outputs. You may also have a look at the following articles to learn more –


