Updated April 6, 2023

Introduction to JSP Login Page
Whenever we used Java Server Pages at the front end in the web applications it’s basically used in the index pages like a login page or home pages because html have predefined tags for creating the UI elements like textbox, scrollbox, etc. but when we use jsp it will create both html elements and java logic codes in the same page so compared to html the code redundancy and external memory will be reduced and also more complexity, performance looks like speed same as html we can refresh the jsp page alone in the web application not necessary to restart the application server frequently when compared to the servlet.
Syntax:
The basic syntax of the login page when we used it in the jsp tags as below.
<html>
<body>
<form method="get/post" action=".jsp">
<input type="text" name="user"value=""/>
<input type="password" name="pass"value=""/>
</form>
<%
-----some java logic for validation in both user and password---
%>
</body>
</html>
The above codes is basic steps for creating a login page when we use the jsp in the web application it’s needed for the html tags for creating the ui specified elements in the web application. We can use the jsp codes in the same html page itself or we can code into the separate page and it can be called in the html forms.
How does the Login Page done by using the JSP?
The jsp tags have separate action tag elements, directives, scripting elements and its have own implicit objects. Scripting elements like scriptlets tag, expression tags, and declaration tags are for creating the ui basics in the html. When we use implicit objects the request and response will be the main role of the jsp because it’s connected into both front and back end logics the server response instance will be called and used in the entire web application using implicit objects.
In jsp configuration also main role of the implicit objects because in login page its be called in the web.xml in the dynamic web projects in the application the session also calculated for every user whenever they are logged in the application the session id will be created it will use for tracking the users in the web application in that time the error or any exceptions its occurred it will throw the exceptions and also write in the logs of the application projects based on the user requirements in the applications.
Jsp directives will also use for the login applications the page, include and taglib directives are the three kinds of the directives in the jsp. When we use include directive in the login application if suppose we can log in again after the user session is expired in the browser or we can use the date and time any other util functions use in the login page these directives will be very useful for adding the jsp tags in the same file or different files it will be called in the include directive in jsp.Taglib is the custom or user-defined tags in the jsp elements.
Next, the JSP Action Elements is a most important function for the login page applications because when we create submit button after submitting the user details it will be validated in the back end so that time submit button is doing some actions triggered in the back end validation it’s the bridge between the front and back end logic codes. We can use some other action tags like forward, include these two tags will be used for adding the different or after validation pages like home, contact us, etc these pages will be shown in the browser. By using java bean class we can use the pojo objects in the jsp applications for storing and retrieving the user datas in the db.
Examples of JSP Login Page
Here are the following examples mention below
Example #1
Code:
<!DOCTYPE html PUBLIC"-//W3C//DTD HTML 4.01 Transitional//EN""http://www.w3.org/TR/html4/loose.dtd">
<html>
<head>
<meta http-equiv="Content-Type" content="text/html; charset=ISO-8859-1">
<title>Welcome Login Form</title>
</head>
<body>
<form action="custom.jsp" method="post">
<table style="width: 50%">
<tr>
<td>User</td>
<td><input type="text" name="users"/></td>
</tr>
<tr>
<td>Pass</td>
<td><input type="password" name="password"/></td>
</tr>
</table>
<input type="submit" value="Login"/></form>
</body>
</html>
<%@page language="java" contentType="text/html; charset=ISO-8859-1"
pageEncoding="ISO-8859-1"%>
<!DOCTYPEhtml PUBLIC"-//W3C//DTD HTML 4.01 Transitional//EN""http://www.w3.org/TR/html4/loose.dtd">
<html>
<body>
<%
String site = "Welcome To My Domain";
out.print(site);
%>
</body>
</html>
Sample Output:
After Login
Example #2
Code:
<!DOCTYPE html>
<html>
<head>
<script type="text/javascript">
function first(){
var p=document.sample.pass.value;
var p1=document.sample.pass1.value;
if(p==p1){
return true;
}
else{
alert("password are not equal!");
return false;
}
}
</script>
</head>
<body>
<form name="sample" action="custom.jsp" onsubmit="return first()">
Password:<input type="password" name="pass"/><br/>
Confirmation Password:<input type="password" name="pass1"/><br/>
<input type="submit">
</form>
</body>
</html>
Sample Output:
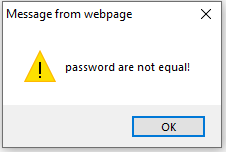
If the password doesn’t match it shows following o/p
If password will match it shows following o/p
Example #3
Code:
<html>
<body>
<script type="text/javascript">
function first(){
var nam=document.sample.n.value;
var passlength=document.sample.p.value.length;
var s=false;
if(nam==""){
document.getElementById("name").innerHTML=
" <img src='Downloads//s.jpeg'/> Please enter the name";
s=false;
}else{
document.getElementById("name").innerHTML=" <img src='Downloads//s.jpeg'/>";
s=true;
}
if(passlength<=6){
document.getElementById("password").innerHTML=
" <img src='Downloads//s.jpeg'/> Please Enter Password must be greater than 6";
s=false;
}else{
document.getElementById("password").innerHTML=" <img src='Downloads//s.jpeg'/>";
}
return s;
}
</script>
<form name="sample" action="custom.jsp" onsubmit="return first()">
<table>
<tr><td>User:</td><td><input type="text" name="n"/>
<span id="name" style="color:red"></span></td></tr>
<tr><td>Password:</td><td><input type="password" name="p"/>
<span id="password" style="color:red"></span></td></tr>
<tr><td colspan="3"><input type="submit" value="reg"/></td></tr>
</table>
</form>
</body>
</html>
Sample Output:
IF password is not greater than 6 characters or numbers then it shows the following o/p:
IF password is greater than 6 characters or numbers then it shows following o/p:
The above three examples we will use the jsp tags for creating the login page for different scenarios. The first example we will use the basic login form using html and after that, it navigates into the jsp page second example we will discuss the password credentials like password and confirmation password for validating the credentials using javascript validation after the validation it’s forward into the jsp page the final example we will use the login form with validations like minimum password range and the image will be used in the html src tags using alert function the pop-up will be raised after the password minimum range is entered if it success navigate into the jsp page.
Conclusion
In Jsp its have its predefined tags, libraries, and directives for created the web pages more sophisticated in the web applications using customized tags the web pages will be more user-convenience and user-friendly nature. In Login page scenarios it’s a basic module of the web-based projects after the initial step of the registration page based on the customer requirements.
Recommended Articles
This is a guide to JSP Login Page. Here we discuss how does the Login Page done by using the JSP along with respective examples for better understanding. You may also look at the following articles to learn more –


