Updated April 5, 2023

Introduction to JSP Page
JSP is an abbreviation of the JAVA Server page which is an extension of JAVA servlet technology. JSP pages provide dynamic web content on the fly which helps in loading the content faster in an interactive fashion. The JSP pages technology consists of added functionalities like JSTL, faster deployment, lesser code, and advanced custom tags in comparison to JAVA servlets. JSP pages have an added advantage of separating web design with development for code clarity and easier maintenance over a longer period of time.
Syntax
The syntax used for JSP pages is
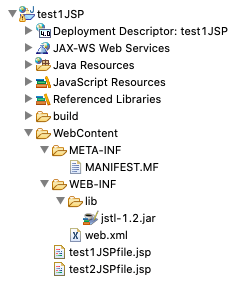
The page should be created and put in a particular folder “WEB-INF” in the project directory for it to function properly. The web.xml file will be created automatically by the IDE (Integrated development environment) you are using so that mapping of the files can be done properly by the IDE itself. The directory structure of the page is displayed below in the screenshot of the example used in this article.
JSP page should start with the ta9*gs which will help HTML tags include JSP and JAVA related libraries. The JSP code is written under separate tags to determine the JSP code but this should all be enclosed under HTML tags like this:
<%@ page language="java" contentType="text/html; charset=ISO-8859-1"
pageEncoding="ISO-8859-1"%>
<%@ taglib uri="http://java.sun.com/jsp/jstl/core" prefix="c" %>
<!DOCTYPE html PUBLIC "-//W3C//DTD HTML 4.01 Transitional//EN" "http://www.w3.org/TR/html4/loose.dtd">
<html>
<head> All header related things to be included here. The title is also attached to the web page in this section itself. </head>
<body> This section contains web static content or form along with links to other JSP pages or JAVA Servlets.  </body>
</html>
How does JSP Page work in JSP?
JSP pages use primarily three functions to initialize, process, and finally, destroy the deployed page to print the dynamic content after interacting with the server. These three functions are jspInit(), _jspService() and jspDestroy() respectively. This is performed only when the JSP file is converted into a JAVA servlet internally. This JAVA file is then initiated to create a class file. Class files run through a JRE to finally get processed. After this file dependent on the local system settings is created then it is loaded onto the server.
Process flow for the creation of dynamic web content via pages is represented below:
The JSP page is called via a JSP page, HTML page, or JAVA servlet. Once it is called then the cycle mentioned below is triggered to generate dynamic content. This dynamic content is then fed on the web page. Any server can be used in the back end like wildfly, tomcat, or others for this technology to work.
Web page → called JSP page→ JSP page (.jsp file) → JSP Translator → JAVA Servlet ( .java file ) -> Compiler → Class file → passed to JRE ( JAVA runtime environment ) → Servlet object → Dynamic content → Web page.
The control and data flow can be well understood with the help of examples. The use of pages is explained in the following section with examples.
Examples
The examples of pages are explained with a screenshot of outputs in this section.
Example #1 – test1JSP project
Code: JSP Page: test1JSPfile.jsp
<%@ page language="java" contentType="text/html; charset=ISO-8859-1"
pageEncoding="ISO-8859-1"%>
<%@ taglib uri="http://java.sun.com/jsp/jstl/core" prefix="c" %>
<!DOCTYPE html PUBLIC "-//W3C//DTD HTML 4.01 Transitional//EN" "http://www.w3.org/TR/html4/loose.dtd">
<html>
<head>
<meta http-equiv="Content-Type" content="text/html; charset=ISO-8859-1">
<title>Example 1 of JSP Pages</title>
</head>
<body>
<h1>Example 1 to demonstrate the use of JSP Pages</h1>
<form name="forEachForm"
action="test1JSPfile.jsp"
method="POST">
Select your favourite programming language from the list provided below: <br/>
C<input type="checkbox" name="option" value="C"/><br/>
C++<input type="checkbox" name="option" value="C++"/><br/>
Java<input type="checkbox" name="option" value="Java"/><br/>
C#<input type="checkbox" name="option" value="C#"/><br/>
PHP<input type="checkbox" name="option" value="PHP"/><br/>
Ruby<input type="checkbox" name="option" value="Ruby"/><br/>
jQuery<input type="checkbox" name="option" value="jQuery"/><br/><br/>
<input type="submit"  style='background-color: green; border-radius: 15px;' value="Submit"/>
</form>
<br/>
<br/>
You selected:
<c:forEach var="lang" items="${paramValues.option}">
<font color="#000000"><c:out value="${lang}"/>,</font>
</c:forEach>
</body>
</html>
Web.xml:
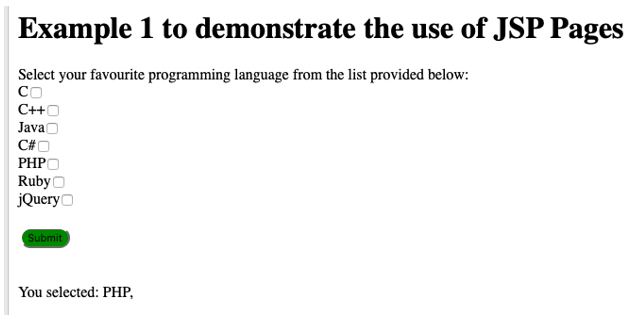
Output:
Explanation: This project contains two main files which are “web.xml” and “test1JSPfile.jsp”. The “web.xml” file is created in reference to the project for mapping purposes. This page contains important tags which will link JSP and other libraries linked like JSTL to the JSP page. These tags are mentioned in the syntax section and are important for the JSP page to generate dynamic web content.
“<meta>” tag contains meta-data for the page. It is not visible on the output screen of the web page but it is supported by browsers for configuring settings related to content display, content loading and character set used. This tag is always displayed under the head section. “<title>” tag is used to set the title of a web page. This should also be declared in the head section only.
In the body section, the form is designed. This form contains “checkboxes” and it is defined in the page. The checkbox input type has some attributes like name and value used internally to attain the value from the checkbox selected. The “<form>” tag contains some important attributes like action and method. The action attribute determines the next location where the control should flow after the submit button is clicked in the end.
Since checkboxes are used for capturing inputs from users so multiple values can be selected. The values of selected checkboxes are pulled out and stored in a keyword from JSTL named “paramValues”. The “paramValues” are then assigned to a variable named “$lang”. The variable “$lang” is then printed (Variables are always preceded by the dollar sign in JSP for identification”. “4lang
“ is iterated using a foreach loop to print all the selected values on the same screen dynamically with the help of JSP code.
Conclusion
JSP pages are a simplified version of JAVA servlet owing to their simplicity and easier maintenance in comparison to JAVA servlets. It comes with the added advantages of custom tags and multiple useful libraries like JSTL multiplying the number of users for JSP technology. This is extensively used and undoubtedly one of the quickest ways to develop interactive web pages over the web.
Recommended Articles
This is a guide to JSP Page. Here we discuss How does JSP Page work in JSP along with respective examples for better understanding. You may also have a look at the following articles to learn more –


