Updated February 28, 2023

Introduction to Kafka Node
Throughout the years, Kafka has evolved tremendously in many ways. Kafka Node is nothing but a Node.js client for Apache Kafka versions of 0.9 and later. We will learn more about the Kafka Node and its examples further.
Let us learn more about Kafka Node:
Just to revise, Kafka is a distributed, partitioned and replicated pub-sub messaging system. Kafka stores messages in topics (partitioned and replicated across multiple brokers). Producers send messages to topics from which consumers or their consumer groups read. It is important, to begin with, the understanding of microservices before we address how Kafka-node operates. We are mainly in the Microservices Era of growth. Many businesses favour the use of Microservices to develop their applications.
The software architecture of microservices is an important model for software engineering and development with that frequency. As the size of applications increases, i.e. data consumed, processed, and generated, finding fault-tolerant, reliable ways of managing both the systems and the handled data becomes increasingly important. As the name suggests, a microservice is software that interacts with other system components to perform a function. Many use cases are event sources for microservices. We will implement Kafka for Event Sourcing using Node.js client.
This is one of the most common cases in which a Microservice through Kafka talks with another Microservice.
Integrating Kafka with NodeJS
Let’s build a NodeJS API that is going to serve as a Kafka producer. Then we will create another consumer in NodeJS who will consume the topic that we are going to create first. Let’s follow the steps needed to consume messages from the topic using the command line.
1. Starting Zookeeper
It doesn’t begin without a Zookeeper; Kafka needs a zookeeper. Start Zookeeper by using the command zkServer.sh.
Command:
$bin/zkServer.sh start
Output:
2. Start Kafka Server
Use the below command to start the Kafka server:
Command:
$ bin/kafka-server-start.sh -daemon $ config/server.properties
3. Topic Creation
Let’s create a topic called “example” with a single partition and a single replica:
Command:
$bin/kafka-topics.sh --create --zookeeper localhost:2181 -- replication-factor 1 --partitions 1 --topic example
The replication-factor determines how many copies of the data will be produced. As we’re working with a single instance, keep this value at 1. Set the partitions as the number of brokers you want your data to be divided between. As we’re running with a single broker, keep this value at 1.
4. Integrating Kafka with NodeJS
The next step is creating individual producers and consumers using Node.js. But before that, let’s connect our Kafka with NodeJS.
npm install kafka-node –save
Built the following config file:
module.exports = {'example',kafka_server: 'localhost:2181',};
5. Creating Producer
We need a producer to instantiate to publish messages with Kafka-node. A message on the given topic is published using the following function.
Code:
const  kafka  =  require  (‘kafka-node’);

const  bp  =  require('body-parser');

const  config  =  require('./config');

try {

const  Producer  =  kafka.Producer;

const  client  =  new  kafka.Client(config.kafka_server);

const  producer  =  new  Producer(client);

const  kafka_topic  =  'example';

console.log(kafka_topic);

let  payloads  =  [

{

topic:  kafka_topic,

messages:  config.kafka_topic

}

];

producer.on('ready',  async  function()  {

let  push_status  =  producer.send(payloads,  (err,  data)  =>  {

if (err) {

console.log('[kafka-producer  ->  '+kafka_topic+']:  broker  failed');

}  else  {

console.log('[kafka-producer  ->  '+kafka_topic+']:  broker  success');

}

});

});

producer.on('error',  function(err)  {

console.log(err);

console.log('[kafka-producer  ->  '+kafka_topic+']:  connection  error');

throw  err;

});

}

catch(e) {

console.log(e);

}
6. Creating Consumer
We will instantiate a customer to listen to messages on a specific topic. The following functionality consumes from a topic.
Code:
const  kafka  =  require  (‘kafka-node’);

const  bp  =  require('body-parser');

const  config  =  require('./config');

try {

const  Consumer  =  kafka.HighLevelConsumer;

const  client  =  new  kafka.Client(config.kafka_server);

let  consumer  =  new  Consumer(

client,

[{  topic:  config.kafka_topic,  partition:  0  }],

{

autoCommit:  true,

fetchMaxWaitMs:  1000,

fetchMaxBytes:  1024  *  1024,

encoding:  'utf8',

fromOffset:  false

}

);

consumer.on('message',  async  function(message)  {

console.log('here');

console.log(

'kafka->  ',

message.value

);

})

consumer.on('error',  function(err)  {

console.log('error',  err);

});

}

catch(e) {

console.log(e);

}
Examples of Kafka Node
Let’s follow the below steps for creating a simple producer and consumer application in Node.js.
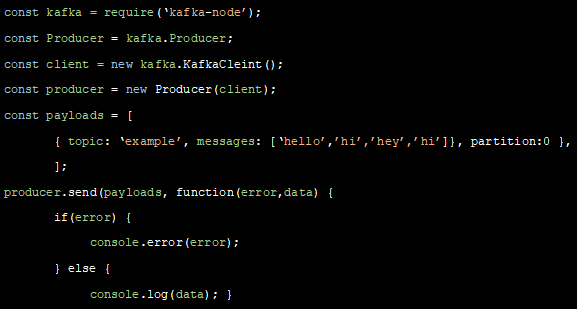
1. Create a producer using the code below in the node shell while the ‘mytopics123’ topic is already created.
Producer.js
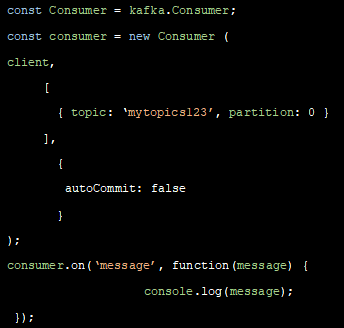
2. Create a consumer using the code below in the node shell in the consumer.js file.
consumer.js
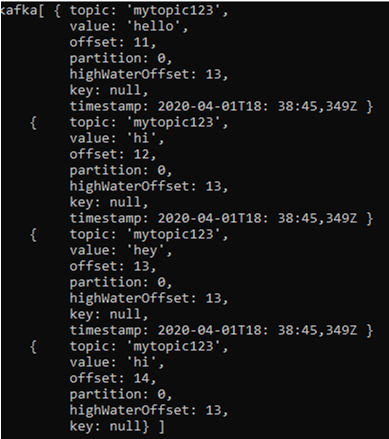
All the available messages will be shown on the node terminal. Following is the output when we run the above consumer.js.
Running consumer.js:
If you don’t create consumer.js and consume using Kafka-console-consumer.sh then you will get the following output:
Let’s run the Kafka-console-consumer.sh and consume all messages which the previous producer sent.
Running Kafka-console-consumer:
Recommended Articles
This is a guide to Kafka Node. Here we discuss what the Kafka-node is and how to integrate the NodeJS with Kafka and its examples. You can also go through our other suggested articles to learn more –


