Updated February 15, 2023
Introduction to Kali Linux Bootable USB
Bootable USB is one of the fastest techniques to run Kali Linux with Live mode through the USB drive. Basically, there are many Kali Linux versions available, we can use any version. In another word, we can say that it allows running the Kali Linux anywhere anytime whenever we require it through the USB drive, so for that purpose, we need a minimum 8GB pen drive and need to make it bootable with the help of any tool.
Key Takeaways
- Creating a Kali bootable USB is very easy and simple.
- After the bootable of the USB drive, we can directly use Kali Linux as Live from the USB driver whenever we require it.
- We have different free open-source tools to make bootable USB drives.
Overview of Kali Linux Bootable USB
To introduce Kali Linux onto the USB drive, the client should consume the ISO onto a USB thumb drive. The ISO picture we downloaded in the past step will be utilized to compose our USB streak drive. The vast majority picked the Kali live picture since they need to boot from a USB drive and utilize a live climate or introduce Kali Linux default settings. Making a bootable Kali Linux USB drive in a Linux climate is simple. Whenever we’ve downloaded and confirmed the Kali ISO document, we can utilize the dd command with sudo to duplicate it over to a USB drive utilizing the accompanying strategy.
Note that we should be running as root, or executing the dd command with sudo. The accompanying model expects a Linux Mint 17.2 work area – contingent upon the distro we’re utilizing, a couple of points of interest might differ somewhat, yet the overall thought ought to be practically the same. In the event that we would like to utilize Etcher, follow similar headings as a Windows client.
How to Create Kali Linux Bootable USB Windows?
Before creating a bootable USB, we need to consider some prerequisites as follows:
- First, we need to verify the ISO image of Kali Linux which we want to execute. If we don’t have one, then we can download it from the official website of Kali Linux.
- If we have a Windows operating system, then windows do not have any tool, so we need to install any third-party tool such as Etcher.
- We will likewise require a USB drive of 8GB stockpiling at any rate. Nonetheless, Frameworks with an immediate SD card space can utilize an SD card with a comparable limit very much like the USB Drive, the interaction glimmering will, in any case, continue as before.
Basically, there are three different methods.
1. By using Etcher
i. Need to check the ISO file, if we don’t have then we need to download it from the official website.
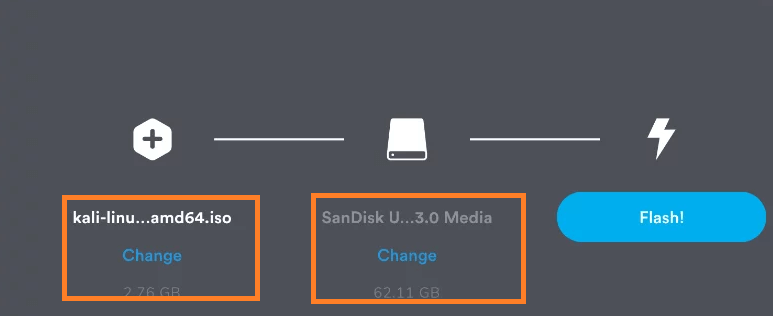
ii. In the second step, we need to attach the USB drive to the machine as shown in the below screenshot.
iii. In the next step, we need to select the Kali Linux image which we already downloaded as well as also need to verify whether the USB is plugged in or not.
iv. Now we need to click on the flash button.
v. After that Ether the tool gives the alter message such as the image has been flashed, and now we can safely remove our USB and continue with Kali Linux boot.
2. With the help of Rufus
i. In the same way we need to download the ISO image of Kali if we don’t have it.
ii. In the second step if we don’t have the Rufus tool then we need to download it from the official website of Rufus.
iii. After that, we need to store both files inside the folder and open the Rufus tool.
iv. Now plugged in our USB drive at the time Rufus automatically detects the USB drive.
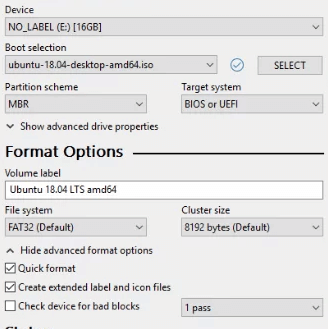
v. In the next step, we need to format it as shown in the below screenshot.
vi. Here we need to select the ISO image of Kali from our machine which we already downloaded.
vii. After some time, an alert message will get displayed to select the DD method.
viii. After the selection of the method, it takes 10-15 min and Kali Linux bootable USB created successfully message will get displayed.
ix. For checking, we need to connect a bootable USB to the machine and select the pen drive as shown in the below screenshot.
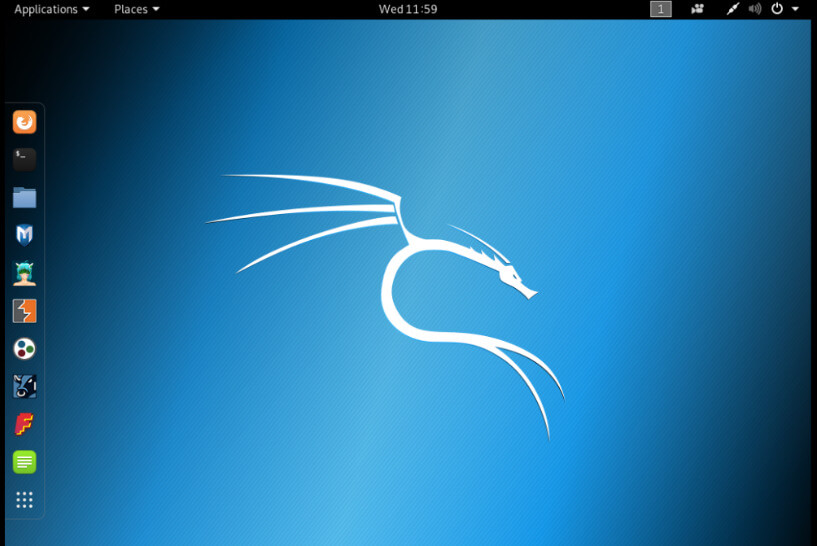
x. After that we need to click on our pen drive option, so we get an actual window of Kali as shown in the below screenshot.
3. By using the Universal USB installer
i. If we don’t have the ISO image of Kali and the Universal USB tool.
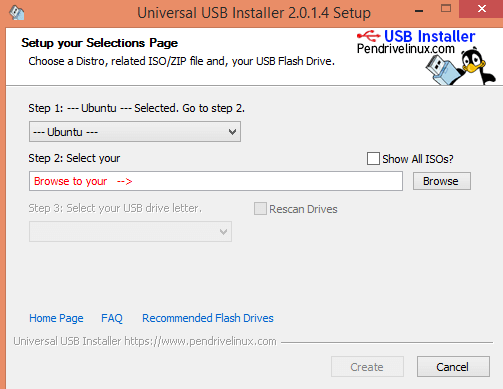
ii. Open the tool and accept the terms and conditions after that we get a new screen as shown in the below screenshot.
iii. In the above screenshot, we can see the different options. In the first step, we need to select the distribution, after that browse the ISO image from our machine as well as select the USB drive from the drop-down and click on the create button.
Features
Given below are the features mentioned:
- Non-damageable: It rolls out no improvements to the host framework’s hard drive or introduced operating system, and to return to typical tasks, we just eliminate the “Kali Live” USB drive and restart the framework.
- Compact: We can convey Kali Linux in our pocket and make them run in minutes on an accessible framework.
- Adaptable: We can move our own custom Kali Linux ISO picture and put it onto a USB drive utilizing a similar methodology.
- Possibly industrious: With a cycle of additional work, we can design of Kali Linux “live” USB drive to have tireless capacity, so the information we gather is saved across reboots.
Conclusion
From the above article, we have taken in the essential idea of the Kali Linux bootable USB and the representation of the Kali Linux bootable USB. From this article, we also saw how and when we use Kali Linux bootable USB.
Recommended Articles
This is a guide to Kali Linux Bootable USB. Here we discuss the introduction, how to create kali linux bootable USB windows. and features. You may also have a look at the following articles to learn more –
