Updated March 21, 2023

Introduction to KNN Algorithm
K Nearest Neighbour’s algorithm, prominently known as KNN is the basic algorithm for machine learning. Understanding this algorithm is a very good place to start learning machine learning, as the logic behind this algorithm is incorporated in many other machine learning models. K Nearest Neighbour’s algorithm comes under the classification part in supervised learning.
What is Supervised Learning?
The supervised learning algorithm is a kind of algorithm where it relies on labelled input to learn and predict based on the function when unlabelled data is provided. As we have understood what supervised learning is let us see what is classification, classification algorithm gives a discrete value as an output, not continuous values.
How does the KNN Algorithm Work?
K Nearest Neighbours is a basic algorithm that stores all the available and predicts the classification of unlabelled data based on a similarity measure. In linear geometry when two parameters are plotted on the 2D Cartesian system, we identify the similarity measure by calculating the distance between the points. The same applies here, KNN algorithm works on the assumption that similar things exist in close proximity, simply we can put into the same things stay close to each other.
Example:
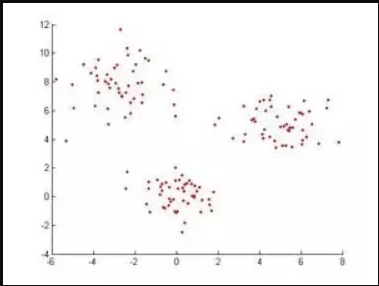
If we have a data set when plotted looks like this, to classify these data points K Nearest Neighbours algorithm will first identify the distance between points and see if they are similar or not.
In Geometry according to Euclidean, distance function can be calculated by the following equation.
If K=1, then the case is simply assigned to a class of its nearest neighbour [We use “1” in almost any of the situations in mathematics, we can alter the value of K while training the models in machine learning and we will discuss this further in the article] X and Y are the values on the co-ordinate axes.
If we notice here, all the measures of distance we are getting will be continuous variables, but we need discrete values while doing classification so, we have to use hamming distance to achieve this.
This equation also brings us the standardisation of numerical values between 0 to 1 when there is a mixture of numerical and categorical values in the data set.
| X | Y | Distance |
| With Cancer | With Cancer | X = Y → D = 0 |
| Without Cancer | Without Cancer | X != Y → D = 1 |
In this way, the algorithm works and now, let’s dive into how do we choose the value of K in KNN.
Choosing K Value in KNN Algorithm
Before seeing what are the factors to consider while choosing K value we have to understand how does the value of K influence of algorithm.
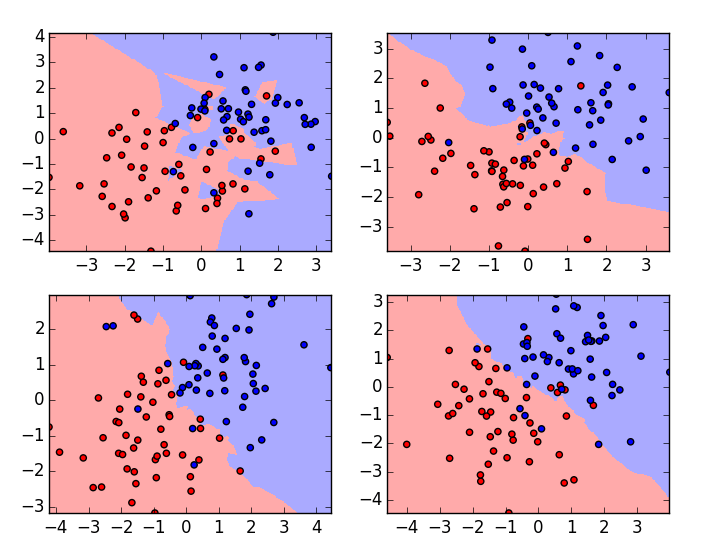
These are the plots of the same data set with varying K values, K-value is 1 for the plot on the left top corner and the highest for the plot on the right bottom corner. If we examine carefully we can understand that the boundary of the classification algorithm becomes smooth as the value of K increases. That is the Value of K is directly proportional to the smoothness of the boundary. So from this, we can understand that if K value is set to 1 then the training model will overfit the data and if the K value is set to a large number then it will underfit the data. To choose an optimal value of K we need to check the validation error with multiple K – values and choose one with the minimum error.
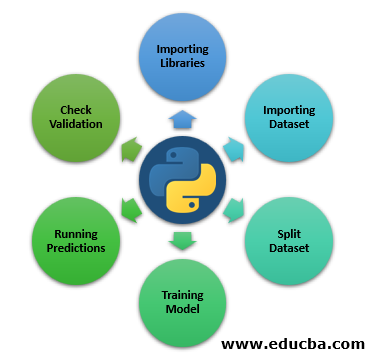
Steps to Implement the KNN Algorithm in Python
So far here we have seen the theoretical part of the K Nearest Neighbour’s algorithm now let us see it practically by learning how to implement it in python.
Step 1: Importing Libraries
In the below, we will see Importing the libraries that we need to run KNN.
Code:
import numpy as np

import matplotlib.pyplot as plt

import pandas as pd
Step 2: Importing Dataset
Here, we will see the dataset being imported.
Code:
file = "/path/to/the/dataset"

#Push dataset into Pandas dataframe

dataset = pd.read_csv(file)
Step 3: Split Dataset
Next step is to split our dataset into test and train split.
Code:
from sklearn.model_selection import train_test_split

X_train, X_test, y_train, y_test = train_test_split(X, y, test_size=0.30)
Step 4: Training Model
Now in this step, we’re going to see a model training.
Code:
from sklearn.neighbors import KNeighborsClassifier

classifier = KNeighborsClassifier(n_neighbors=3)

classifier.fit(X_train, y_train)
Step 5: Running Predictions
Running predictions on the test split data.
Code:
y_pred = classifier.predict(X_test)
Step 6: Check Validation
Next step is to evaluate algorithm and check the validation error, run again with different K value and consider the k value where we get the minimum validation error. This is how we can practically implement K Nearest Neighbours classifier, there are multiple ways to implement this algorithm this is just one of them and in this article, I have described very briefly the steps as our main agenda is to understand how the algorithm works.
Conclusion
As said earlier, K Nearest Neighbours algorithm is one of the simplest and easiest algorithms used for classification. Based on how it works it also comes under the “Lazy Learning Algorithm”. Generally, the K-value that everyone passes while training the model is an odd number but that is not a compulsion.
However, there are few cons as well while using KNN few of them are:
- It doesn’t go well with the categorical data, because we cannot find the distance between two categorical features.
- It also doesn’t work well with high dimensional data, as it will be difficult for the algorithm to calculate the distance in each dimension.
If we see currently most of the use cases in Machine Learning are surrounded by the classification algorithm at the basic level, that is how KNN is playing a major role in the machine learning world.
Recommended Articles
This is a guide to KNN Algorithm. Here we discuss the introduction and working of the K Nearest Neighbours algorithm with steps to implement the kNN algorithm in python. You may also look at the following articles to learn more-


