Updated February 14, 2023
Introduction to Kotlin JVM
Kotlin jvm provides several annotations which facilitate kotlin class compatibility in a kotlin. The annotation affects how kotlin code is compiled into the byte code and how we use the resulting classes in kotlin. Most of the jvm annotation in kotlin does not contain any impact while used in code. However, the java jvm annotation of @jvmname has a problem using kotlin.
Key Takeaways
- We are specifying the JVM default in kotlin jvm. It is the default method that was generated for the interface, which was not abstract.
- It forces the compiler to generate the assessors of annotated interface with a default class. It is used with an annotation name as @JvmName.
What is Kotlin JVM?
The Godot module allowed us to write our application logic in kotlin by using JVM. As we know, kotlin is a general purpose open source programming language designed for java virtual machines. Also, it is used while developing android applications. It focuses on clarity, safety, and tooling support originating from JetBrains. The annotation and function are the same as what we use in the java platform. We use the jvm repeatable function to make the class repeatable in kotlin.
Kotlin JVM Function?
The annotation of @JvmName changes the function name from the byte code; at the same time, we call the following function. In the below example, we are using the getName function by using the annotation name as @JvmName. We are using the jvm name annotation as follows.
Code:
@JvmName ("Get the name of user")
fun getName() : String {
  return "studName"
}
Output:
In the below example, we are using the actual name of kotlin; we are using the variable name as studname and the function name as getName. There are two types of use cases where annotation of JvmName is handy by using functions and type erasure.
Code:
@JvmName ("Get the name of user")
fun getName() : String {
val username = getName()
return "studName"
}
Output:
The first use case in the function using the same name is auto-generated using the setter and getter method. In the below example, we are using the getId method for defining the function name conflicts as follows.
Code:
@JvmName ("Get the ID of stud")
val ID = "ID"
fun getId() : String = "from:$ID"
return "ID"
}
Output:
If suppose we want a function with the ID, then we can use the JvmName to tell the kotlin compiler to rename the function at the byte code level.
Create a Project Kotlin JVM
We can create the project by using the Intellij idea. After creating the project, we can make the application in kotlin by using JVM.
Below steps shows how we can create the project by using kotlin as follows:
1. In the first step, we are opening the Intellij idea framework; it is the framework of kotlin which was used to develop the application. We can use any framework for creating the project. We are developing the jvm project using the Intellij idea in this example.
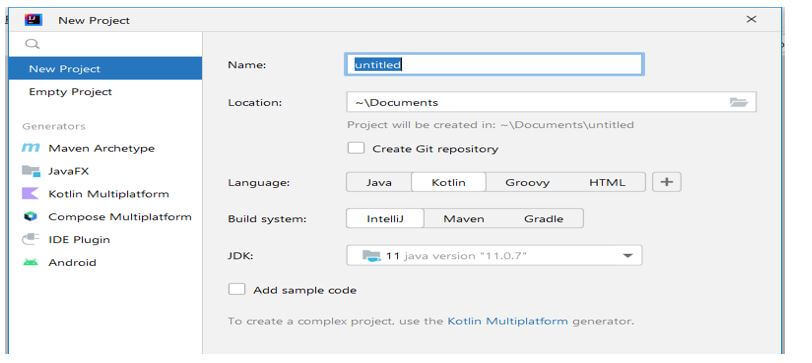
2. After opening the Intellij idea project in this step, we create the new project by clicking on the file -> new -> project tab. After clicking on this tab, it will open the below window.
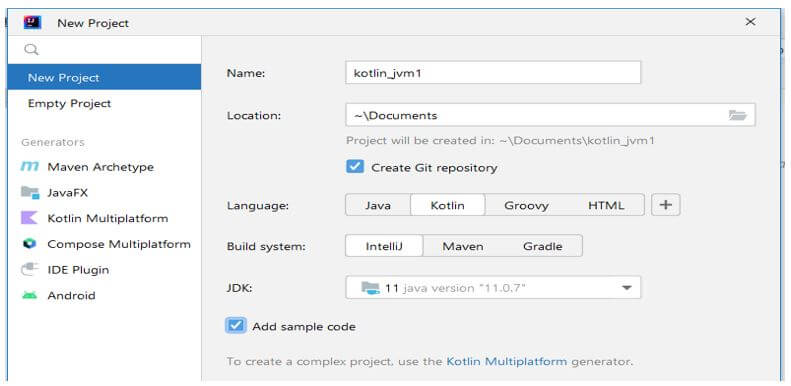
3. After opening the window of the kotlin project in this step, we create a new project name as kotlin_jvm1, define the location as \documents, and create the git repository. We are selecting the language as kotlin, the build system as Intellij, and the Jdk version as follows. We are adding sample code while creating a new project; it will add sample code as “hello world.” After defining all these functions, we click the create button to create a new java kotlin project.
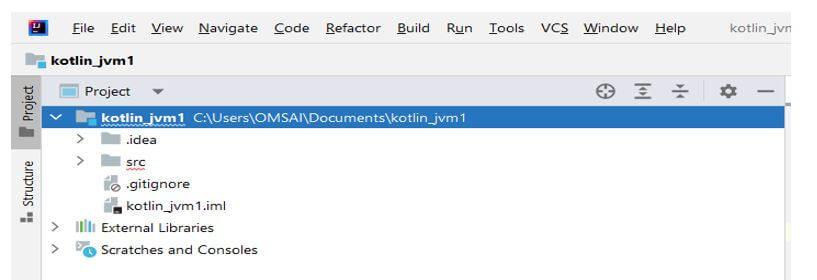
4. After creating the project, we can check the sample file is created with the name Main.kt will show the sample code, which will print the result in output. The below example shows the project structure of it as follows.
Application
To create a jvm application, first, we need to create a jvm project. However, we have already created the jvm project, so we have not created it again.
The below steps show we are creating the application as follows:
1. Suppose we choose a build gradle system, then we have built.gradle script file in our project. It includes the jvm plugin of kotlin dependencies required for the application console. Ensure that we need to use the latest version of the plugin as follows.
Code:
plugins {
  kotlin("jvm") version "1.7.10
    kotlin application
}
Output:
2. After adding the plugin in this step, we open the Main.kt file to modify the code.
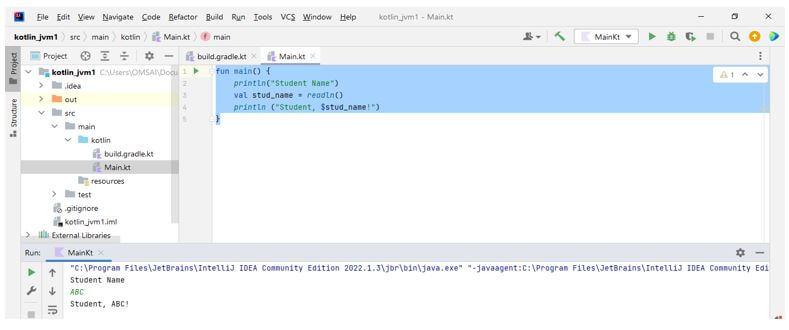
3. After opening the main.kt file, we are adding the below code into the Main.kt file as follows.
Code:
fun main() {
  println("Student Name")
  val stud_name = readln()
  println ("Student, $stud_name!")
}
Output:
4. After editing the main.kt file; in this step, we run the application as follows.
FAQ
Given below is the FAQ mentioned:
Q1. What tools of the build are supported by it?
Answer:
As per the JVM side, the main build tools are the maven, ant, and gradle. There are other tools also supporting the kotlin JVM.
Q2. What does the kotlin jvm compile do?
Answer:
The jvm kotlin produces the compatible byte code of java. At the time of targeting, the javascript kotlin will generate the code compatible with the module’s system.
Q3. Which version is jvm kotlin targeting?
Answer:
Kotlin is choosing the version of jvm for the execution. By default, the compiler of kotlin produces the byte code, which is compatible with java 8.
Conclusion
The Godot module allowed us to write our application logic in kotlin by using JVM. The annotation affects how kotlin code is compiled into the byte code and how we use the resulting classes in kotlin.
Recommended Articles
This is a guide to Kotlin JVM. Here we discuss the introduction, create a project kotlin JVM, application, and FAQ, respectively. You may also have a look at the following articles to learn more –
