Updated April 13, 2023

Introduction to Kubernetes Selector
Kubernetes selector allows us to select Kubernetes resources based on the value of labels and resource fields assigned to a group of pods or nodes. It is useful when we have to get details or perform any action on a group of Kubernetes resources or when we have to deploy a pod or group of pods on a specific group of nodes. It works as a filter when we want to get details of any Kubernetes objects that have similar labels on it.
How does Selector Works in Kubernetes?
All Kubernetes objects have some fields or metadata like name, namespace, status, etc. associated with it and if we can want to get detail of objects that have the same namespace we can do it by specifying the option ‘–field-selector’. We need to apply labels that are actually key/value pairs to the objects or to the node if we want to use the labelSelector or nodeSelector. We specify the ‘-l’ option with key/value pairs to get a list of objects that matches the key/value pair. For example, if we want to list all pods that have label key equal to ‘environment’ and value equal to ‘prod’ assigned to it, we can simply specify ‘environment=prod’ with the ‘-l’ option.
Types of Kubernetes Selector
Following are the types of kubernetes selector.
1. Label Selector
We apply labels to the Kubernetes objects to organize or select a group of objects. Labels can be attached at creation time or added and modified at any time. Labels are case sensitive. We can use Label Selector using the option ‘-l’. Let’s create three pods with labels “env: prod” and “app: nginx-web” and two pods with “env: QA” and “app: nginx-web” as below: –
apiVersion: v1
kind: Pod
metadata:
name: nginx-web-server1
labels:
env: prod
app: nginx-web
spec:
containers:
- name: nginx
image: nginx
ports:
- containerPort: 80
apiVersion: v1
kind: Pod
metadata:
name: nginx-web-server3
labels:
env: prod
app: nginx-web
spec:
containers:
- name: nginx
image: nginx
ports:
- containerPort: 80apiVersion: v1
kind: Pod
metadata:
name: nginx-web-qa1
labels:
env: QA
app: nginx-web
………..apiVersion: v1
kind: Pod
metadata:
name: nginx-web-qa
labels:
env: QA
app: nginx-web
………..apiVersion: v1
kind: Pod
metadata:
name: nginx-web-server2
labels:
env: prod
app: nginx-web
spec:
containers:
- name: nginx
image: nginx
ports:
- containerPort: 80List all the pods with labels using below command:
$kubectl get pods --show-labelsExplanation: In the above snapshot, we have a total of 5 pods with labels mentioned above. Now we can list all pods that have label “env=QA” attached to it using the label selector as below:
$kubectl get pods -l "env=QA" --show-labelsExplanation: In the above snapshot, only QA pods are displayed. “–show-option” is optional and it is used to confirm the output.
Below command will show all pods which do not have label “env” is equal to “QA”, here it will show prod pods: –
$kubectl get pods –l "env!=QA" --show-labelsWe can also use multiple labels to narrow down our results as below:
$kubectl get pods -l "env=QA, app=nginx-web" --show-labels
$kubectl get pods -l  "env=prod, app=nginx-web" --show-labels
We have two types of selectors that are supported by Kubernetes API – equality-based and set-based. Above mentioned examples are equality-based selectors. Let’s see some examples of a set-based selector. That supports ‘in’, ‘notin’, and ‘exists’ operators.
$kubectl get pods –l "app in (nginx-web)" --show-labelsExplanation: The first command shows all pods which have label “env” and value “prod” and “QA” and in the second example, we have mentioned “app” key to “nginx-web” as an equality-based selector that means we can use both types of the selector to narrow down the result.
Below command demonstrate ‘notin” operator in action:
2. Field Selector
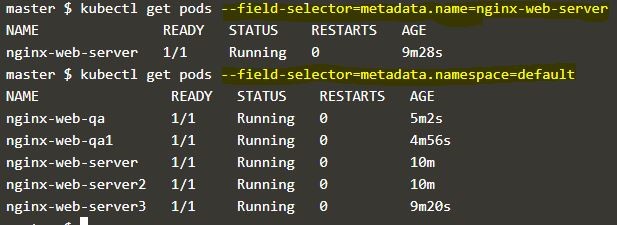
Field selector is used to querying Kubernetes objects based on the value of one or more resource fields that we need to define when we create the objects. We use ‘–field-selector’ option to get the details of Kubernetes objects as below:
$kubectl get pods --field-selector=metadata.name=nginx-web-server
$kubectl get pods --field-selector=metadata.namespace=default
Explanation: In the above example, we have used the above-created pods. We have created those pods without defining namespace so the ‘default’ namespace has been assigned by the Kubernetes. In the first example, we have queried based on the ‘name’ field and got only one output as there is one pod with that name and in the second example queried based on the ‘namespace’ so got all 5 pods as those are in the default namespace.
3. Node Selector
Node selector is used when we have to deploy a pod or group of pods on a specific group of nodes that passed the criteria defined in the configuration file. We need to label the nodes accordingly.
Here we are going to attach a label “disk=ssd” to one of the node in the cluster as below:
$kubectl label <object_type> <object_name> key=value
$kubectl label node node01 disk=ssd
Explanation: In the above example, rename the node ‘node01’ with the key is equal to “disk” and value for this key is “ssd”. If the key is already assigned with a different value and want to change it then need to use the option ‘–overwrite’ as below: –
$kubectl lable node node01 disk=ssd --overwriteLet’s create two pods using the below configuration file to understand how ‘nodeSelector’ works. Here, we have one pod with nodeSelector ‘disk=ssd’ and another one with ‘disk=ssd2’.
apiVersion: v1
kind: Pod
metadata:
name: nginx-web-ssd
labels:
env: prod
app: nginx-web
spec:
containers:
- name: nginx
image: nginx
ports:
- containerPort: 80
nodeSelector:
disk: ssd
apiVersion: v1
kind: Pod
metadata:
name: nginx-web-hdd
labels:
env: prod
app: nginx-web
spec:
containers:
- name: nginx
image: nginx
ports:
- containerPort: 80
nodeSelector:
disk: hddAfter deploying the above two pods when we check the status of the pods, it looks like as below:
Explanation: In the above snapshot, the pod which has nodeSelector ‘disk=ssd’ has been deployed successfully, however, the pod which has nodeSelector ‘disk=hdd’ is showing as ‘Pending’ because there is no node available which has the label ‘disk=hdd’. It will be in the ‘Pending’ state until the scheduler finds any node with the label mentioned in the configuration file.
Conclusion
We have used Kubernetes selector to get the details of the objects however we can perform tasks on it such as deletion of a group of pods having a specific label attached to it, etc. nodeSelector is a very basic way to constrain pods to nodes however if we need more control on selecting node then we can use node affinity and anti-affinity feature.
Recommended Articles
We hope that this EDUCBA information on “Kubernetes Selector” was beneficial to you. You can view EDUCBA’s recommended articles for more information.


