Updated July 10, 2023
Introduction to Laravel Crud Generator
The four different actions of data storage, known as CRUD (Create, Read, Update, and Delete), describe the acronym. Crud Generator is a tool that helps build a user interface to execute the above operations on the available data. It mainly considers the different types of fields and the relationship between the instances. The Laravel Crud Generator receives or discovers the structure of the database. In addition, the Laravel Crud Generator also accepts a configuration that specifies the fields to be displayed and provides instructions on how to display them. It also generates UI according to the mapping which takes place between data types and the widgets.
What is Crud Generator in Laravel?
Laravel, a very popular and well-known open-source PHP Framework, has many advanced and necessary features that come in handy to developers and programmers. With the help of a crud generator in Laravel, you can easily create, view, edit, and remove any article as per your requirement. To our benefit, we can use the resource controllers to make our work very easy and convenient so that we may not have to repeat our actions all over again, as it is designed to push some Laravel routing techniques.
With the help of Laravel Crud Generator, you can do the following things:
- Add, Edit page
- Modal, View, Controller
- Searching, Sorting by field
- Pagination
- Export csv/pdf
- Single and multiple delete options
- Left join. Search, Sort data from the foreign table
- Generate fields like Input, Text area, Image, Date, Time, Dropdown, Checkbox, etc.
The developers have updated the latest version of the Laravel Crud Generator and added additional features for the user’s convenience. Once you generate your Crud in Laravel, you do not have to worry about going through a lengthy process of putting the commands for actions to take place. Your Laravel Crud Generator will create your data as required in seconds. It is a user-friendly generator and is also fully responsive. It also has a Bootstrap Admin Panel. You can easily integrate the code you generate into your project without errors. The coding is also very clean, comfortable, and easy. The additional benefit is that there are unlimited fields there for your use. There is no restriction of any kind on the same. It is fast programming. With the help of the Laravel crud generator, you can easily organize your data as per your Format and create the necessary columns where the data will reflect. It is also helpful as the coding is easy and simple. Even beginners can try their hands on Laravel crud generator as it is not difficult, and knowledge of simple coding is good enough to get going. Laravel Crud Generator has fine-tuned and integrated numerous internal functions already established within Laravel.
Example of Laravel Crud Generator
For more clarity, let us look at a Laravel Crud Generator example.
Step 1: Create a new Laravel project
Step 2: Set up your Laravel application by connecting it to a database and linking it with the server.
Step 3: Create one Crud Generator command, e.g., php artisan make: command crud generator.
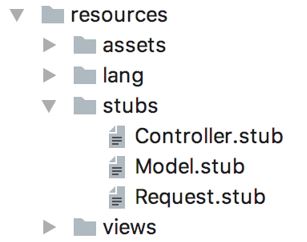
Step 4: Create blueprints. Create the stubs directory and name the files accordingly. The stub files will have placeholders. The headers you will use are Model.Stub, Controller.Stub and Request.Stub
Step 5: Open CrudGenerator.php, which you created. You will have to change the signature and description there. Create a function for the stub to get it activated.
Code:
protected $signature= 'crud:generator
{name : Class (singular) for example User}';
protected $description = 'Create CRUD operations';
Step 6: Create a model from resources/stubs. Replace the placeholders with the desired values. Decide on a particular value and replace all the places with the desired value.
Step 7: Create new files to use the data from the model.stub file.
Step 8: Repeat the action for the controller and the request. Put the input (in our case, it will be a car) that should pass with the help of the command. Then, create a route resource and append it to the api.php file.
Step 9: Open a terminal to run: php artisan crud: generator car
Step 10: Create the migration tables. In this case, it is the Cars migration table. Change the ‘up’ function to public and thereby migrate the tables.
php artisan make:migration create_cars_table --create=carsStep 11: Test the command by checking all the options on your created table.
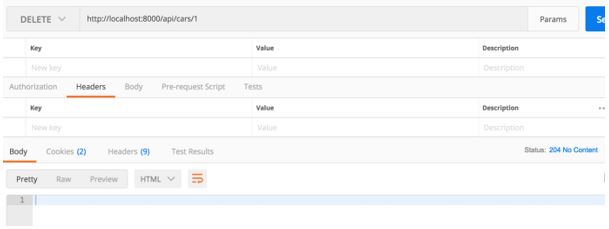
Destroy
Explanation:
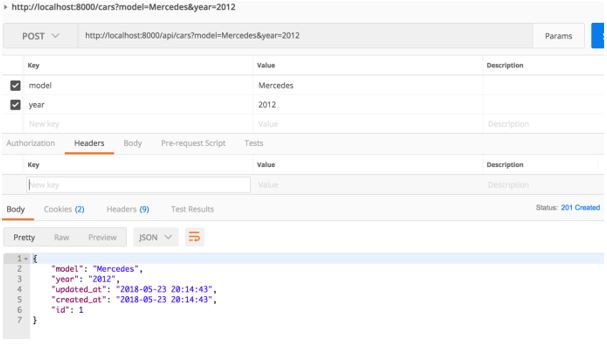
In the above image, you can find the migration table well formulated with all the necessary options for further action. The above example is of the car models; additional details are attached. It becomes easy to organize the data of the car models and define their year of production and other important data as set by the user in the beginning when commanding the creation of the options in the table. Once created with Laravel crud generator, this format becomes easy, and there is no limitation on the creation of table columns. Once you quickly run the command during the final step, you will see that there will be no error or error-free running and processing of the said command. In case of any error that may error, there will be a definite explanation of the error. Therefore, it will become convenient for the users or programmers to work on the minor mistakes and rectify them to complete the process of crud generation.
You can use the Postman (Store, Index, Find, Update, and Destroy) to test the service up to the end to ensure that the data is clear and precise. When the appropriate data is entered into the table’s fields, data production and processing occur without errors.
Conclusion
The Laravel Crud Generator is specially designed for conveniently creating enlarged tables with all the fields necessary for organizing data and information in the form, etc. Also, once the data is entered in the table, it can be organized systematically and retrieved in many available formats as defined by the user while updating the Laravel Crud Generator.
Recommended Articles
We hope that this EDUCBA information on “Laravel Crud Generator” was beneficial to you. You can view EDUCBA’s recommended articles for more information.


