Updated April 11, 2023

Introduction to Laravel Forms
In Laravel, while working with objects, you need to update or create these objects very frequently. So creating forms becomes very usual to update or create these resources in the database.
So first let’s start with opening the form.
{!! Form::open(array('url' => 'xxx/yyy')) !!}
//
{!! Form::close() !!}
Method ‘Post’ is assumed automatically by convention; however, another method can also be specified.
For Example:
echo Form::open(array('url' => 'xxx/yyy', 'method' => 'put'))You can also create forms which point to controller methods or named routes.
For Example:
echo Form::open(array('action' => 'Controller@<method-name>'))echo Form::open(array('route' => 'route.<route-name>'))Parameters can also be passed to these forms.
For Example:
echo Form::open(array('action' => array('Controller@<method-name>', $user->id)))echo Form::open(array('route' => array('route.<route-name>', $user->id)))Files can also be uploaded to forms using the ‘files’ option.
For Example:
echo Form::open(array('url' => 'xxx/yyy', 'files' => true))Creating a Form with Model Binding
Ever wanted your form to be populated in accordance with model contents? Here is the crack, try Form::model as shown below:
echo Form::model($user, array('route' => array('user.update', $user->id)))With this, when a form element will be generated, say some input text, for example, the field value will take that value of model which will match with the field name. Let’s understand this said line with an example. So, if the input text is named ‘link’, then the attribute ‘link’ of the model will be considered as value. But then there are some old inputs; they will take over the new value if matched with the input name.

1. Labels
Let’s jump to labels now and see how a label element is generated. So here it goes:
echo Form::label('email', '<email-address>');Who don’t like some extra cherries over cake? Let’s specify some extra attributes as follows:
echo Form::label('email', '<email-address>', array('class' => 'awesome'));2. Generating Inputs
Text Input:
echo Form::text('FirstName');Default Input:
echo Form::text('email', 'xxyy@gmail.com');Text Area Input:
echo Form::textarea('address');Password Input:
echo Form::password('passkey');Number Input:
echo Form::number('contact', 'some-value');File Input:
echo Form::file('picture');For file input to work, the ‘files’ option should be ‘true’.
[echo Form::open(array('url' => 'xxx/yyy', 'files' => true))]Radio button Input:
echo Form::radio('name', 'some-value');Sometimes we need radio buttons that are already selected, the syntax goes like this:
echo Form::radio('name', 'some-value', true);Checkbox Input:
echo Form::checkbox('name', 'some-value');Sometimes we need checkboxes that are already checked, the syntax goes like this:
echo Form::checkbox('name', 'some-value', true);Drop-Downs:
echo Form::select('married', array('Y' => 'Yes', 'N' => 'No'));Sometimes we need drop-downs that are already selected with some default value, the syntax goes like this:
echo Form::select('married', array('Y' => 'Yes', 'N' => 'No'), 'N');Grouped List:
The syntax goes like this:
echo Form::select('colour', array( 'Primary' => array('red' => 'Red'), 'Secondary' => array('purple' => 'Purple'),));Button:
echo Form::button('click');Submit Button:
echo Form::submit('confirm');3. Macros
Do you know we can define our very own helpers in Form class? Yes, we can! These are known as “macros”. They are very easy to be defined. Now, we will see how we can define one of these. You have to give a name to your macro and a Closure. Now register it simply like this:
Form::macro('myMacroField', function(){ return '<input type="awesome">';});Tadaa, your macro has been defined.
It’s time to see how you will call your macro. So, it can be called using the name. The syntax goes like this:
echo Form::myMacroField();4. Components
We can define our very own custom components like custom macros. The only difference between components and macros is that components use Blade Templates to generate HTML while macros use closure. Closures can prove to be very useful for frontend which needs some special markup for their forms.
Let’s see how a custom component is built. The syntax for the same goes like this:
Form::component('someText', 'components.form.text', ['name', 'someValue', 'parmeters']);Passing default values:
You can pass default values while you are writing a method signature for your component. You just have to assign values to your array list. This is how it is done:
Form::component('someText', 'components.form.text', ['name', 'someValue' => null, 'parmeters' => []]);Calling Component:
If we want to call the Component created above (where we passed some default values), this can be done as follows:
{{ Form::someText('last_name')}};Its output will be something just like this:
<div class="form-group'>
<label for="last_name">Last Name</label>
<input type="text" name="last_name" value="" class="form-control">
</div>
5. Example Form
Take for example, a ‘Profile’ model and ‘ProfileController’ resource controller from our web application. We will now create a Profile page which will show a form. This form will be used to create a ‘Profile’ object. Our controller’s function to create a profile will look something just like this:
public function create()
{
$profile = new Profile;
return view('profile.create', ['profile' => $profile]);
}
Now an object needs to be created and should be passed through. Then this newly created object will be used to create a form in our view ‘create’.
It goes as follows:
{!! Form::model($profile, ['action' => 'ProfileController@store']) !!}
{!! Form::close() !!}
6. Form Fields
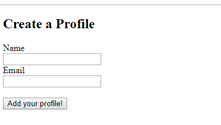
Let’s take for example two inputs from the user in the ‘Profile’ model. Suppose we take ‘name’ and ‘email’. These are just two text fields. Our form after adding these fields will look something like:
{!! Form::model($profile, ['action' => 'ProfileController@store']) !!}
<div class="form-group">
{!! Form::label('name', 'Name') !!}
{!! Form::text('name', '', ['class' => 'form-control']) !!}
</div>
<div class="form-group">
{!! Form::label('email', 'Email') !!}
{!! Form::text('email', '', ['class' => 'form-control']) !!}
</div>
<button class="btn btn-success" type="submit">Add your Profile!</button>
{!! Form::close() !!}
So this will show up a profile creation form to the user through which you can get data from user and store it in your database as shown:
Another simple example to get you familiar with forms:
{!! Form::model($car, ['action' => 'CarController@store']) !!}
<div class="form-group">
{!! Form::label('make', 'Make') !!}
{!! Form::text('make', '', ['class' => 'form-control']) !!}
</div>
<div class="form-group">
{!! Form::label('model', 'Model') !!}
{!! Form::text('model', '', ['class' => 'form-control']) !!}
</div>
<button class="btn btn-success" type="submit">Add the Car!</button>
{!! Form::close() !!}
Now if you hit the URL, you will see a form like this:
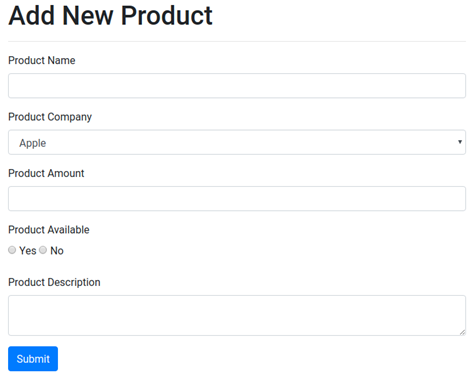
Let’s look at another example that contains a drop-down and radio buttons as well.
@extends('layout.layout')
@section('content')
<h1>Add New Product</h1>
<hr>
<form action="/products" method="post">
{{ csrf_field() }}
<div class="form-group">
<label for="title">Product Name</label>
<input type="text" class="form-control" id="productName" name="name">
</div>
<div class="form-group">
<label for="description">Product Company</label>
<select class="form-control" name="company">
<option>Apple</option>
<option>Google</option>
<option>Mi</option>
<option>Samsung</option>
</select>
</div>
<div class="form-group">
<label for="description">Product Amount</label>
<input type="text" class="form-control" id="productAmount" name="amount"/>
</div>
<div class="form-group">
<label for="description">Product Available</label><br/>
<label class="radio-inline"><input type="radio" name="available" value="1"> Yes</label>
<label class="radio-inline"><input type="radio" name="available" value="0"> No</label>
</div>
<div class="form-group">
<label for="description">Product Description</label>
<textarea type="text" class="form-control" id="productDescription" name="description"></textarea>
</div>
@if ($errors->any())
<div class="alert alert-danger">
<ul>
@foreach ($errors->all() as $error)
<li>{{ $error }}</li>
@endforeach
</ul>
</div>
@endif
<button type="submit" class="btn btn-primary">Submit</button>
</form>
@endsection
Now if you hit the URL, you will see a form like this:
Conclusion – Laravel Forms
Hopefully, this article will be able to make you understand the concepts of Laravel forms easily. So far we have covered enough about Laravel form concepts which will enable you to create your web application with well-formed forms in it which will help you to get data from users and store it in your database. So what are you waiting for? Ready, set, go. Happy developing!
Recommended Articles
We hope that this EDUCBA information on “Laravel Forms” was beneficial to you. You can view EDUCBA’s recommended articles for more information.


