Updated March 23, 2023

How to Create Layout Manager in Java?
The following article provides an outline for Layout Manager in Java. Layout managers are basically used in the graphics programming of Java. We can develop window-based applications containing various cool layouts. Layout managers are used to arrange different components in a particular manner. A Layout manager is an interface that is implemented by all classes of layout managers. We just need to import the required packages and basic java coding to create this.
Java AWT has below layout mangers which we can import to use their various inbuilt features:
- awt.CardLayout
- awt.FlowLayout
- awt.BorderLayout
- awt.GridLayout
- awt.GridBagLayout
Syntax:
Layout manager does not require any special syntax. You need to import required packages from java.awt.* in your program to use their features.
Examples of Layout Manager in Java
Given below are the examples of Layout Manager in Java:
Example #1
java.awt.CardLayout
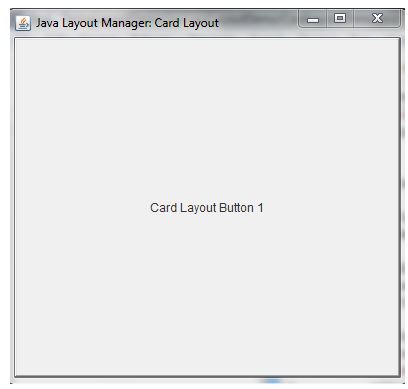
The card layout is not used as much now a day. This layout basically stacks one component on others as a card. You can ignore the exception of code as anyway it will show you the output. You are also advised to go through the code with the inline comments for better understanding.
Code:
package awtCardLayoutDemo;
import java.awt.Button;
import java.awt.CardLayout;
import java.awt.Container;
import java.awt.event.ActionEvent;
import java.awt.event.ActionListener;
import javax.swing.JFrame;
public class AWTCardLayoutDemo extends JFrame implements ActionListener {
public static CardLayout crd = new CardLayout(70, 60);
public static Container cn;
@Override
public void actionPerformed(ActionEvent e) {
crd.next(cn);
}
public static void main(String[] args) {
CardLayoutDemo cld = new CardLayoutDemo();
}
public CardLayoutDemo() {
setVisible(true);
setDefaultCloseOperation(EXIT_ON_CLOSE); //indicates terminate operation on close of window
CardLayout cl = new CardLayout(); //create Card layout frame
setLayout(cl);
setTitle("Java Layout Manager: Card Layout");
setSize(200, 200);
add(new Button("Card Layout Button 1"));
add(new Button("Card Layout Button 2"));
add(new Button("Card Layout Button 3"));
add(new Button("Card Layout Button 4"));
add(new Button("Card Layout Button 5"));
add(new Button("Card Layout Button 6"));
}
}
Output:
Example #2
java.awt.FlowLayout
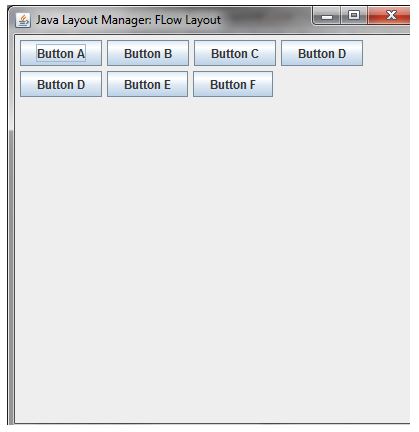
Here we create a window inside which the components inside the frame are arranged in a direction from left to right until the end of the frame. After that components will be automatically taking new rows and be aligned accordingly.
Code:
package demoFlowLayoutAWT;
import java.awt.*;
import javax.swing.*;
public class AWTFlowLayoutDemo {
JFrame fj;
public AWTFlowLayoutDemo() {
fj = new JFrame();
fj.setDefaultCloseOperation(JFrame.EXIT_ON_CLOSE); //indicates terminate operation on close of window
JButton btn1 = new JButton("Button A");
JButton btn2 = new JButton("Button B");
JButton btn3 = new JButton("Button C");
JButton btn4 = new JButton("Button D");
JButton btn5 = new JButton("Button D");
JButton btn6 = new JButton("Button E");
JButton btn7 = new JButton("Button F");
fj.add(btn1);
fj.add(btn2);
fj.add(btn3);
fj.add(btn4);
fj.add(btn5);
fj.add(btn6);
fj.add(btn7);
fj.setLayout(new FlowLayout(FlowLayout.LEFT)); //create flow layout frame
fj.setTitle("Java Layout Manager: Flow Layout");
fj.setSize(300, 400);
fj.setVisible(true);
}
public static void main(String[] args) {
new AWTFlowLayoutDemo();
}
}
Output:
Example #3
java.awt.BorderLayout
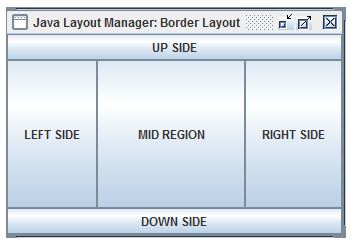
In this example, we will see how we can divide a frame in different borders or sectional layout. Here we will divide the frame into 5 different sections.
Code:
package awtBorderLayoutDemo;
import javax.swing.JButton;
import javax.swing.JFrame;
import javax.swing.JPanel;
import java.awt.BorderLayout;
public class AWTBorderLayoutDemo {
public static void main(String[] args) {
JFrame.setDefaultLookAndFeelDecorated(true);
JFrame fj = new JFrame("Java Layout Manager: Border Layout");
fj.setDefaultCloseOperation(JFrame.EXIT_ON_CLOSE); //indicates terminate operation on close of window
JButton jbtn1 = new JButton("UP SIDE");
JButton jbtn2 = new JButton("DOWN SIDE");
JButton jbtn3 = new JButton("LEFT SIDE");
JButton jbtn4 = new JButton("RIGHT SIDE");
JButton jbtn5 = new JButton("MID REGION");
JPanel pnl = new JPanel();
pnl.setLayout(new BorderLayout()); //create border layout frame
pnl.add(jbtn1, BorderLayout.NORTH);
pnl.add(jbtn2, BorderLayout.SOUTH);
pnl.add(jbtn3, BorderLayout.WEST);
pnl.add(jbtn4, BorderLayout.EAST);
pnl.add(jbtn5, BorderLayout.CENTER);
fj.add(pnl);
fj.pack();
fj.setVisible(true);
}
}
Output:
Example #4
java.awt.GridLayout
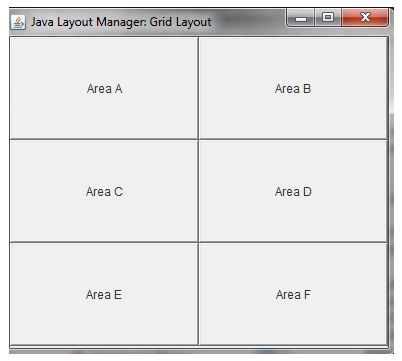
Let us take an example of the implementation of grid layout in the case of java Swing. In this example, we will see how we can align components in grid-like fashion using a grid layout. You are advised to go through the code with the inline comments for better understanding.
Code:
package awtGridLayoutDemo;
import java.awt.Button;
import java.awt.GridLayout;
import javax.swing.JFrame;
public class AWTGridLayoutDemo extends JFrame {
public static void main(String[] args) {
GridLayoutDemo gld = new GridLayoutDemo();
}
public GridLayoutDemo() {
setVisible(true);
setDefaultCloseOperation(EXIT_ON_CLOSE); //indicates terminate operation on close of window
GridLayout gl = new GridLayout(3, 2);//create grid layout frame
setLayout(gl);
setTitle("Java Layout Manager: Grid Layout");
setSize(200, 200);
add(new Button("Area A"));
add(new Button("Area B"));
add(new Button("Area C"));
add(new Button("Area D"));
add(new Button("Area E"));
add(new Button("Area F"));
}
}
Output:
Example #5
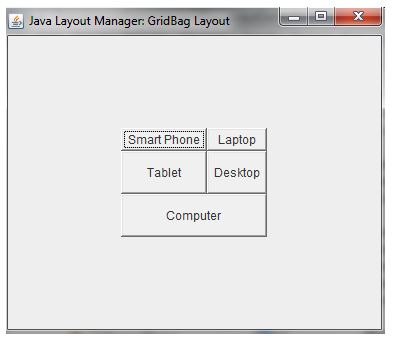
java.awt.GridBagLayout
In this example, we will see how we can align components in a customized grid-like fashion using a grid bag layout. What grid layout differs from the grid bag layout is basically in the customization part. Grid is a symmetric structure whereas, in a grid bag, you can customize the components as per your choice. You are advised to go through the code with the inline comments for better understanding.
Code:
package awtGridBagLayoutDemo;
import java.awt.Button;
import java.awt.CardLayout;
import java.awt.FlowLayout;
import java.awt.GridBagConstraints;
import java.awt.GridBagLayout;
import javax.swing.JFrame;
public class AWTGridBagLayoutDemo extends JFrame {
public static void main(String[] args) {
GridBagLayoutDemo gbld = new GridBagLayoutDemo();
}
public GridBagLayoutDemo() {
setSize(300, 300);
setPreferredSize(getSize());
setVisible(true);
setDefaultCloseOperation(EXIT_ON_CLOSE);
GridBagLayout gbl = new GridBagLayout();
GridBagConstraints gbcnt = new GridBagConstraints();
setLayout(gbl);
setTitle("Java Layout Manager: GridBag Layout")
GridBagLayout layout = new GridBagLayout(); //create grid bag layout
this.setLayout(layout);
//below code is customization of grid fashion
gbcnt.fill = GridBagConstraints.HORIZONTAL;
gbcnt.gridx = 1;
gbcnt.gridy = 0;
this.add(new Button("Smart Phone"), gbcnt);
gbcnt.gridx = 2;
gbcnt.gridy = 0;
this.add(new Button("Laptop"), gbcnt);
gbcnt.fill = GridBagConstraints.HORIZONTAL;
gbcnt.ipady = 20;
gbcnt.gridx = 1;
gbcnt.gridy = 1;
this.add(new Button("Tablet"), gbcnt);
gbcnt.gridx = 2;
gbcnt.gridy = 1;
this.add(new Button("Desktop"), gbcnt);
gbcnt.gridx = 1;
gbcnt.gridy = 2;
gbcnt.fill = GridBagConstraints.HORIZONTAL;
gbcnt.gridwidth = 2;
this.add(new Button("Computer"), gbcnt);
}
}
Output:
Conclusion
This concludes “Layout Manager in Java”. As you can see how we had designed different types of layouts exploiting many features of java window toolkits.
Recommended Articles
This is a guide to Layout Manager in Java. Here we discuss how to create a layout manager in java with syntax and examples respectively. You may also have a look at the following articles to learn more –
