Updated April 18, 2023

Introduction to Linux Mount Command
In the Linux operating system, the mount command is used to attached or mount the external storage like USB flash driver, external HDD’s, different block storages in the Linux ecosystem. Similarly, we can detach the external storage from the same Linux environment.
The Linux Mount command-line utility was written by Colin Plumb.
Syntax of Mountcommand
mount [OPTION...] DEVICE_NAME DIRECTORY- mount: The mount keyword in the command | syntax. It will take two sets off an argument as an option and the device name. Accordingly, it will mount the storage block on the respective directory.
- OPTION: We can provide the different flags as options that are compatible with the mount command.
- DEVICE_NAME: The name of the storage block
- DIRECTORY: Input directory name on which the storage block will mount.
Note: The external storage devices will visible in the “/dev” directory.
How Linux Mount Command Works?
With the help of the Linux mount command, we can attach the different external storage devices with the Linux file system. We can attach the external block storage at runtime as well. It will most important when the live storage space is full and there is no space left in the server to handle the incoming data. In this case, we can attach the external storage device and try to move the infrequent access data to the newly attached storage block and move it. With this data movement, space will create in the server and able to handle the live or incoming data in it.
With the reference of the “/dev” directory, we can able to mount the external storage block or devices to Linux operating system. The mount command will accept the different set of inputs as “OPTION” and “DEVICE NAME” and as per the inputs mount command will mount the different storage devices to a specific directory (“DIRECTORY”).
Examples of Linux Mount Command
Here are the examples mention below
Example #1 – MountCommand| Mount Block Storage
The mount command is useful to mount the different types of storage in the Linux file system. Here we are using the standard block storage. To perform the mounting operation, we just need to follow the mound command syntax.
Command :
mount /dev/sda4 /mountExplanation :
In the Linux operating system, we can create external block storage. Once the external block storage will create. The new block storage definition will update in “/dev” path. To get the detailed information of storage in the Linux system, we can use the “lsblk” command (refer screenshot 1(a)). In “/dev” directory all the storage devices are listed. When any storage device will connect in the server. It will be listed in the same directory (refer screenshot 1(b)).
Before running mount command, we are cross verifying the current mounting storage status on the current server (refer screenshot 1(c)). In the “/dev” directory, we are using the “sda4” block storage to mount on “/mount” directory. As per the above command, we mount the block storage “sda4” on the “/mount” directory (refer screenshot 1(d)).
lsblkOutput :
Screenshot 1 (a)
cd /dev/
pwd
ls
Screenshot 1 (b)
df -hTScreenshot 1 (c)
mount /dev/sda4 /mount/Screenshot 1 (d)
Example #2 – MountISO Files
In the Linux ecosystem, we can update the Linux packages without the internet. There is no internet require to install the packages just we need to mount the ISO filesystem to any Linux Directory.
Command :
mount /dev/sr0 /ISO_FileSystemExplanation :
As we know, we need an internet connection to install the packages on any Linux server. But in case, if we don’t have internet connectivity then we are not able to install the Linux packages. To overcome this condition, we need to mount the “.iso” file on any directory and try to install the packages with the help on the mounting directory. As per the above command, we are mounding the ISO storage “/dev/sr0” on the “/ISO_FileSystem” directory. Initially, there is no data in it (refer screenshot 2 (a)). Once the ISO storage was mounted on the “/ISO_FileSystem” directory the ISO data will be visible in the same directory (refer screenshot 2 (b)).
Output :
cd /ISO_FileSystem/Screenshot 2 (a)
mount /dev/sr0 /ISO_FileSystemScreenshot 2 (b)
Example #3 – MountNFS Directory
In the Linux ecosystem, we are having the facility to mount the external storage blocks that are not associated with a live server or machine. We can mount different storages like NFS storage, file block, object block, storage block, etc.
To install the NFS Storage, we need to install the below packages as per the operating system.
nfs-common – for Ubuntu and Debian
nfs-utils – CentOS and Fedora
Command :
mount /nfs/storageExplanation :
To mount the network file storage in the Linux operating system, we need to do entry in “/etc/fstab”. We need to update the below information in the same file i.e.
<file system>: 10.10.132.74:/storage
<dir>: /nfs/storage
<type>: nfs
<options>: defaults
<dump>: 0
<pass>:0
Output :
cat /etc/fstabExample #4 – Mount – Permanent Storage
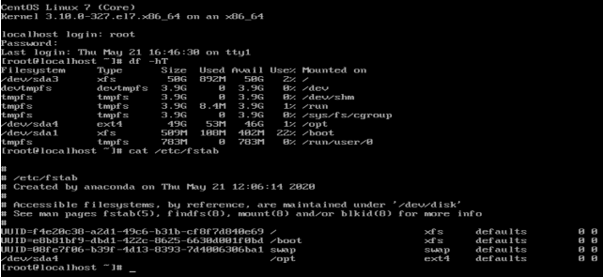
By default, in a Linux environment, every mounting process is temporary. Unless and until it will hardcore in fstab file. To keep the mounted storage permanently, we need to add the below entry in the fstab file.
Storage path
Mount directory path
Format of the storage type
Options
Dump
Pass
Command :
vi /etc/fstabExplanation :
As per the above command, we are just updating the “/etc/fstab” file with the above mentation parameters in the Linux environment. Once the parameter will update in the file then the storage information will permanently available in the Linux environment.
Command :
df -hT
cat /etc/fstab
Output :
Umount Command
We can mount different types of storage in the Linux operating system. But also we are having the facility to umount the mount storages from the file system.
Command :
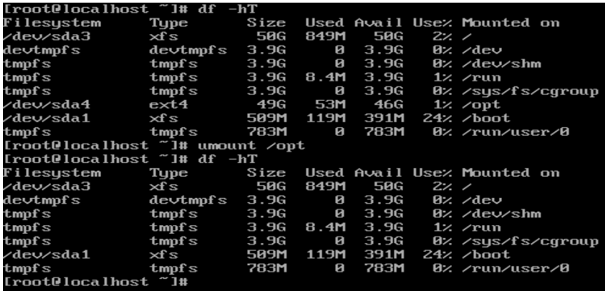
umount /optExplanation :
As per the above command, we are unmounting the attached storage on the “/opt” directory. It will unmount the storage but data is present as it is subject to the block will not be the format.
umount /opt
df -hT
Output :
Conclusion
We have seen the uncut concept of “Linux Mount Command” with the proper example, explanation, and command with different outputs. The mound command is very important when the storage block will full and we need to keep the exiting data plus manage the upcoming data. It will also helpful for proper management of the Linux file system.
Recommended Articles
We hope that this EDUCBA information on “Linux Mount Command” was beneficial to you. You can view EDUCBA’s recommended articles for more information.


