Introduction to Matlab Object
The MATLAB language uses many specialized objects. For example, Exception objects, timer objects, the serial object, and so on. MATLAB toolboxes are used to define objects to manage data and analyses performed by the toolbox. Objects provide specific functionality that is not easily available from general-purpose language components. Objects are used to inform when errors occur, to execute code at a certain time interval, to enables you to communicate with devices connected to your computer’s serial port, etc.
Syntax:
The syntax for Matlab object is as shown below:
Object_name = class_name;
How to Create Matlab Object?
To create an object, first, we need to create a class, using ‘ classdef ’ we create a class, in class we take some properties and end the class and then we take methods some methods using function statements after all these lastly we end the class with an end statement. First, we save the class using the .m extension.
Now, take a new Matlab script and create an object using the same class name which we used to create a class. For creating the object we write syntax like:
Object_name = class_name;
Let’s consider a1 is an object name and BasicClass1 is a class name. In class, we create 1 property and 3 methods. After creating an object of class we can perform the several operations on a class by using that class object:-
- For accessing the properties to assign the data.
- To perform operations on data calling of the method.
- We saw all the properties and their current values available in the class.
Examples to Implement Matlab Object
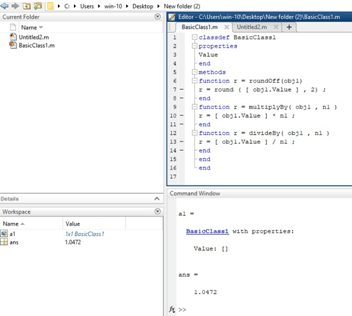
Let see the first example, in this example first, we create one class, that class name is ‘BasicClass1 ’. In this class we take a property like value, the must be only the numbers. Then we take a method, basically, methods are nothing but operations that defined by the class. We create some operations and then we end the method also with an end statement. And then finally we end the BasicClass1 class with an end statement. In methods for operations, we use some functions. This code saves using the .m extension.
Code:
class def BasicClass1

properties

Value

end

methods

function r = roundOff(obj1)

r = round([obj1.Value],2);

end

function r = multiplyBy(obj1,n1)

r = [obj1.Value] * n1;

end

function r = divideBy(obj1,n1)

r = [obj1.Value] / n1;

end

end

end
Example #1
Let us see to create an object and how it’s used. In this example we can create an object with the respected class name in our example it’s ‘ BasicClass1 ’, we create objects namely ‘a1’. Initially the value of the property it’s empty. Then using objects we can access the properties of the class that’s nothing but the property is value. So we assign some number to the value property using a class object, and simply it can display it.
Code:
clc ;

clear all ;

close all ;

a1 = BasicClass1

a1.Value = pi/3;

a1.Value
Output:
As we have seen in the command window the output was value = [ ] empty. Because the initial value of property is empty. Then we assign the number to property value and the number is pi (3.142) / 3 and displays it using the class object.
Example #2
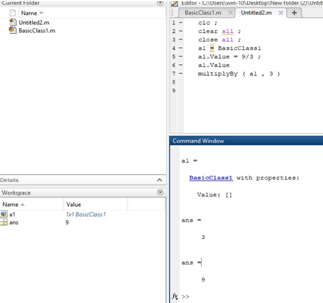
Let us see an example, for this example also we use the same class that’s ‘BasicClass1’. First, we simply create an object for the same class name that’s BasicClass1. Then we can assign the number to property value and display it. Then after we call the methods of that class by using the help of class object ‘a1’. We called the method name, the method name is ‘multiplyBy (obj1 , n1)’ multiplying operation by the given number in parenthesis we simply pass the argument and then display the result.
Code:
clc ;

clear all ;

close all ;

a1 = BasicClass1

a1.Value = 9/3;

a1.Value

multiplyBy(a1,3)
Output:
Example #3
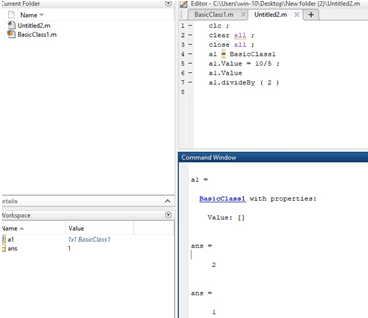
Let us see an example, for this example also we use the same class that’s ‘BasicClass1’. First, we simply create an object for the same class name that’s BasicClass1. Then we can assign the number to property value and display it. Then after we call the methods of that class by using the help of class object ‘a1’. We called the method name, the method is ‘divideBy (obj1 , n1)’ divide operation by the given number in parenthesis we simply pass the argument and then display the result.
Code:
clc ;

clear all ;

close all ;

a1 = BasicClass1

a1.Value = 10/5 ;

a1.Value

a1.divideBy( 2 )
Output:
Conclusion
In this article, we saw the concept of Matlab object. We understood the basic concept and different ways to use Matlab objects and what exactly is a Matlab object. And also we saw the syntax. Also first we saw how to declare or create a class on Matlab and then how to create a class object. And what operations we perform using that class object.
Recommended Articles
This is a guide to Matlab Object. Here we discuss the Introduction of Matlab Object and how to Create along with different Examples as well as its Code Implementation. You can also go through our suggested articles to learn more –


