Updated June 30, 2023
Introduction to Matlab Stacked Bar
Stacked Bar Graph is used to represent a larger category by dividing it into smaller categories. Stacked bars represent the relationship that the smaller parts have with the total amount. Stacked bars put value for segments one after the other. The smaller segments in the stacked bar graph add up to the total value of the category. These types of graphs are ideal for comparing total values across each segmented or grouped bar. However, the problem with Stacked Bars is that it becomes harder to read these as the number of segments increases.
Syntax for Creating Stacked Bars in Matlab:
∙ bar(- - , 'stacked')
Description:
bar(- – , ‘stacked’) is used to display each group as one multi-colored bar
Examples of Matlab Stacked Bar
Let us now understand the code to create stacked bars in MATLAB.
Example #1
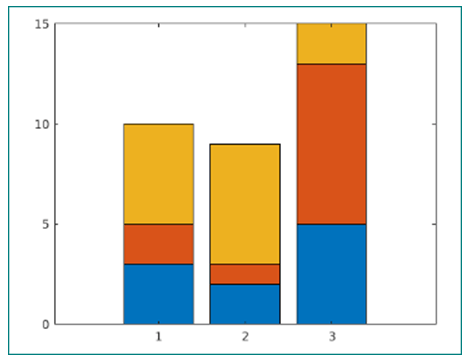
In the first example, we will create a basic stacked bar without defining any category.
Below are the steps that we will follow for this example:
- Define the matrix whose rows will be used as bars, i.e, each row of the matrix will be represented as a bar in the stacked graph
- Pass this matrix as an input to the ‘Bar’ function
- Pass ‘stacked’ as the second argument.
Code:
A = [3 2 5; 2 1 6; 5 8 2];

bar(A, 'stacked')
This is how our input and output will look in the MATLAB command window:
Input:
A = [3 2 5; 2 1 6; 5 8 2];
bar(A, 'stacked')
Output:
As we can see in the output, the function ‘bar’ along with the 2nd argument ‘stacked’ has given us a stacked bar graph in the output.
Example #2
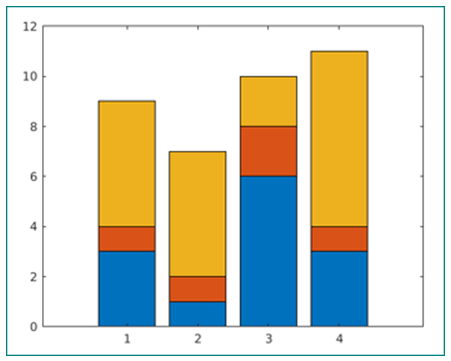
In this example, we will create a stacked bar with 4 bars & 3 segments in each.
Below are the steps that we will follow for this example:
- Define a matrix of size 4 X 3 whose rows will be used as bars, i.e, each row of the matrix will be represented as a bar in the stacked graph
- Pass this matrix as an input to the ‘Bar’ function
- Pass ‘stacked’ as the second argument. This argument represents that we need a stacked bar graph as the output
Code:
A = [3 1 5; 1 1 5; 6 2 2; 3 1 7];

bar(A, 'stacked')
This is how our input and output will look in the MATLAB command window:
Input:
A = [3 1 5; 1 1 5; 6 2 2; 3 1 7];
bar(A, 'stacked')
Output:
As we can see in the output, the function ‘bar’ along with the 2nd argument ‘stacked’ has given us a stacked bar graph in the output.
Example #3
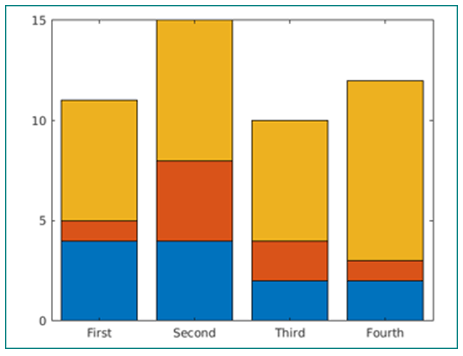
In this example, we will create a stacked bar with different categories along the x-axis. For this, we will define a categorical array representing the x-axis.
Below are the steps that we will follow for this example:
- Define a categorical array with required categories. The number of elements in the array should be equal to the number of bars in the stacked graph (i.e. number of rows in our input matrix)
- Pass this array and matrix as inputs to the ‘Bar’ function
- Pass ‘stacked’ as the third argument. This argument represents that we need a stacked bar graph as the output
Code:
X = categorical({'First', 'Second', 'Third', 'Fourth'});

X = reordercats(X, {'First', 'Second', 'Third', 'Fourth'});

A = [4 1 6; 4 4 7; 2 2 6; 2 1 9];

bar(X, A, 'stacked')
This is how our input and output will look in the MATLAB command window:
Input:
X = categorical({'First', 'Second', 'Third', 'Fourth'});
X = reordercats(X, {'First', 'Second', 'Third', 'Fourth'});
A = [4 1 6; 4 4 7; 2 2 6; 2 1 9];
bar(X, A, 'stacked')
Output:
As we can see in the output, the function ‘bar’ along with the 2nd argument ‘stacked’ has given us a stacked bar graph in the output.
Conclusion
- We use Stacked Bar Graphs to represent a larger category by dividing it into smaller categories.
- ‘Bar’ function and the argument ‘stacked’ function are used to create Stacked bar graphs.
- The input for the Bar function is a matrix with its rows representing the number of bars and columns representing the number of segments in each bar.
Recommended Articles
This is a guide to Matlab Stacked Bar. Here we also discuss the introduction and syntax of Matlab stacked bar, different examples, and code implementation. You may also have a look at the following articles to learn more –


