Updated March 10, 2023

Introduction to Matlab xlswrite
Xls command is basically used for excel file operations, and xlswrite is used to write or interprets an excel file. Along with the command, we can give the file name whatever we want and decide or select which sheet we want for writing. There is one more parameter range that decides the limit of rows and columns which is to be used. In this topic, we are going to learn about Matlab xlswrite.
Syntax:
- xlswrite(filename, A)
- xlswrite(filename, A, sheet, xlRange )
How Does Xlswrite Functions Work in Matlab?
To write data on a Microsoft Excel worksheet, we use an xlswrite statement. A filename statement is used for the unique identification of the file. After the identification of the file, the data will be written to the Microsoft Excel worksheet with the help of the ‘xlswrite’ function.
The steps for writing data on Microsoft Excel worksheet using an xlswrite statement:-
Step 1: First, identify the file using the ‘filename’ statement.
Step 2: Then, we take input data into a variable
Step 3: Then, we use an xlswrite statement with proper syntax for writing data to Microsoft
Excel worksheet
Step 4: After executing the code in Matlab, the data is stored in a Microsoft Excel worksheet
Examples of Matlab xlswrite
Given below are the examples of Matlab xlswrite:
Example #1
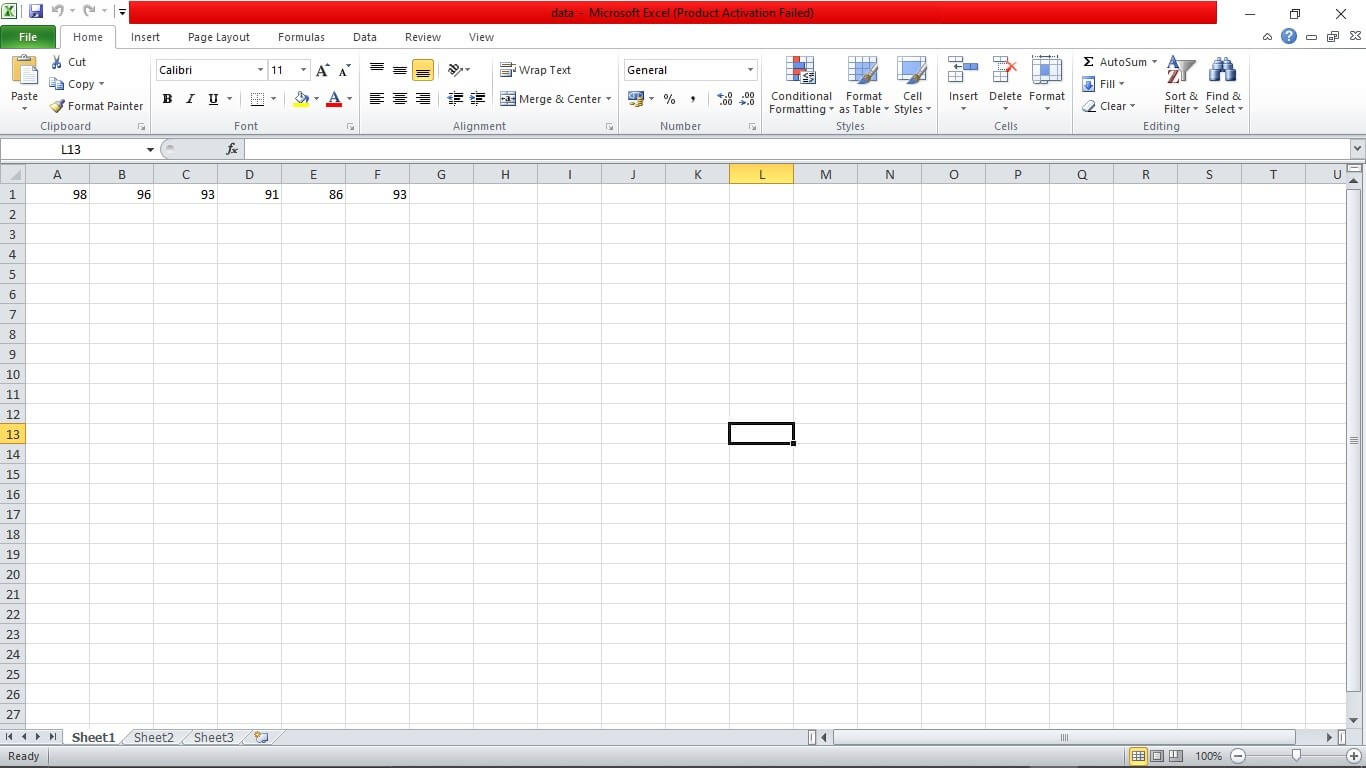
Let us see a simple example of the xlswrite statement. Basically, xlswrite is used to write data to the Microsoft Excel worksheet. For writing data on the Microsoft Excel worksheet, we use an xlswrite statement with proper syntax. A filename statement is used for the unique identification of the file. We use “filename = ‘data.xlsx’” to identification of the ‘data.xlsx’ file. The file with the ‘xlsx’ extension is nothing but a Microsoft Excel worksheet. We create a Microsoft Excel file with the name ‘data.xlsx’. Then we take a variable to store the input arguments. So we take a variable, namely D, and the input arguments are loaded into the variable. D = [98 96 93 91 86 93] it assign the input values to the variable D. Now, we can write the data into the Microsoft Excel worksheet. To write the data, we use the xlswrite function. For the writing into the Excel file, “xlswrite(filename, D)” syntax is used. After executing the file, the input data is written into the Microsoft Excel worksheet.
Code:
clc;

clear all;

close all;

filename = 'data.xlsx';

D = [98 96 93 91 86 93 ];

xlswrite(filename,D)
Output:
Command window:
Example #2
Let us see another example of the xlswrite statement. As we know, the xlswrite is used to write data to the Microsoft Excel worksheet. In this example, we can write the data to the specific address and the specific sheet also. In this example, we take readings for the voltage and frequency of the signal. Here ‘filename’ statement is used to the unique identification of the file. We use “filename = ‘readings.xlsx’ ” to identification of the ‘readings.xlsx’ file. The file with the ‘xlsx’ extension is nothing but a Microsoft Excel worksheet. We create a Microsoft Excel file with the name ‘data.xlsx’. Then we take a variable to store the input arguments. So we take a variable, namely G, and the input arguments are loaded into the variableG = {‘VOLTAGE’, ‘FREQUENCY’; 200,98; 225,99; 223,97} it assigns the input values to the variable G. Now, we can select the sheet by using the syntax. Here we used a simple syntax “sheet = 2;” to select the second sheet. The xlRange function is used to give a specific location for the start of writing. Now we can write the data into the Microsoft Excel worksheet. To write the data, we use the xlswrite function. “xlswrite(filename, G, sheet,xlRange)“ this line is used to write the input data to the Microsoft Excel worksheet. After executing the file, the readings are written into the given Microsoft Excel worksheet.
Code:
clc;

clear all;

close all;

filename = 'readings.xlsx';

G = {'VOLTAGE','FREQUENCY'; 200,98; 225,99; 223,97};

sheet = 2;

xlRange = 'D1';

xlswrite(filename,G,sheet,xlRange)
Output:
Command window:
Example #3
Let us see one more example of an xlswrite statement. In this example, we can write the data of the variable to the Microsoft Excel worksheet. In this example, we use the path to identify the file. Here we directly identify the Excel file. So first, we take one variable, namely b. Random data is stored into the variable b. After that, we use the xlswrite statement to write the data to the Excel file.
xlswrite(‘C:\Users\win-10\Desktop\temp.xlsx’,b,’ D5:m15′) is used to write the data stored into the variable b to the specified Excel file that is “temp.xlsx”. D5 and m15 are the starting and ending points for writing the data. After executing the code, the data into the variable b is written into the given Microsoft Excel worksheet with specified starting and ending points.
Code:
clc;

clear all;

close all;

b= rand(10);

xlswrite('C:\Users\win-10\Desktop\temp.xlsx',b,'D5:m15');
Output:
Command window:
Conclusion
In this article, we have seen the concept of xlswrite; basically, xlswrite is used to write data to the Microsoft Excel worksheet file along with customized parameters and default parameters. Then we saw syntax related to xlswrite statements to generate a database in Matlab code.
Recommended Articles
This is a guide to Matlab xlswrite. Here we discuss How Does Xlswrite Functions Work in Matlab and Examples along with the codes and outputs. You may also have a look at the following articles to learn more –


