Updated April 6, 2023

Introduction to MobX React Native
For any React Application, State Management is an important aspect. React is a UI Library so we need state management to take care of the state of the application. Sometimes, State Management is quite problematic as its quite easy to develop a React Application with an inconsistent State and it will be quite difficult to handle. In this article we will understand MobX as a State Management solution for a React Native Application. MobX is used with any JavaScript Framework as a State Management Library. React and MobX are quite powerful when used together and correctly. React Native uses MobX’s mechanism of storing and updating the application state to render its components. The idea of MobX is to check the minimal state, derive it, and to never change the state into more states.
Concept of MobX
MobX has three concepts which are listed below:
- Observables
- Actions
- Reactions
1. Observables
Observables keep the core state of the application. It is used to create an object which can perform new changes to which the user can react. The idea is to make an object able to emit new changes to which the observer can react. It can be done using a @observable decorator.
Below is an example where we have a variable named counter which changes over time.
import { observable } from
"mobx", class Store {
@observable counter = 0;
}
export default new Store();
2. Computed Observables
The values which are produced from earlier defined observables are called computed values. MobX doesn’t allow the creation of more states. Let’s take an example where our counter variable was holding the number of minutes by which a flight gets delayed. Now, we will add a computed delay message which is derived from the observable counter.
import { observable, computed } from
"mobx", class Store {
@observable counter = 0;
@computed get delayMessage = () => {
return 'The flight is delayed by' + this.count;
};
}
export default new Store();
The above mentioned @computed works as a function that automatically changes the delayed message every time the value of counter changes.
3. Actions
Actions are functions that modify the state. Uni-Directional data flow is supported by MobX which means that every time the state of the action changes, it updates each and every view which is related to the state. We will add an action that updates according to the counter variable whenever the delay increases.
Store {
import { observable
, action
, computed } from "mobx";
class Store {
@observable counter = 0;
@computed get delayMessage = () => {
return 'The flight is delayed by' + this.count;
};
@action
updateDelay = delay => { this.counter = delay;
};
}
export default new Store();
Examples
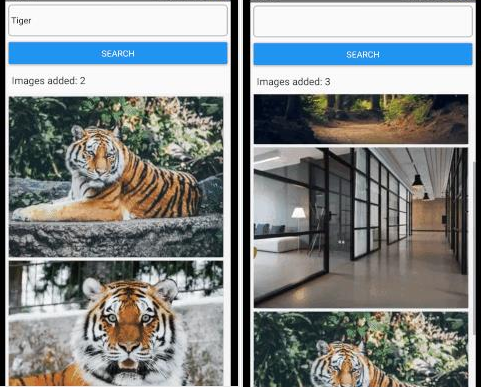
We are going to develop an app that fetches images from Unsplash and displays it to the user. Our application is going to use Unsplash API for fetching images. The API can be generated here.
Step 1:
We will be searching for random images and will save the results. Then will allow the user to add the image to favorites.
import { action, observable ,decorate } from "mobx";
class Store {
text = '';
updateText = (text) => { this.text = text;
}
data = null; searchImages = () => {
fetch(`https://api.unsplash.com/search/photos?client_id=${API_KEY}&page=1&query=${this.text}&o rientation=landscape`)
.then(response => response.json())
.then(data => this.setData(data));
};
setData = (data) => { this.data = data;
};
}
decorate(Store, { text: observable, updateText: action, data: observable, searchImage: action, setData: action,
});
export default new Store();
Step 2:
We will create a component PictureList.js which is going to render the list of images. It will also display the pictures added to favorites.
import React from "react";
import { TextInput, Button, FlatList, View } from 'react-native'; import { inject, observer } from "mobx-react";
function PictureList(props) {
const { text, updateText, data, searchImages } = props.store; return (
<>
<TextInput style={styles.input} value={text} onChangeText={updateText}
/>
<Button title="Search"
style={styles.button}
onPress={searchImages}
/>
/>
<FlatList data={data.results}
keyExtractor={(item) => item.id} renderItem={({ item }) => (
<ImageView
source={{ uri: item.urls.small }} onPress={() => {}}
/>
)}
/>
</>
);
}
export default inject("store")(observer(PictureList));
Step 3:
import { action ,decorate, observable } from "mobx"; class Store {
text = '';
updateText = (text) => {...}; data = null;
searchImages = () => {...};
setData = (data) => {...}; favorites = [];
addToFavorite = (image) => { this.favorites.push(image); this.data = null;
this.text = '';
};
}
decorate(Store, { text: observable, updateText: action, data: observable, searchImage: action, setData: action,
favorites: observable, addToFavorite: action,
});
export default new Store();
We are going to update the View for the newly added Observables and actions. Previously searched pictures will be erased.
const { favorite, addToFavorite} = this.props.store return (
<>
{data?
<FlatList style={styles.container}
data={data.results}
keyExtractor={(item) =>
item.id} renderItem={({ item })
=> (
<ImageView
source={{ uri: item.urls.small }}
onPress={() => addToFavorite(item.urls.small)}
/>
)}
/> :
<FlatList
style={styles.container}
data={favorites}
keyExtractor={(item, index) =>
index.toString()} renderItem={({ item }) => (
<ImageView
source={{ uri: item }} // render favorite images
/>
)}
/>
}
</>
);
import { computed ,decorate, action, observable } from
"mobx"; class Store {
get getFavoriteCount() {
return
this.favorites.length;
}
}
decorate(Store, { getFavoriteCount: computed,
});
export default new Store();
const { getFavoriteCount } =
this.props.store; return (
<Text style={styles.count}>
Images added:
{getFavoriteCount}
</Text>
data={data.results}
keyExtractor={(item) => item.id} renderItem={({ item }) => (
<ImageView
source={{ uri: item.urls.small }}
onPress={() => addToFavorite(item.urls.small)}
/>
)}
/> :
<FlatList style={styles.container} data={favorites}
keyExtractor={(item, index) => index.toString()} renderItem={({ item }) => (
<ImageView
source={{ uri: item }} // render favorite images
/>
)}
/>
}
</>
);
import { computed ,decorate, action, observable } from "mobx"; class Store {
get getFavoriteCount() { return this.favorites.length;
}
}
decorate(Store, { getFavoriteCount: computed,
});
export default new Store();
const { getFavoriteCount } = this.props.store; return (
<Text style={styles.count}> Images added: {getFavoriteCount}
</Text>>
);At last, we will provide the store to the root component.
import React from 'react';
import PictureList from './src/container/PictureList'; import { Provider } from 'mobx-react';
import store from './src/store'; const App = () => {
return (
<Provider store={store}>
<PictureList />
</Provider>
);
};
export default App;
Output:
Conclusion – MobX React Native
In this article, we understood how State Management is necessary for any application. We understood how MobX and React are powerful when they are used together. MobX makes State Management easy and hassle-free. In this article, we got to know about observables, Computed Observables, Actions, and Reactions. At the end, we went through an example in which we fetched different pictures from Unsplash, managed the state of the application, and understood how a user can add pictures to favorites and we can keep a count on it. I hope this article would have cleared some concepts on MobX.
Recommended Articles
This is a guide to MobX React Native. Here we discuss the Introduction of MobX React Native along with examples. You may also have a look at the following articles to learn more –


