Updated March 8, 2023
Definition of MongoDB keyfile
MongoDB keyfile is used to authenticate our database from unauthorized access, we can authenticate our replica set using MongoDB keyfile. To enforce the access of keyfile using replica set we require to configure the security between each replica set using user access control. After implementing keyfile authentication each member from the replica set will use the same authentication mechanism which was we have developed using MongoDB keyfile. We can generate our keyfile using any method which was available, also we can generate our keyfile between 6 to 1024 characters.
Syntax:
Below is the syntax of keyfile in MongoDB.
1) Create keyfile –
Openssl rand <Encoding method> <no_of_keyfile_characters> > <path and name of keyfile>
2) Set the path of keyfile in MongoDB configuration file –
Security :
keyfile : <path and name of the keyfile>
3) Start the MongoDB instance using keyfile –
Mongod –keyFile <name and path of the keyfile> --replSet <name of the replica set>
Parameter description syntax of keyfile in MongoDB is as follows.
1) Openssl – This is a Linux command which was used to generate keyfile. Using OpenSSL we can generate the 1024 pseudo random password.
2) Encoding method – This parameter is defined as the method which was we have using to encode the pseudo-random code.
3) No of keyfile characters – This is defined as no of characters which was we have used while generating a keyfile.
4) Path and name of keyfile – This parameter is defined as the path where we have stored our keyfile. Also, we need to give keyfile name at the time of keyfile creation.
5) Security – This is the parameter of the MongoDB configuration file which was used to define the authentication method of the MongoDB server. Using this parameter we can define authentication as keyfile in MongoDB.
How Keyfile works in MongoDB?
- To use keyfile authentication we need to create database admin users for database administration purpose only.
- The first step is to create keyfile, the main purpose of the MongoDB keyfile is to authenticate every database instance using the contents of the keyfile. Using this content and proper keyfile only the MongoDB instance is connected to the replica set.
- If suppose we don’t have keyfile we cannot connect the replica set, it will show the error like authentication is failed.
- We can generate a minimum of 6 characters and a maximum of 1024 characters keyfile in MongoDB. Also, keyfile contains characters in the base-64 format.
- To authenticate the database within a replica set all members need to share at least one key with each other.
We can generate a MongoDB keyfile using any method. Openssl is a popular method to generate keyfile.
After generating the keyfile we need to copy the file on every server on which the replica set is running. We need to ensure that the user which was running the mongod instance is the owner of the file and he is able to access that keyfile. - After copying keyfile on each server we need to change the security method to keyfile and need to restart all the replica set.
- After restarting all the replica sets we need to initiate the replica set using the following command.
rs.initiate () - After creating the replica set members check the primary replica set by using the following command.
rs.status () - After connecting to the primary replica set we need to create database user which have admin privileges on the database server.
- After connecting to the primary replica set we need to check the user authentication using the replica set.
- After checking user authentication we need to create a cluster-admin user for the admin database.
Example
The below steps shows create keyfile in MongoDB. We have to create keyfile of the replica set.
1) Create keyfile
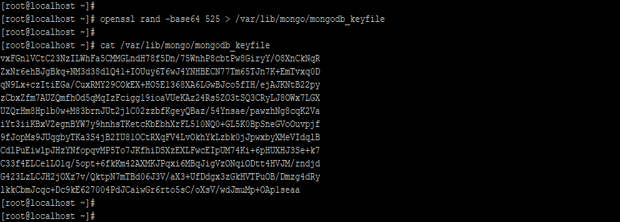
- In the below example, we have to create a keyfile name as mongodb_keyfile and we have to store this file into the MongoDB data directory.
- We have created the keyfile using the OpenSSL command. We have used 525 characters to create keyfile.
Code:
openssl rand -base64 525 > /var/lib/mongo/mongodb_keyfile

cat /var/lib/mongo/mongodb_keyfile
Figure – Example to create keyfile.
2) Copy the keyfile on every replica member
After creating the keyfile we need to copy this file on each replica set. We have using cp command to copy the file.
Code:
cp -aRp /var/lib/mongo/mongodb_keyfile /var/lib/mongo1/mongodb_keyfile

ls -lrt /var/lib/mongo1/mongodb_keyfile

cp -aRp /var/lib/mongo/mongodb_keyfile /var/lib/mongo2/mongodb_keyfile

ls -lrt /var/lib/mongo2/mongodb_keyfile
Figure – Example to Copy the keyfile on every replica member.
3) Enable the access control on every replica set
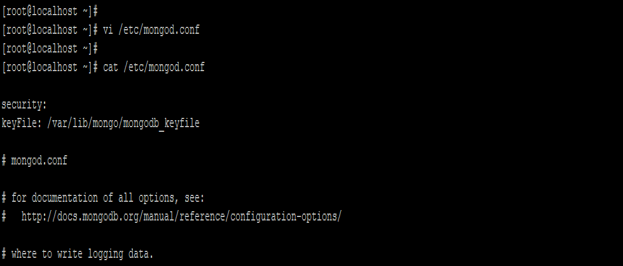
- We have enabled access control on every server. For enabling the access control we need to configure the same into our configuration file.
- After enabling the authentication we need to restart the replica set.
Code:
vi /etc/mongod.conf

cat /etc/mongod.conf
Figure – Example of enable the access control on replica set.
systemctl start mongod

systemctl status mongod
Figure – Example start the MongoDB replica instance.
4) Connect to the replica set
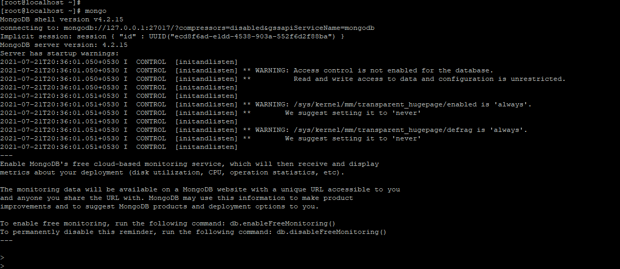
After starting the replica set connect to the replica instance using mongo command.
Code:
mongo
Figure – Example to connect the replica set.
5) After connecting to the replica set check the status of replication
After connecting to the database server need to check the status of the replica set. We have to check the replication status using rs. status () command.
Code:
rs.status ()
Figure – Example to check status of replica set.
6) Create the administrator user
After checking the replica set status we need to create the administrator user for the keyfile authentication.
Code:
admin = db.getSiblingDB ("admin") // connect to admin database

admin.createUser ( //create user command

{

user: "mongodb_admin", // username

pwd: passwordPrompt(), // password prompt

roles: [ { role: "userAdminAnyDatabase" (Admin access of any database) , db: "admin" (database name) } ]
// database privileges

}

)
Figure – Example to create administrator user.
7) Authenticate the user
In the below example, we have to authenticate our admin database user.
Code:
db.getSiblingDB ("admin" (database name) ).auth("mongodb_admin" (user name), passwordPrompt())
Figure – Example of authenticate the user.
8) Create cluster-admin user
In the below example, we have created the cluster-admin user for keyfile authentication.
Code:
admin = db.getSiblingDB("admin") // connect to admin database

admin.createUser( // create user command

{

user: "mongodb1", // username

pwd: passwordPrompt(), // password prompt

roles: [ { role: "userAdminAnyDatabase" (Admin access of any database) , db: "admin" (database name) } ]
// database privileges

} )
Figure – Example to create cluster-admin user.
Conclusion
MongoDB keyfile is used to authenticate the database from unauthenticated access. We need to create keyfile using the encryption method. In the above example, we have created keyfile using the OpenSSL command. Keyfile is very important and useful in MongoDB to authenticate the database from unauthorized access.
Recommended Articles
This is a guide to MongoDB keyfile. Here we discuss the definition, syntax, How keyfile works in MongoDB? examples with code implementation. You may also have a look at the following articles to learn more –


