Updated October 30, 2023
Multiple IFS in Excel
The Multiple IFS function in Excel is a powerful and time-saving tool for checking multiple conditions in a single formula. It tests each condition in order and stops when it finds the true condition. Once it finds the true condition, it gives you the result that is associated with that condition.
What’s great about this function is that it can check many conditions and give you a different value for each condition. Moreover, this differs from the regular IF function, which can only check one condition and give you one of two results.
You can include up to 127 pairs of conditions and values in the Multiple IFS function. It’s compatible with Excel 2016 and later versions, including Excel for Microsoft 365.
Arguments
- Logical _test: This is a logical expression that can be “TRUE” or “FALSE.”
- Value_if_true: This will return the value as TRUE if the specified condition is in sync.
- Value_if_false: This will return the value as FALSE if the specified condition is unmet.
For example, the formula =IF(A2=2, “TRUE,” “FALSE”), checks if A2 is equal to 2. If it is, the formula will show “TRUE“. If A2 is not equal to 2, the formula will show “FALSE“.
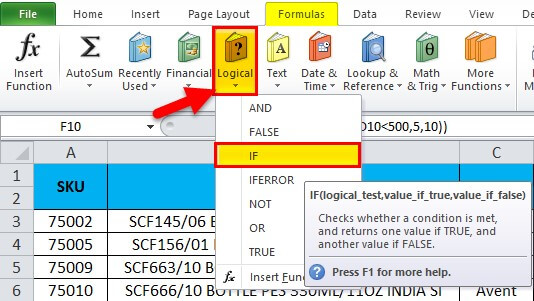
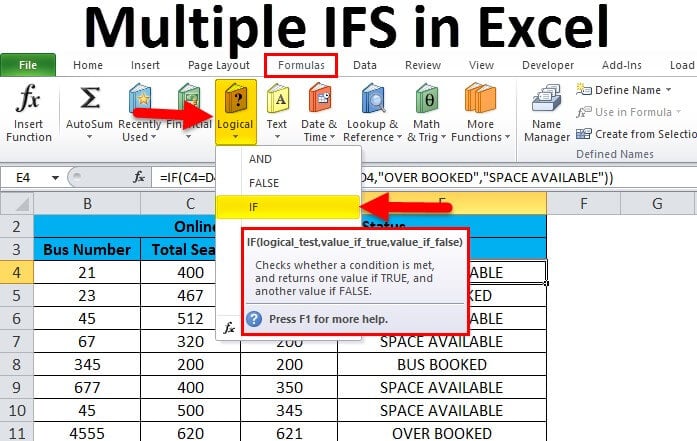
In Excel, the IF function is categorized under the LOGICAL condition group in the FORMULAS menu, as shown in the screenshot below.
How to Use the IF Function in Excel?
Multiple IFS in Excel is very simple and easy. Let’s understand Multiple IFS in Excel, which are as below.
Example #1 Using the IF Function in Excel
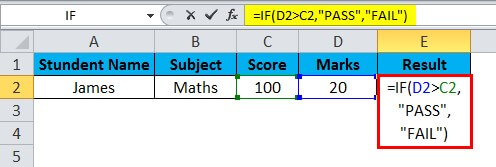
Consider the following table where students’ marks with the subject are shown:
Here, we will use the IF condition to determine the student’s PASS or FAIL status by following the steps below.
- First, select cell E2. We want to display PASS or FAIL results in this cell.
- Enter the IF function – =IF(D2>C2, “PASS”, “FAIL”). Here, the IF function compares students’ marks in cell D2 with the passing marks in cell C2.
- Apply the formula and press enter to get the output as follows.
Example #2 Multiple IFS in Excel with TEXT
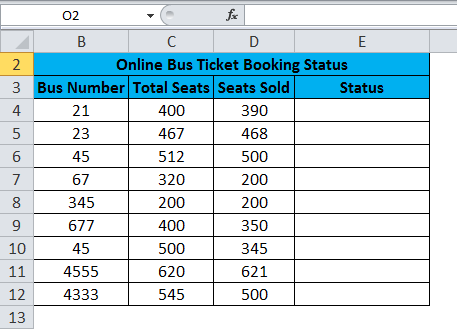
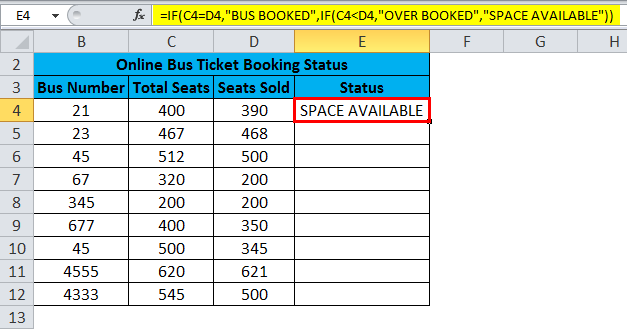
Using a simple example, we will learn how to use the multiple IF function. Consider the table below where we have an Online Bus Ticket Booking System, and we need to know the booking status of all the seats. We can derive the output using the Multiple IFS function in such cases.
To calculate the status for each booking using the IF function in Excel, follow these steps:
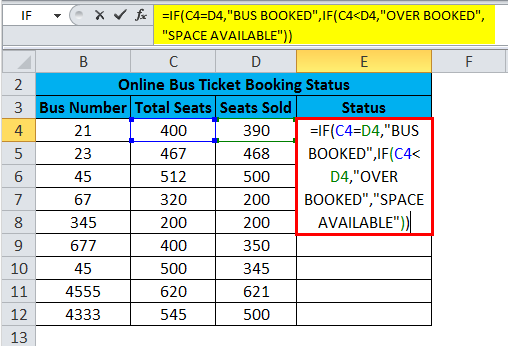
- Select the cell where it is necessary to display the status (in this case, E4).
- Type the equal sign (=) to begin the formula.
- Type the IF function and an opening bracket.
- Select the cell that contains the total seats (in this case, C4).
- Add the first condition: C4=D4 (total seats equal to sold).
- Type a comma.
- Type “BUS BOOKED” in double quotes to indicate a confirmed booking.
- Type another comma.
- Add the second condition: C4<D4 (total seats are less than seats sold).
- Type a comma.
- Type “OVERBOOKED” in double quotes to indicate more bookings than available seats.
- Type another comma.
- Then type “SPACE AVAILABLE” to show seats available for booking.
- Type the closing bracket for the IF function.
- Press Enter to apply the formula to the selected cell.
- Hence, the formula should look like this: =IF(C5=D5, “BUS BOOKED,” IF(C5<D5, “OVERBOOKED,” “SPACE AVAILABLE”))
- Once we apply the Multiple IFS, we will get the below output status:
- In the example given, the IF function checks whether the value in cell A1 is less than 390. If the value exceeds or equals 390, the function returns the status as “OVERBOOKED” or “BUS BOOKED“, respectively. However, if the value is less than 390, the function returns “SPACE AVAILABLE” as the status. This function is useful for analyzing data and deciding based on specific conditions.
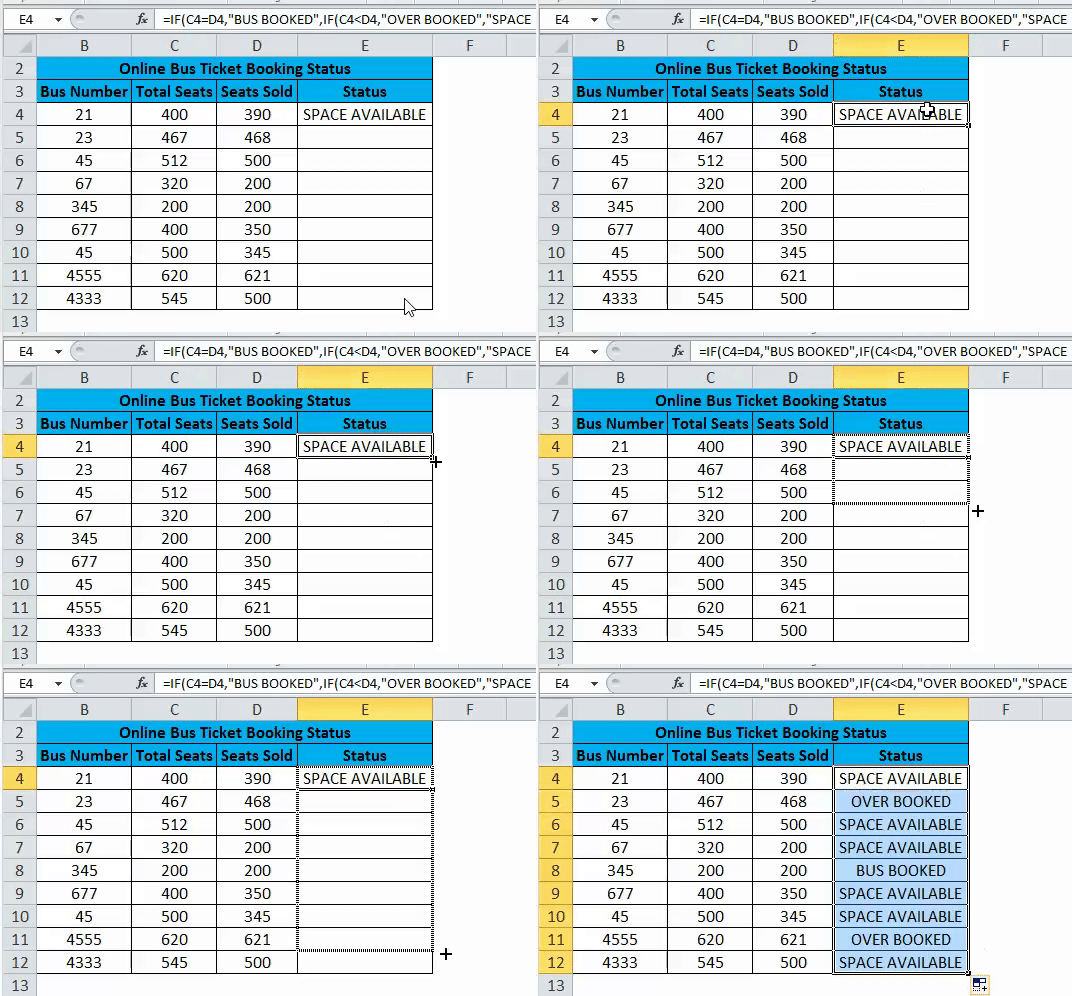
- Drag down the formula for all the cells so that we will get the below output result:
Result:
Example #3 Multiple IFS Using Numeric Value
In this example, we will see how multiple IFS use numeric values to display the status.
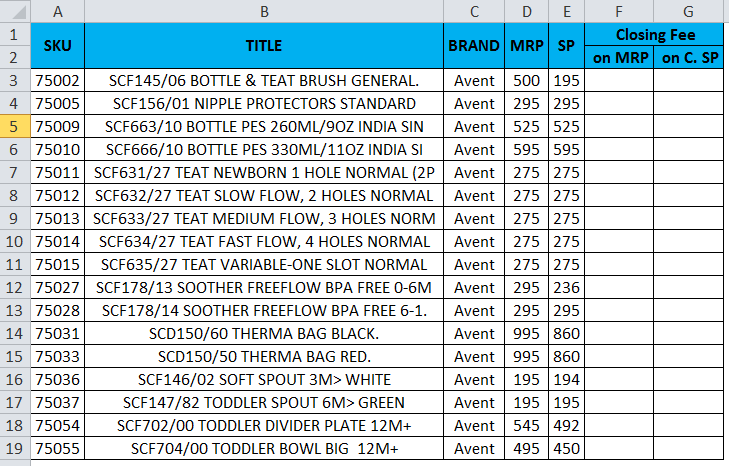
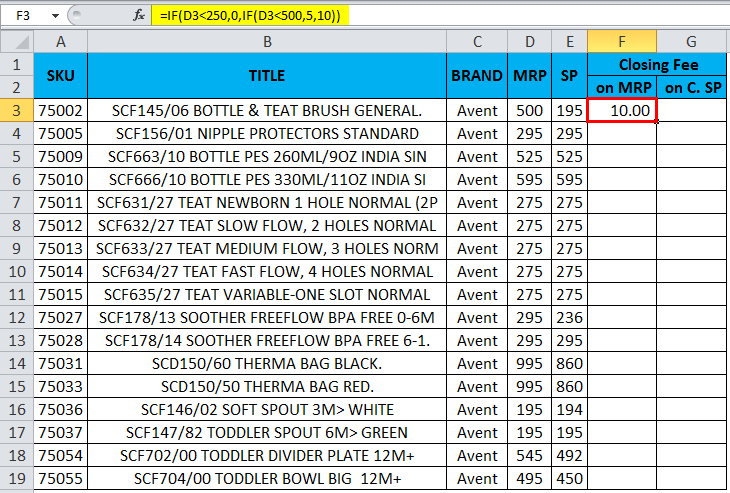
Consider the example below that shows MRP and SELLING PRICE, where we need to find the closing FEE for Amazon titles. Here, we will use the Multiple IFS to get the CLOSING FEE for both the MRP AND SELLING PRICE by following the below steps:
- Here’s how we will apply the Multiple IF condition statement for MRP Closing Fee:
-
- Check if the MRP is less than $250. If it is, set the Closing Fee as Zero.
- If the MRP is greater than or equal to $250, then check if it is less than 500, and if it is, set the closing fee as five (5).
- If the MRP exceeds or exceeds 500, set the closing fee as ten (10).
-
- Here’s how we will apply the Multiple IF condition for the SELLING PRICE Closing Fee:
-
- Check if the Selling Price is less than $250; if it is, the Closing Fee should be zero.
- If the Selling Price is between $250 and $499, the Closing Fee should be $5
- If the Selling Price is $500 or greater, the Closing Fee should be $10.
-
- We will apply the above two conditions by using the Multiple IFS in both columns.
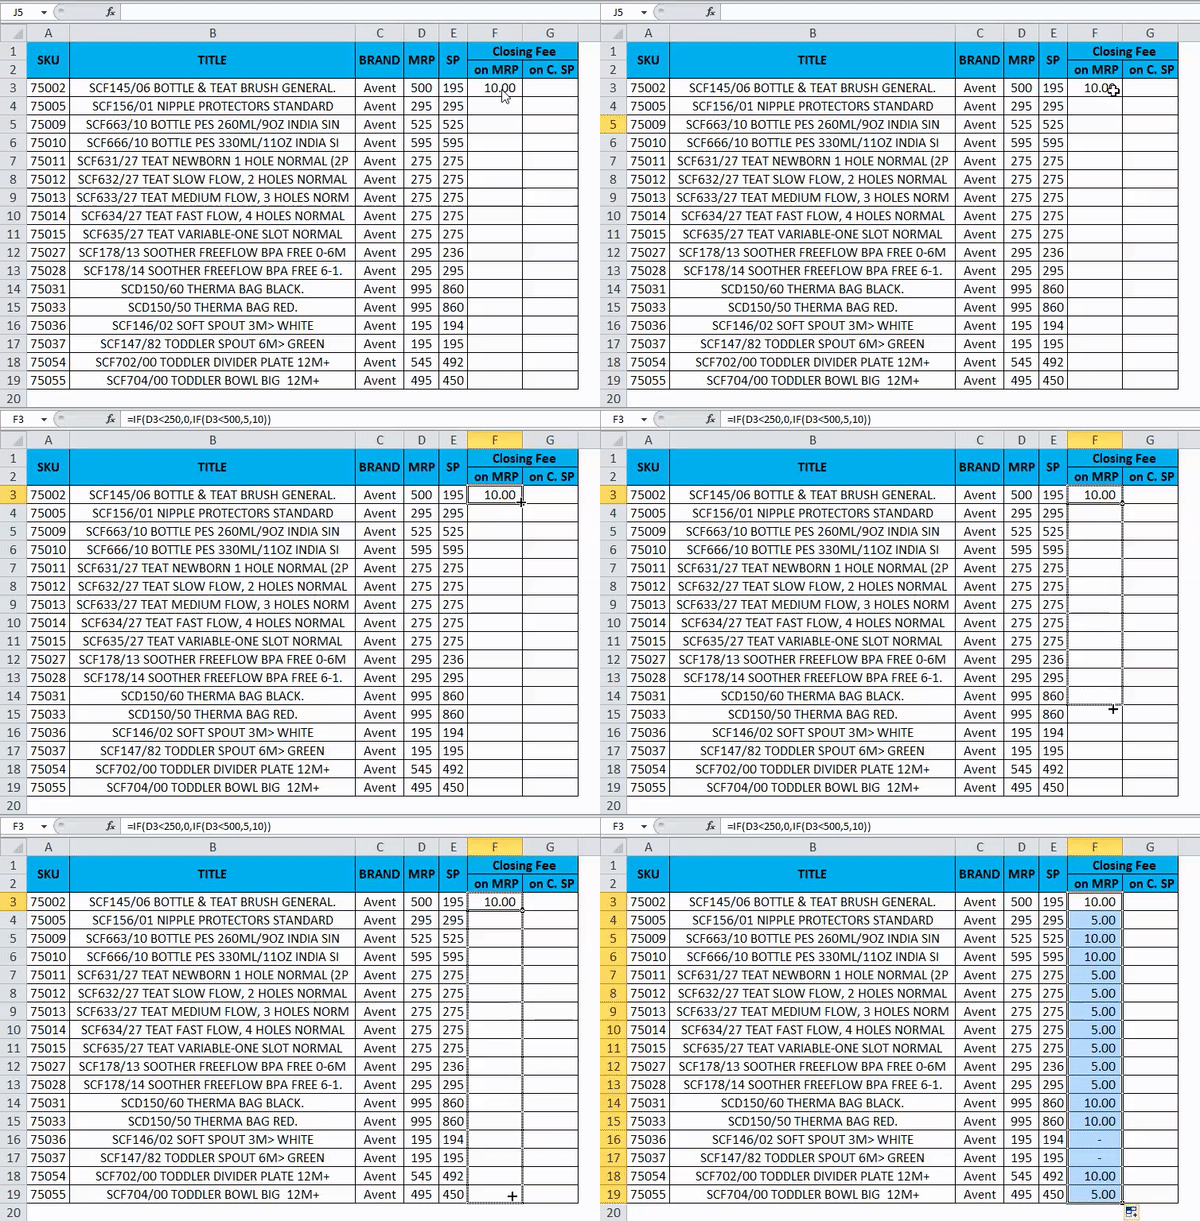
- First, insert the IF statement in F3.
- Begin by typing an opening bracket and selecting cell D3.
- Apply the condition: “D3<250” (indicating that the MRP is less than $250). Then, display the Closing Fee as zero and insert a comma.
- Next, insert another IF condition and open the brackets. Type the condition “D3<500” (indicating that the MRP is between $250 and $499).
- If this condition is met, display the Closing Fee as 5; if not, display it as 10.
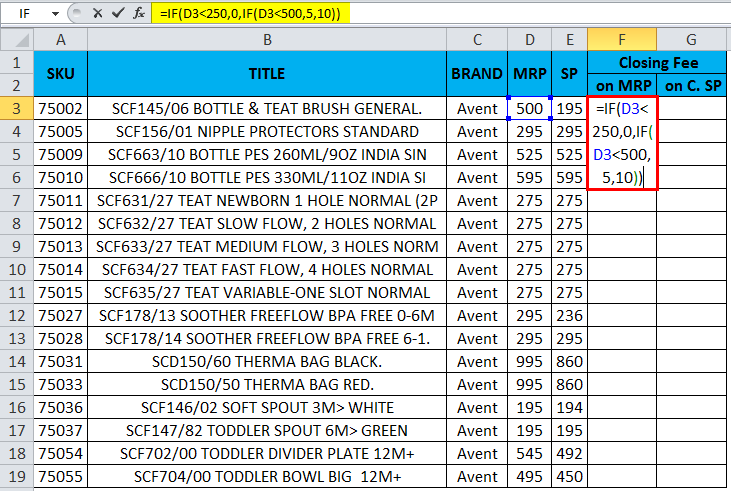
- Lastly, if we combine the above IF conditions, we will get the Multiple IFS statement shown as:
- Once we apply the Multiple IFS, we will get the below output status:
The screenshot above shows that the closing fee for MRP is 10.
How did we arrive at this value?
- First, Excel evaluated the first IF condition, which checks if 500 is less than 250. Since this is false, the condition does not apply, and Excel moves on to the next IF condition.
- The second IF condition checks if the MRP value is less than 500. In this case, the MRP is 500, not less than 500, so Excel moves to the last part of the IF statement, which displays the closing fee as 10.
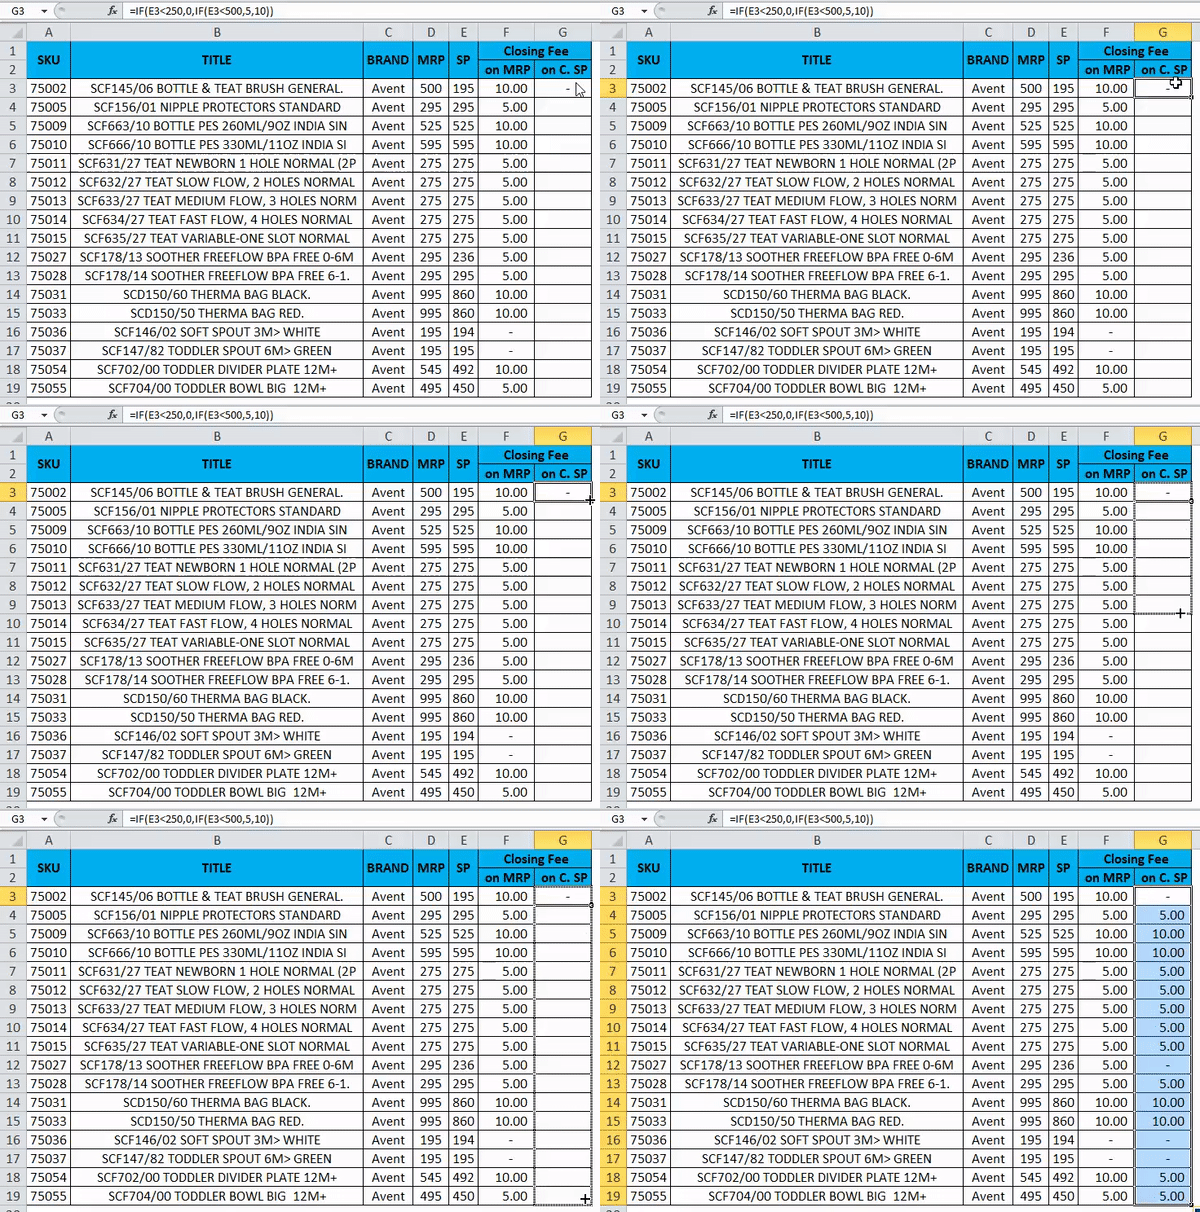
To calculate the closing fee for the Selling Price column, we can apply another Multiple IF statement as follows: =IF(E3<250,0, IF(E3<500,5,10)).
We can then drag this formula down to all cells in the column to obtain the corresponding closing fees
The resulting table is shown below.
Also, you can take photos of your important documents and upload them into JPG to Excel converter online. This efficient tool provides you with the ease of data extraction from photos of your balance sheets, bills, and more and store all into MS Excel editable spreadsheets for further assistance.
Things to Remember
- When we use a string in Excel, Multiple IFS ensures we always enter the text in double quotes, or else the statement will throw the error as #NAME.
- While using Multiple IFS, ensure that we have closed multiple opening and closing parenthesis, or else we will get the error alert stating that the formula applied is wrong.
- One can include up to 127 pairs of conditions and values in the Multiple IFS function.
- Conditions in the Multiple IFS function are evaluated in their order of listing. However, one must arrange the conditions in accordance with the order required. In case of multiple simultaneously true conditions, the first condition in the list will take precedence.
- Multiple IFS function is only available in Excel 2016 and later versions, including Excel for Microsoft 365. However, in the case of an earlier version of Excel, one can use the nested IF function as an alternative.
Frequently Asked Questions(FAQs)
Q1. What is the syntax for multiple IFS functions in Excel?
Answer: The syntax for multiple IFS functions in Excel is:
Q2. Can I use multiple IFS functions within a single formula in Excel?
Answer: Yes, it is possible to use multiple IFS functions within a single formula in Excel to test for different conditions and return different results.
Example:
In this example, the formula checks the value in cell A1 and gives different results based on the value. If A1 is less than 10, the formula returns “Low“; if A1 is between 10 and 19, it shows “Medium“. If A1 is between 20 and 29, it shows “High“. And if A1 is between 30 and 39, it returns “Very High“. The formula shows an empty cell if none of the conditions are true.
Q3. What is the difference between multiple IFS and nested IF functions in Excel?
Answer: The main difference between multiple IFS functions and nested IF functions in Excel is that multiple IFS functions allow you to test for multiple conditions in a single function, while nested IF functions only allow you to test for one condition at a time.
Example of a formula using the multiple IFS function:
Example of a formula using the nested IF function:
Recommended Articles
This article has been a guide to Multiple IFS in Excel. Here we discuss the usage of Multiple IFS in Excel, practical examples, and a downloadable Excel template. You can also go through our other suggested articles:
